
Rule of Thirds Photography Examples – Most Popular Composition Rule
The Rule of Thirds is perhaps the most popular rule of composition when it comes to photography.
In this post we will be looking at a lot of different of Rules of Thirds examples. Some people like to write it as Rule of 3rds because as you are about to find out, it actually follows a mathematical approach.
I am a great advocate of following Rule of Thirds and teach it nearly in all my online courses, because it is applicable to both Photography as well as Videography.
What is the Rule of Thirds in Photography?
First of all let’s look at the Rule of Thirds Photography definition:
“Rule of thirds Composition is one of the Photography rules of composition where you divide the frame into thirds using horizontal and vertical lines and then place the subject at any one of the intersection of those lines”.
Not all photographers like to follow rules as they feel it binds them but this is one rule which really has the capacity to make your shots look more aesthetic when followed for shots that really require it. So let’s go through it.
First I’ll explain you what rule of thirds means in a technical manner and then I’ll tell you my own way of following of it which is very easy to understand.
Look at the Rule of Thirds portrait below:
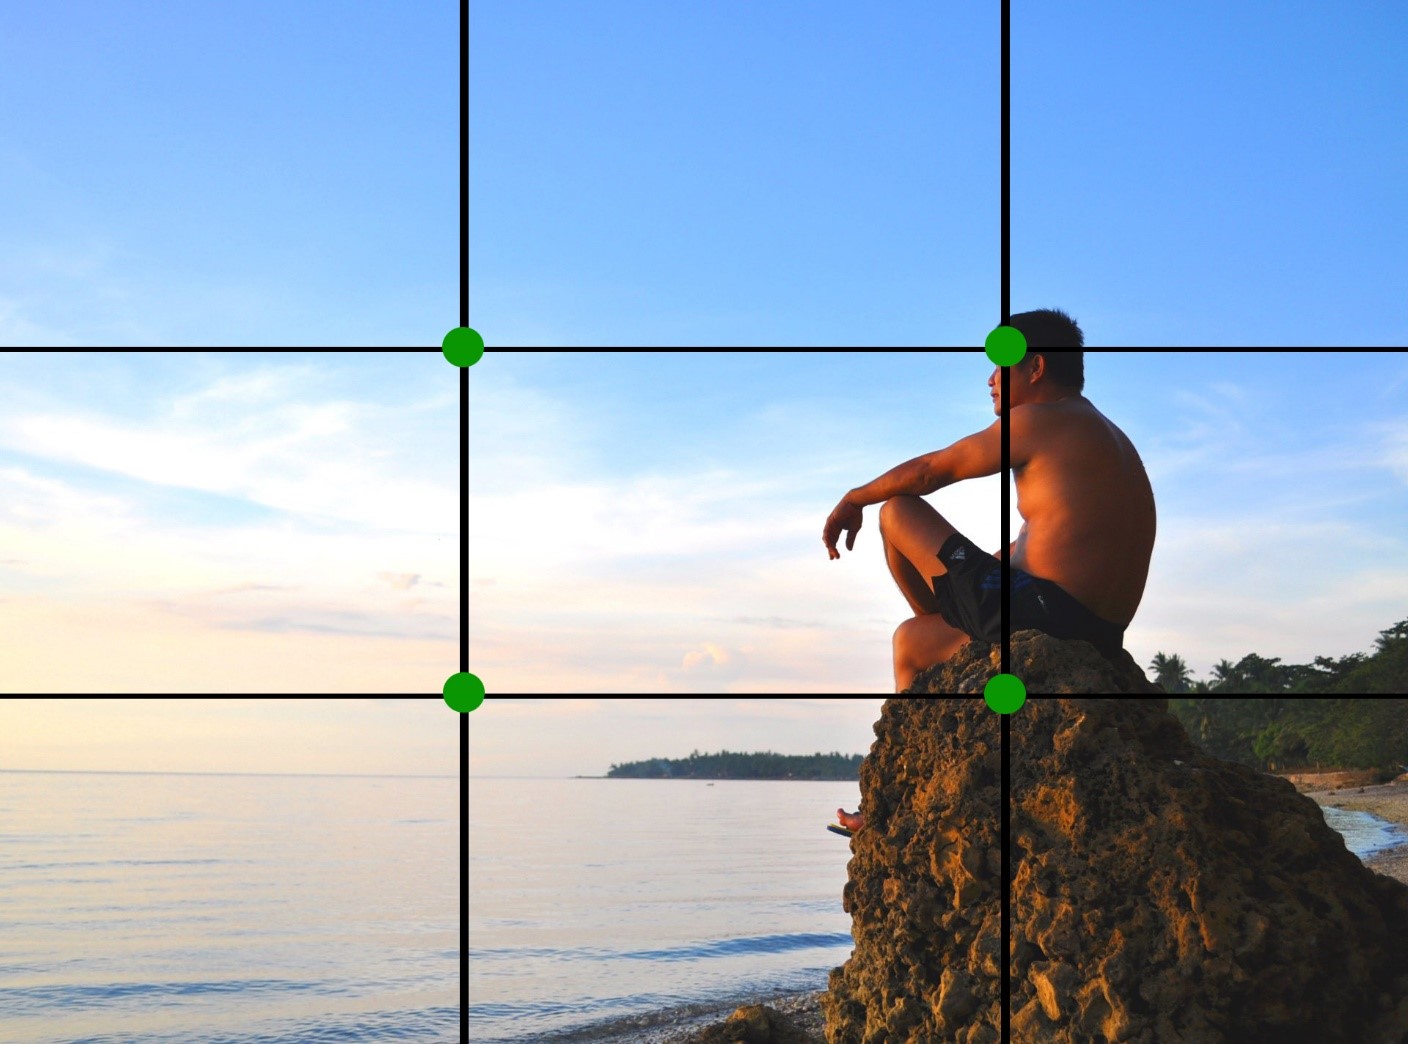
You can see the picture has been divided into nine parts by a grid formed by four lines.
What rule of thirds says is that the focal point of your shot should lie on one of the four intersecting points that are formed by these lines. These four points have been shown by the little green circles in the shot above.
A focal point basically refers to the point where your focus point lies. So it’s that part where you exactly lock the focus using the focus point.
The easier way to understand rule of thirds is that we have to avoid putting the subject in the center of the frame every time and instead, start putting them on the left or the right side of the frame.
It’s one of the tendencies of beginners to put the subject in the center of the frame in every shot.
Rule of thirds says that it’s aesthetically better to put the subject on the sides.
For instance, look at image below:
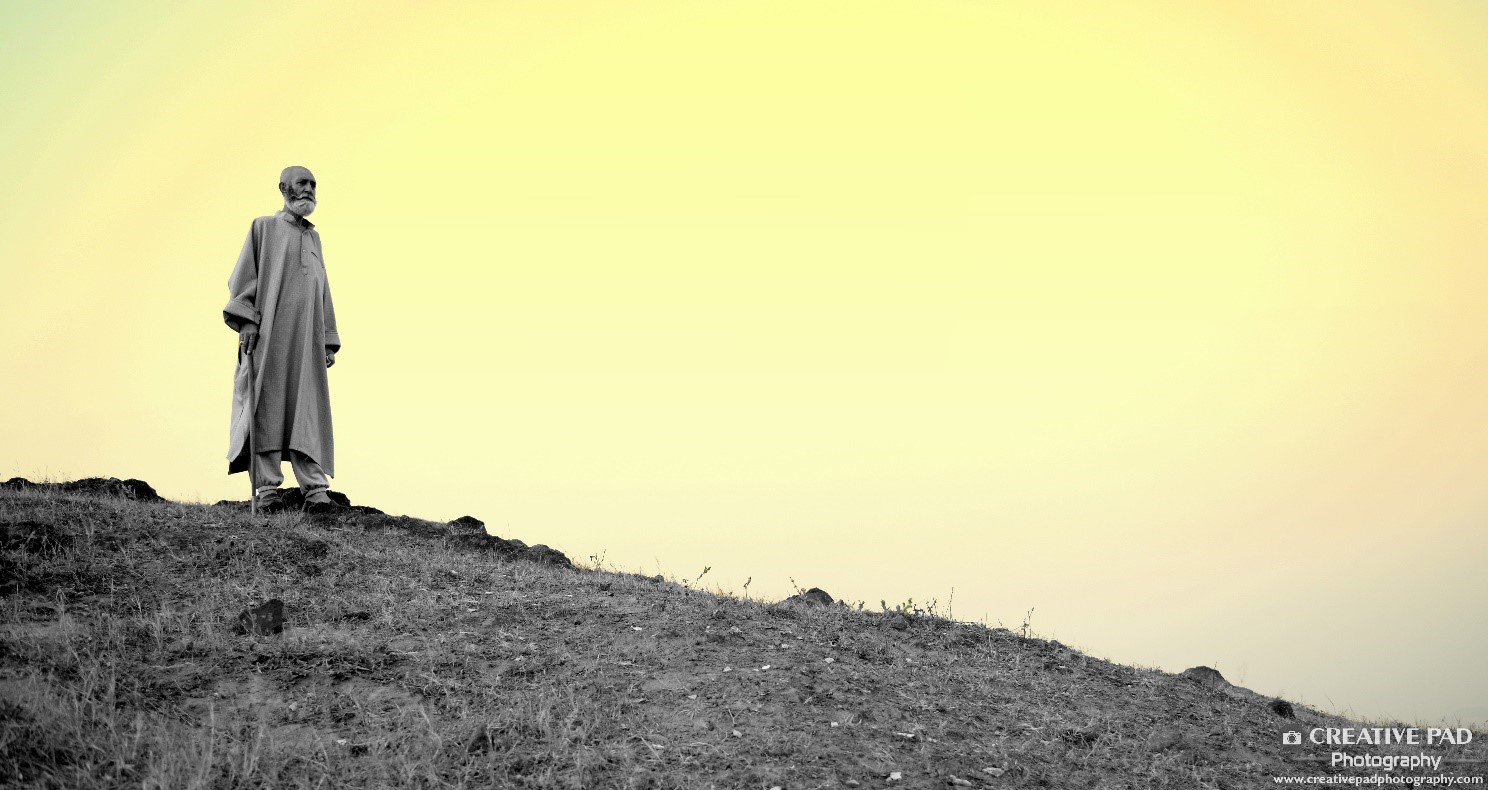
In this image above, you can see that I’ve shot the man by keeping him on one side in the frame and not in the center. Just try to imagine him in the center of the frame. You’ll realize that if he was in the center of that sloping hill, the whole shot would look unbalanced.
An unbalanced composition immediately looks causal and poor to the eye of the viewer. For instance, look at the shot below:

You can see that the space behind the crow looks a bit of a wasted space and is making the shot look unbalanced.
If I crop the shot, I can make it look balanced again by putting the crow on one side, like shown below:

This shot immediately looks better as there is no unnecessary negative space around the subject.
Rule of Thirds Examples
The best way to understand rule of thirds is by looking at images. So let’s have look at a few more images that follow rule of thirds. When you are looking at these shots, try imaging how the shot would look like if the subject was in the centre:

You can see that the shot looks aesthetically pleasing and balanced with the cup of coffee on one side and not in the centre.

This rule of thirds portrait serves as a great example for achieving balance in composition. If the girl is put in the centre, the whole composition would look unbalanced.

In this case, if I put the buck in the centre, the composition will look very unbalanced because first of all, there will be too much clutter towards the right hand side as both the tree and deer will be very close. Secondly, there will be unnecessary negative space on the left hand side.

Here I’ve placed the bird using rule of thirds.

Something similar here as the last shot.

In this shot, if I put the bird in the centre, there will be a lot of unnecessary negative space behind its back. When shooting living things, always remember to give more space towards the side that they are facing.

The diya has been placed using rule of thirds. Had it been in the centre, the composition would look unbalanced.

In this shot I have given space on the right side as that’s where he was looking. You’ll soon be seeing another shot of this man where rule of thirds is not used.

The man has been placed in the frame using the rule of thirds.

The crying child has been placed using the rule of thirds.
Now if you’ve been watching all these shots carefully, you’ll notice that most of them have one thing in common – and that is that the subject is not the only important part of the shot. The background is important too.
So following rule of thirds is a must when the background is important in a shot too. Because having a background in a shot means that the subject will get some space. To fill this space aesthetically, it’s better to put the subject on one side rather than in the centre.
Exceptions to the Rule of Thirds – Compositions That Break This Rule
So what are the exceptions to rule of thirds?
Going by the last point, one of the exceptions to rule of thirds are shots where you fill the frame, i.e. shots where you’ve zoomed into the subject so much that the background is not playing an important part.
For instance, look at the two shots below:


You can see that in the first shot, enough of the background is in the frame. So it’s essential that the monkey is put in the frame using rule of thirds.
But in the second shot, you can see that we have filled the frame with the monkey and hence, there isn’t really any room for the background to show. In such cases, it’s okay to let the subject be in the centre.
Let’s see another example:
You just saw this shot before:
Here I’ve placed him using the rule of thirds because the background is also important. But let’s look at another shot of the same man:

Here I’ve gone closer to him and almost filled the frame with the subject. The background is not as important in this one as the previous shot. Hence I can choose to ignore rule of thirds. Though even in this shot I have given some space on the right as I like to give some space towards the side in which the subject is gazing. But even if I crop the space on the right and place him centrally, it would be fine.
Another example typical portrait shots, like the ones below:


In these shots you can see that the subjects are almost completely occupying the frame and very little of the background is visible, so it’s ok to place them centrally.
Let’s look at a few more shots where the subject(s) has filled the frame:


Another exception is when you have a shot where the area around the subject is symmetrical or similar. In such a case, you can put the subject in the centre. For example, look at the shot below:

In the shot above, you can see that I have placed the cigarette using rule of thirds. But since the background is exactly the same everywhere, I can easily place it in the centre too and it will still look good. Another shot that falls in the same category is the one below:
Have a look at another shot:

In this shot, I could have placed the Buddha idol in the centre, but the only thing that prevented me from doing so were the rocks that you can see in the background behind on the left. Those rocks have made the background slightly non-symmetrical. If the rocks behind did not exist, then the whole background would be roughly be the same and it would have allowed me to put the idol in the centre. But because the rocks are present, I put the idol on the right to balance things out.
Let’s look at some shots where the subject is in the centre because the area around it or the background behind it is symmetrical or uniform in nature:


To sum up, where ever you see a lot of negative space (space around the subject), which is not symmetrical or similar, use rule of thirds.
Conclusion
So I hope this article made you realize the importance of following the rule of thirds in composing your shots. But at the same time I also hope it made you aware that photography is a subjective art and you’re always free to break any rule, provided you’ve thought through it enough and are willing to back yourself.
If you are a complete beginner and want to learn the art of photography, then do check out my flagship course called Photography for Beginners, which has 45 videos and 6.5 hours of content. It’s available via Udemy.com. You can watch the promo video below to get an idea of what all it contains:


Hi,
Very good brief on the rule…liked it thoroughly…thanks for sharing the content.
Thanks.
Finally I am able to understand something abt this rule of thirds. Very useful