Free Photography Course for Beginners

Welcome to This Free Photography Course
Hi there. I’m Kush Sharma. I have created this completely free photography course for you.
I’m a professional photographer and a photography instructor. My online courses have been downloaded in over 170 countries and I’ve had the privilege of teaching this amazing art to thousands of people via my online courses and workshops. This website is dedicated to creating courses around photography and video making.
When I started out learning photography, I quickly found myself, like many others, in a myriad of opinions and lessons on different mediums like videos on YouTube, free and paid e-books, blog articles, etc.
What bothered me was that most of these ‘lessons’ somehow assumed that people already had the most basic knowledge about how a DSLR camera functions. The most basic functions like Aperture, Shutter Speed and ISO (if you’re hearing these terms for the first time, you’ve found the right article) were explained in haste and unconvincingly, with the emphasis being only on the more technical aspects of photography.
While that may have been alright for some aspiring photographers who had already got themselves acquainted with these terms, it certainly did not make for a good impression on a complete beginner like me.
That experience motivated me to come out with a complete guide that explains the basics in a way that even a person who hasn’t ever held a camera can grasp the concepts quickly.
I remember when I started out learning I just had one thing in mind, and that was to learn, first the basics and then the advanced stuff, as quickly as I could. And that is exactly the aim of this guide – to help you get started with the beautiful art of Photography in a very short time.
I hope you have a great time reading, watching and learning from this guide and that you get started clicking in no time.
One Final Point Before We Start – A Note About the Recommended Photography Gear
In this free course, you will often see a lot of gear like cameras, lenses, accessories and so on. You can check out this page where I have listed down all the photography gear (of all genres) so you don’t have to research things on your own. You can access this page any time.
Now let’s start!
Table of Contents
- Different Parts/Functions of a DSLR camera
- Basic Things to Know When You Take Your First Shot: Auto-focus, Manual Focus and Focus Point
- Getting Started With Manual Mode and Learning How to Change the Values of Different Settings
- Basic Settings in a DSLR Camera and Manual Mode
- How Aperture, Shutter Speed and ISO work together – Understanding the Exposure Triangle
- Making your photography quicker by using Auto-ISO
- Using a Tripod and its Importance
- Causes of Soft Images and How to Avoid Them
- Conclusion
Different Parts/Functions of a DSLR camera
DSLR stands for Digital Single-Lens Reflex camera. Before we see how it works, let’s go through its different parts and functions.
But let’s look at the different parts and functions that make up a DSLR camera to understand how it works:
Lens
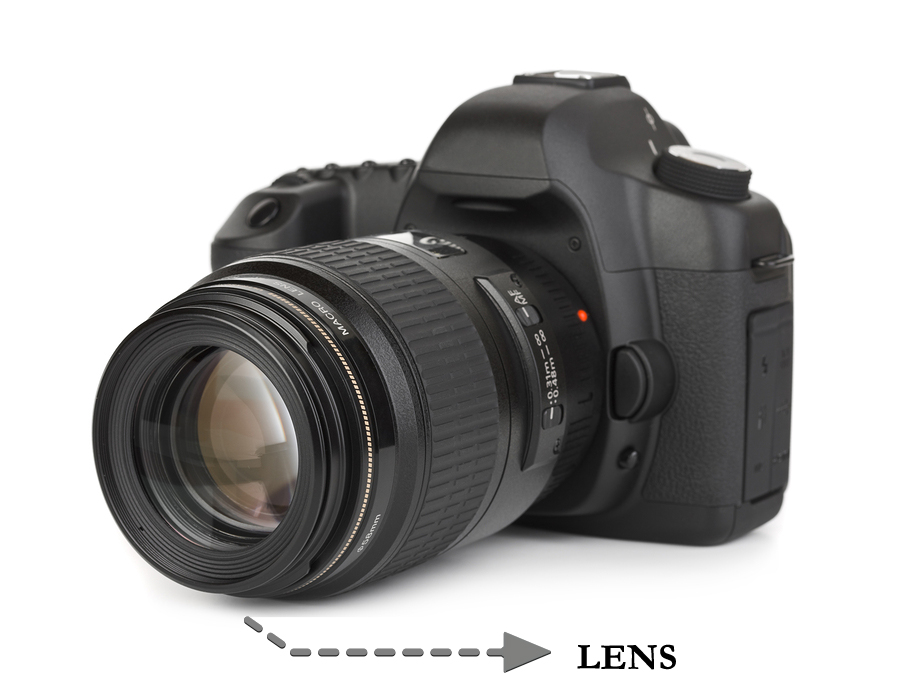
A camera lens is a major part of the DSLR camera. It’s an optical device that is detachable and fits in front of the camera body.
You can think of it as the human eye. Its job is to allow the light to come inside the camera.
In a DSLR camera, you can attach and detach a lens from the body, enabling you to use different types of lenses as you’ll learn later on.
Let’s see how you can attach and detach a lens to the body.
Here’s what you have to do:
- Find the lens release button located to the left of the lens, like shown in the image below:

- Press this button and while keeping it pressed, rotate the lens till it comes off. Be careful while performing this step as the lens can pop out of your hand if you are not paying attention and holding it firmly.
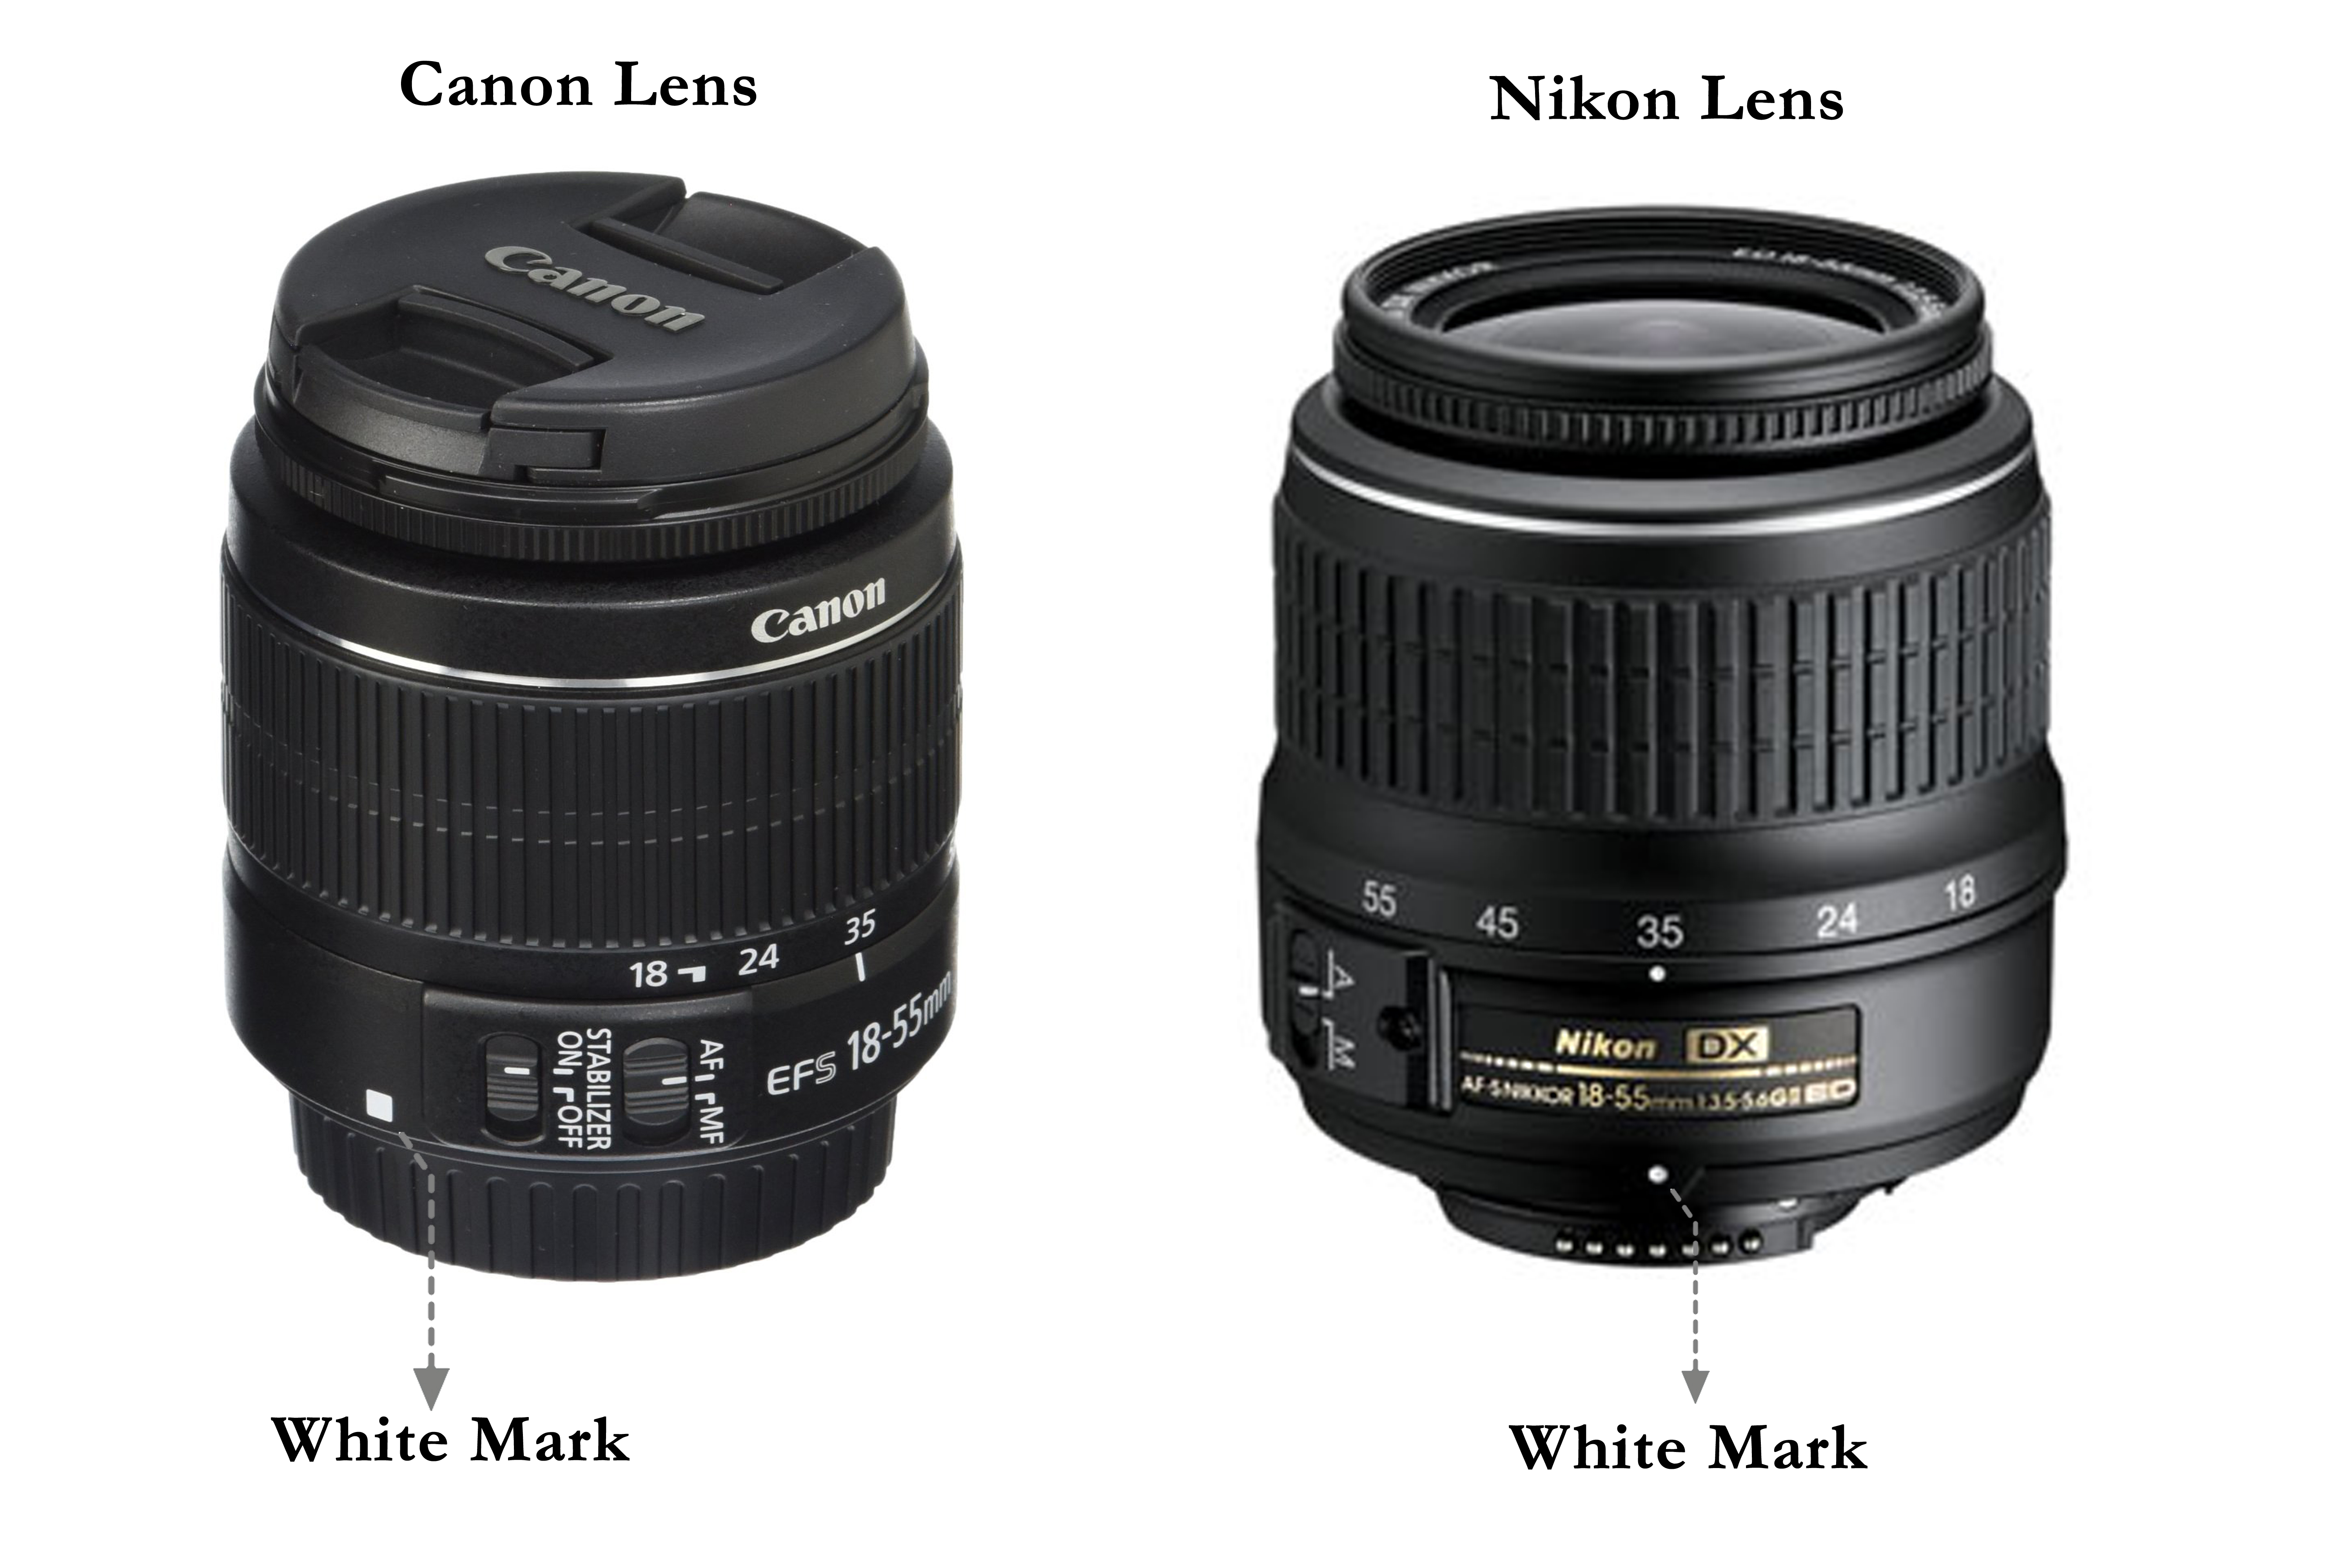
- To attach the lens, first find a white mark on the lens, like shown in the image below:
- Then find a white mark on the body of the camera where the lens attaches, like shown in the image below:
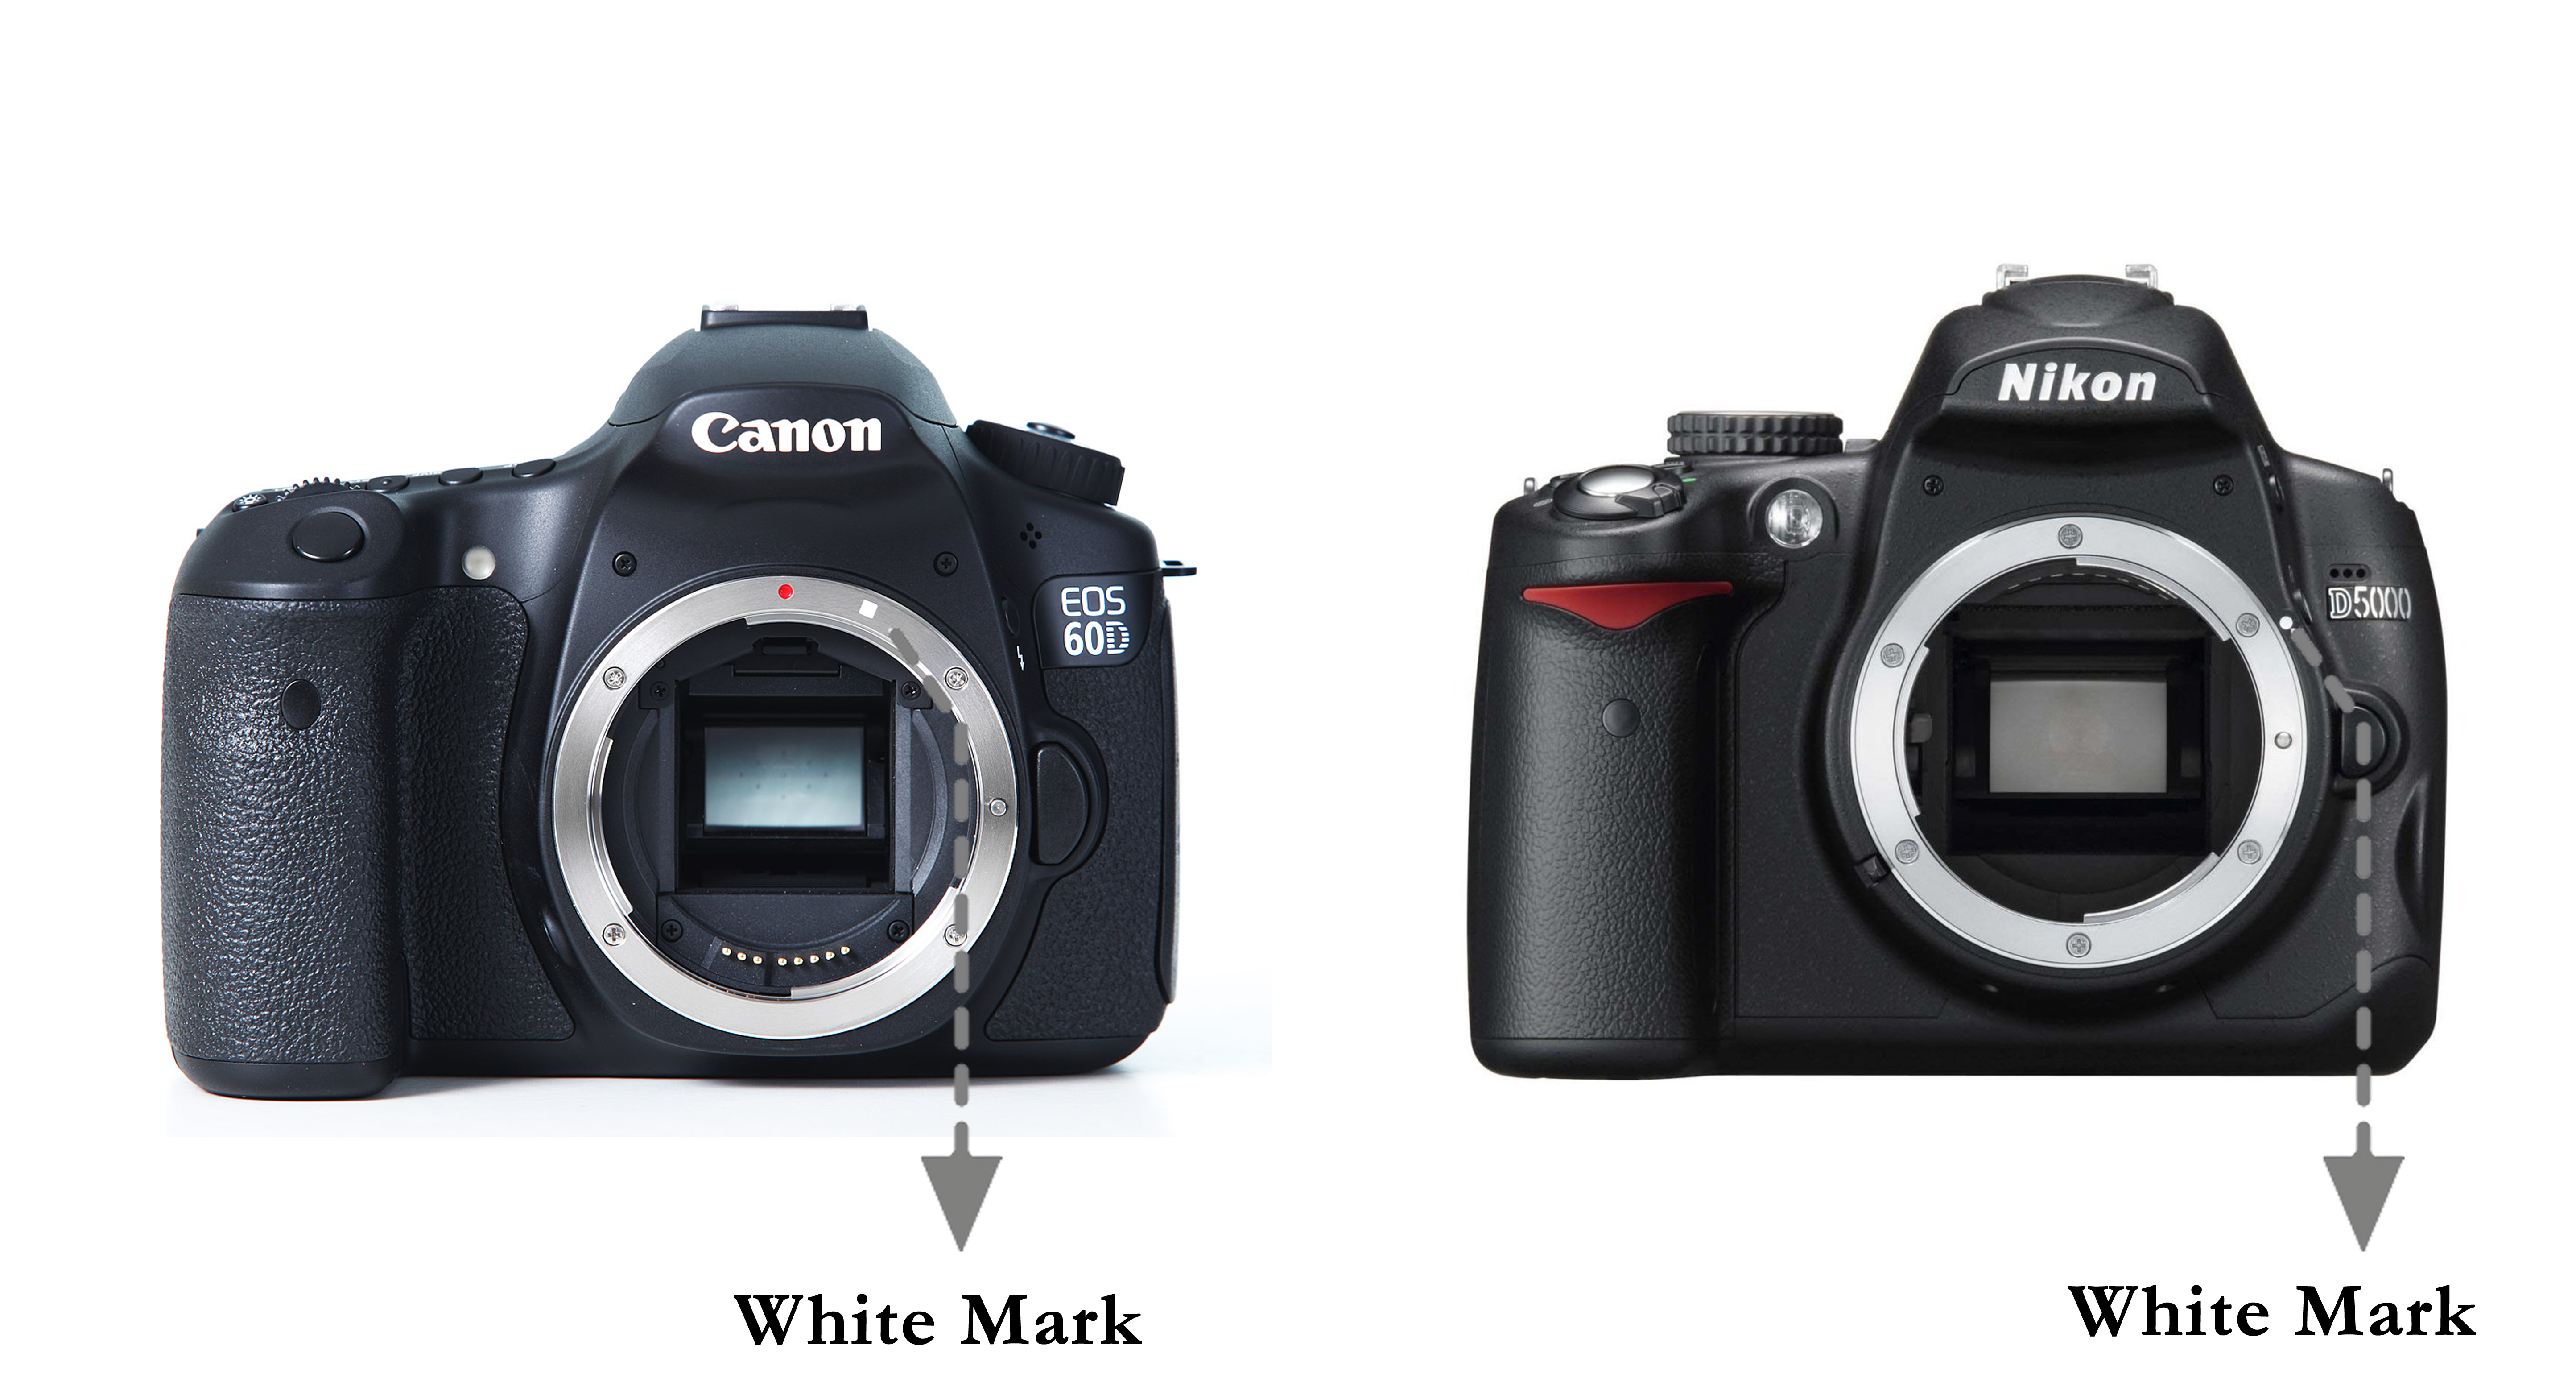
- Bring the lens close to the body in such a way that both the white marks, on the lens and the body, are next to each other, like shown in the image below:
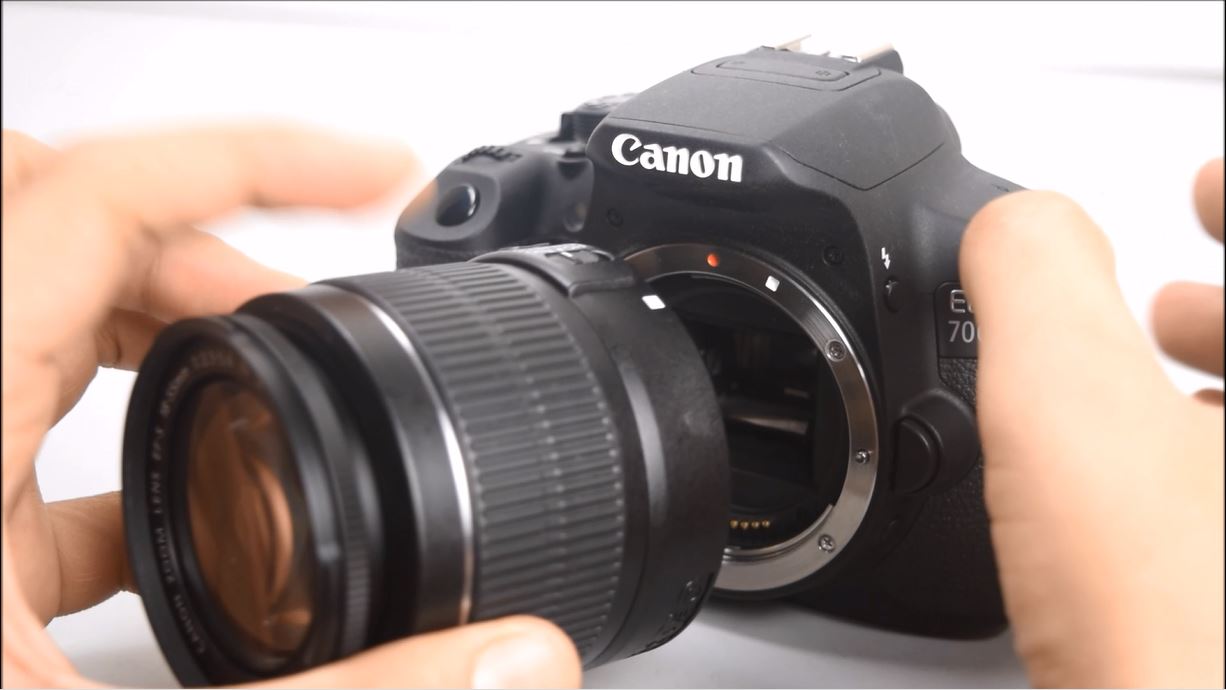
- Once, the lens is fitting in the body in such a way that both the white dots are connected to each other, just rotate the lens till you hear a click. That’s it!
The best part of a DSLR camera, and something that makes it unique and so popular is the fact that you can use different types of lenses for different purposes.
For instance, if you go to a zoo, you’re likely to find that the main animals like the lions and tigers are far away from you.
With a normal camera, you may not be able to get too close to them. But with a DSLR camera, you can change your lens and attach a telephoto lens. Telephoto lenses are bigger and help you zoom and reach far away things. That is because they have a higher focal length.
Again, I won’t go into the science part of it, so just for your understanding, focal length is the number that you see on the lens as shown in the image below:
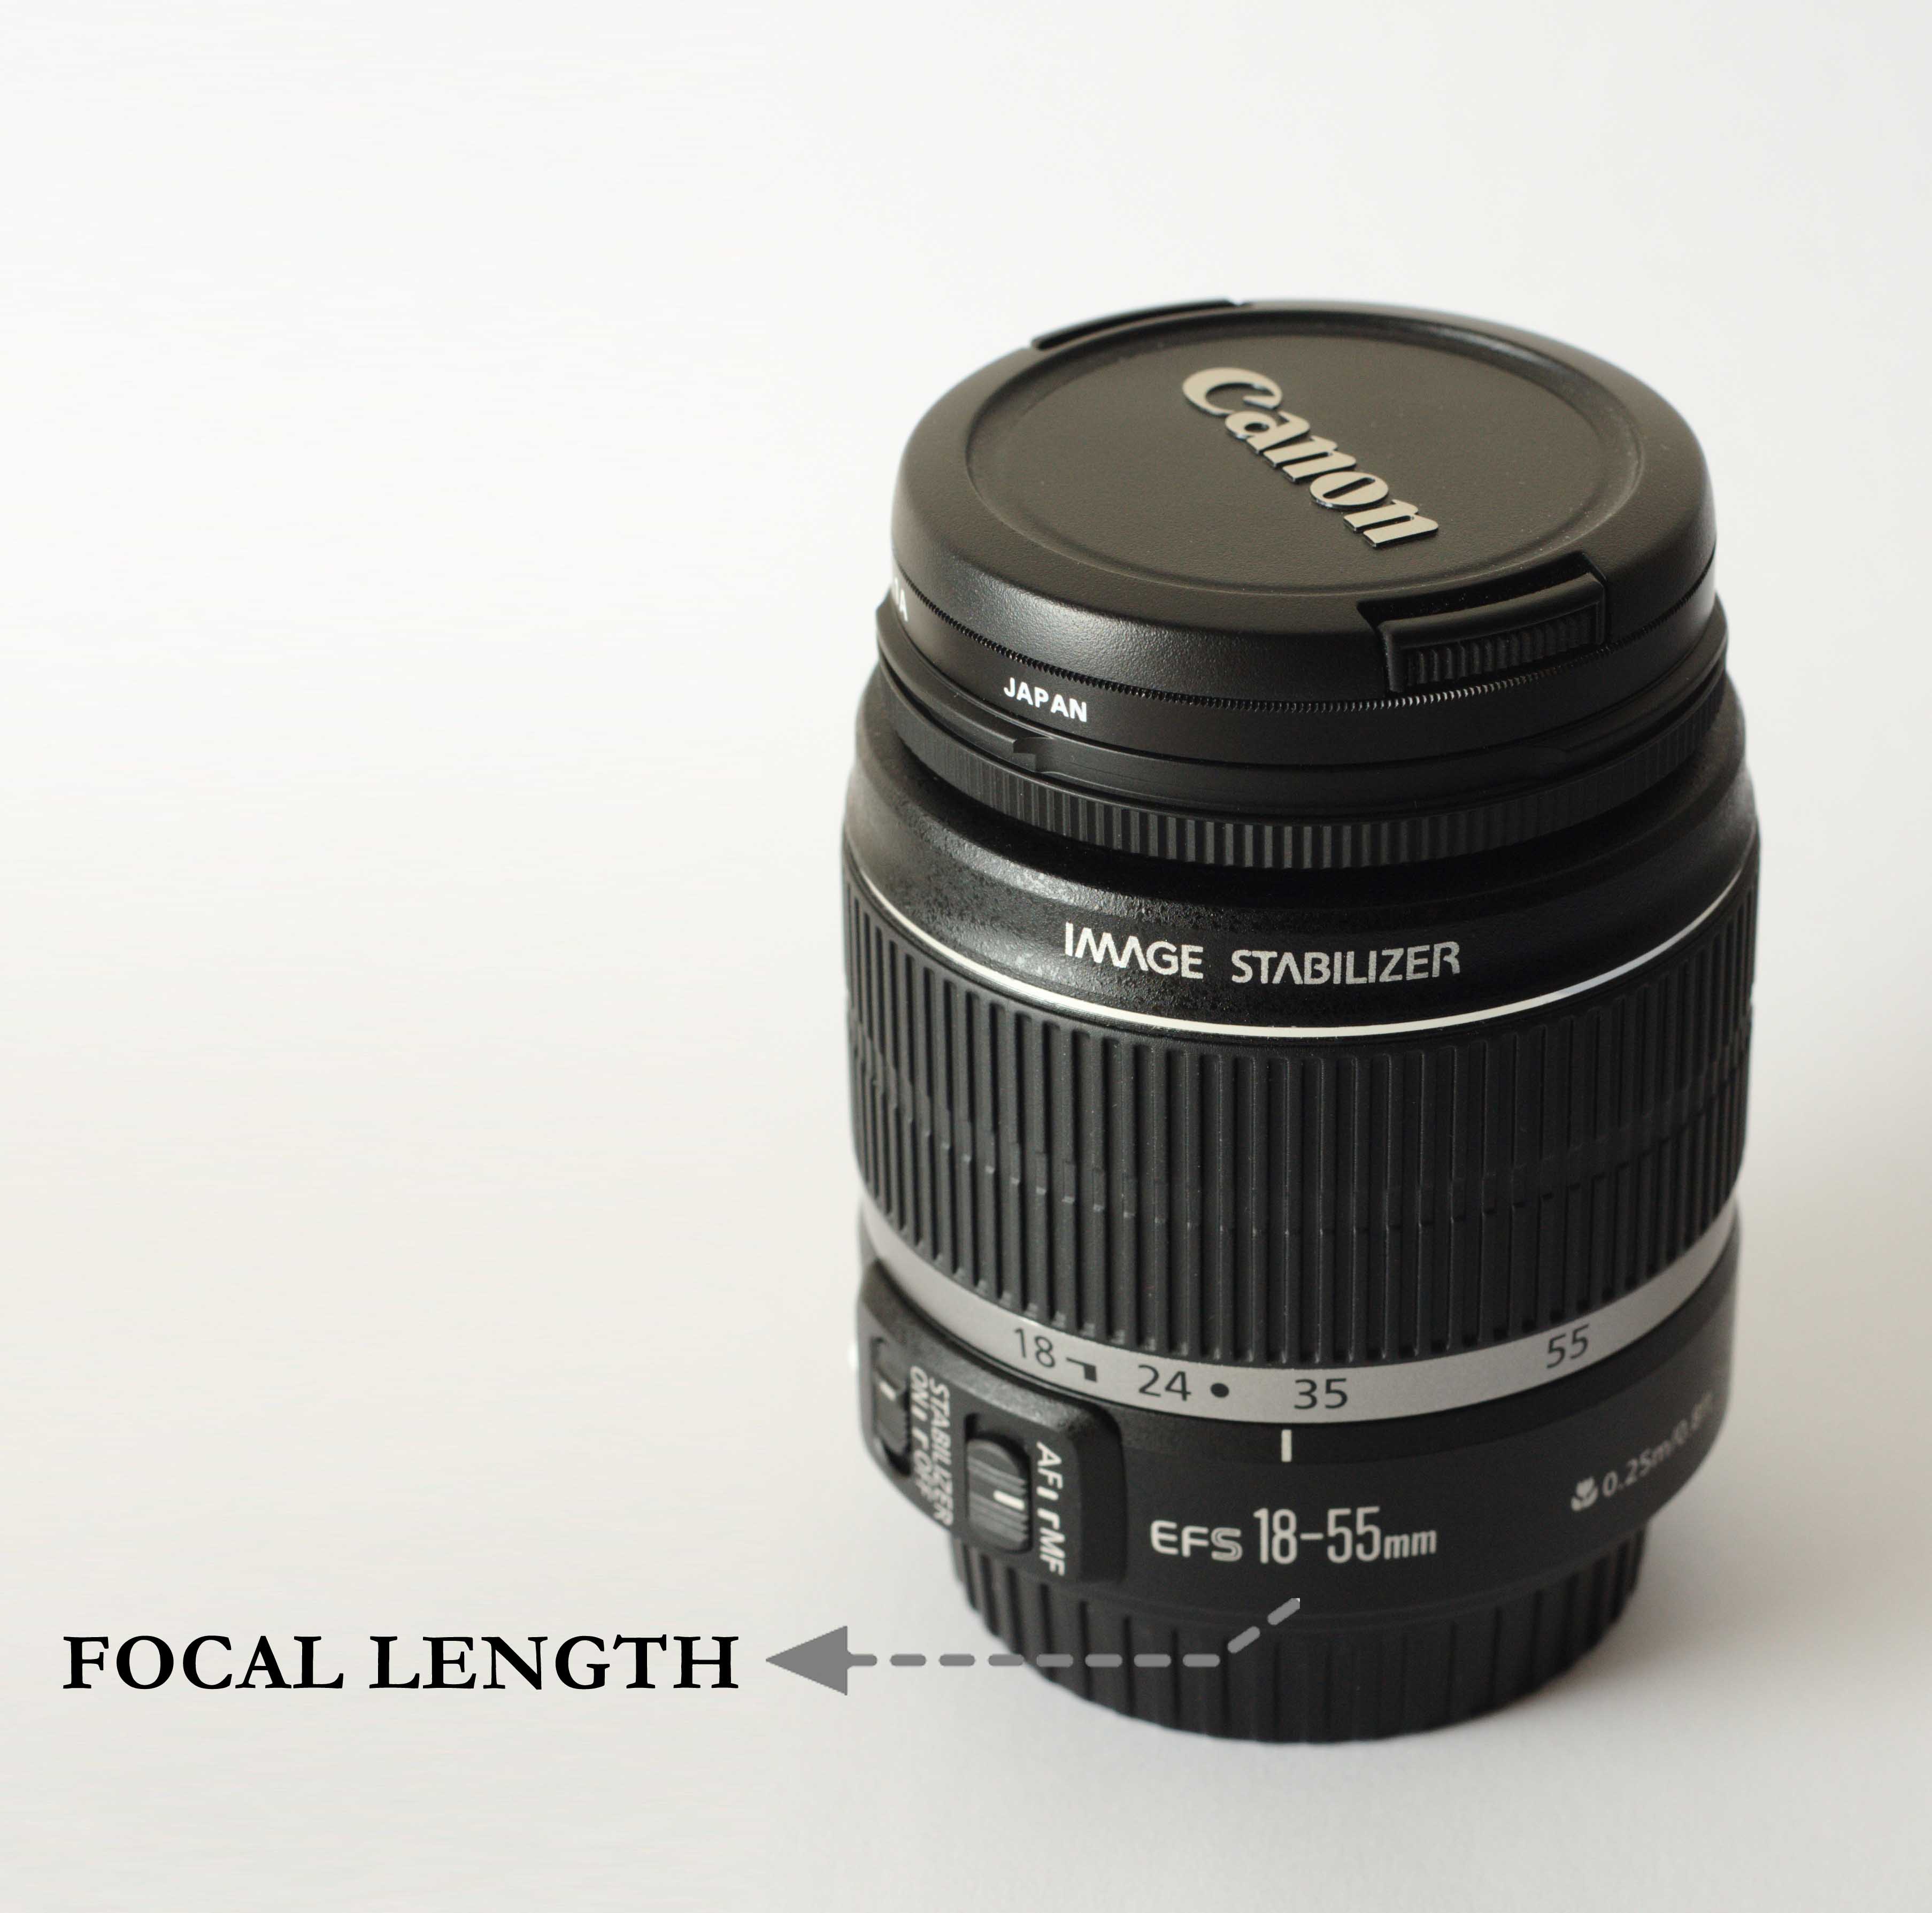
Focal length is measured in millimetres. The lens shown in the image above has the focal length 18mm – 55mm. Simply speaking, these numbers mean how much you can zoom in or zoom out.
For instance, in the 18-55 lens, at 18mm you can see a lot of the scene. If you want to zoom in and go towards 55mm, you have to rotate the zoom ring, as shown in the image below:

As you go to 55mm, you’ll see that you are zooming in.
Watch the video below to see how this actually looks:
Understanding Focal Length (Video)
Video for Nikon Users
Video for Canon Users
Lenses in which you can zoom in and zoom out are called as zoom lenses.
There are other type of lenses called as prime or block lenses, which have a fixed focal length. For example, the image below shows a 50mm prime lens for Canon and Nikon.

In such a lens there is no zoom ring. The focal length is fixed. So if you want to zoom in, you have to physically go closer to the subject. The advantage of these lenses over zoom lenses is that they are usually much sharper and as you’ll later learn, they allow for a wider aperture, something which is very important. You’ll be learning about what aperture is and how it works when we start learning the manual mode.
The bigger the focal length number, the more you can zoom in. For instance, one of my favourite lenses for wildlife photography is the Tamron 150-600 as shown below:
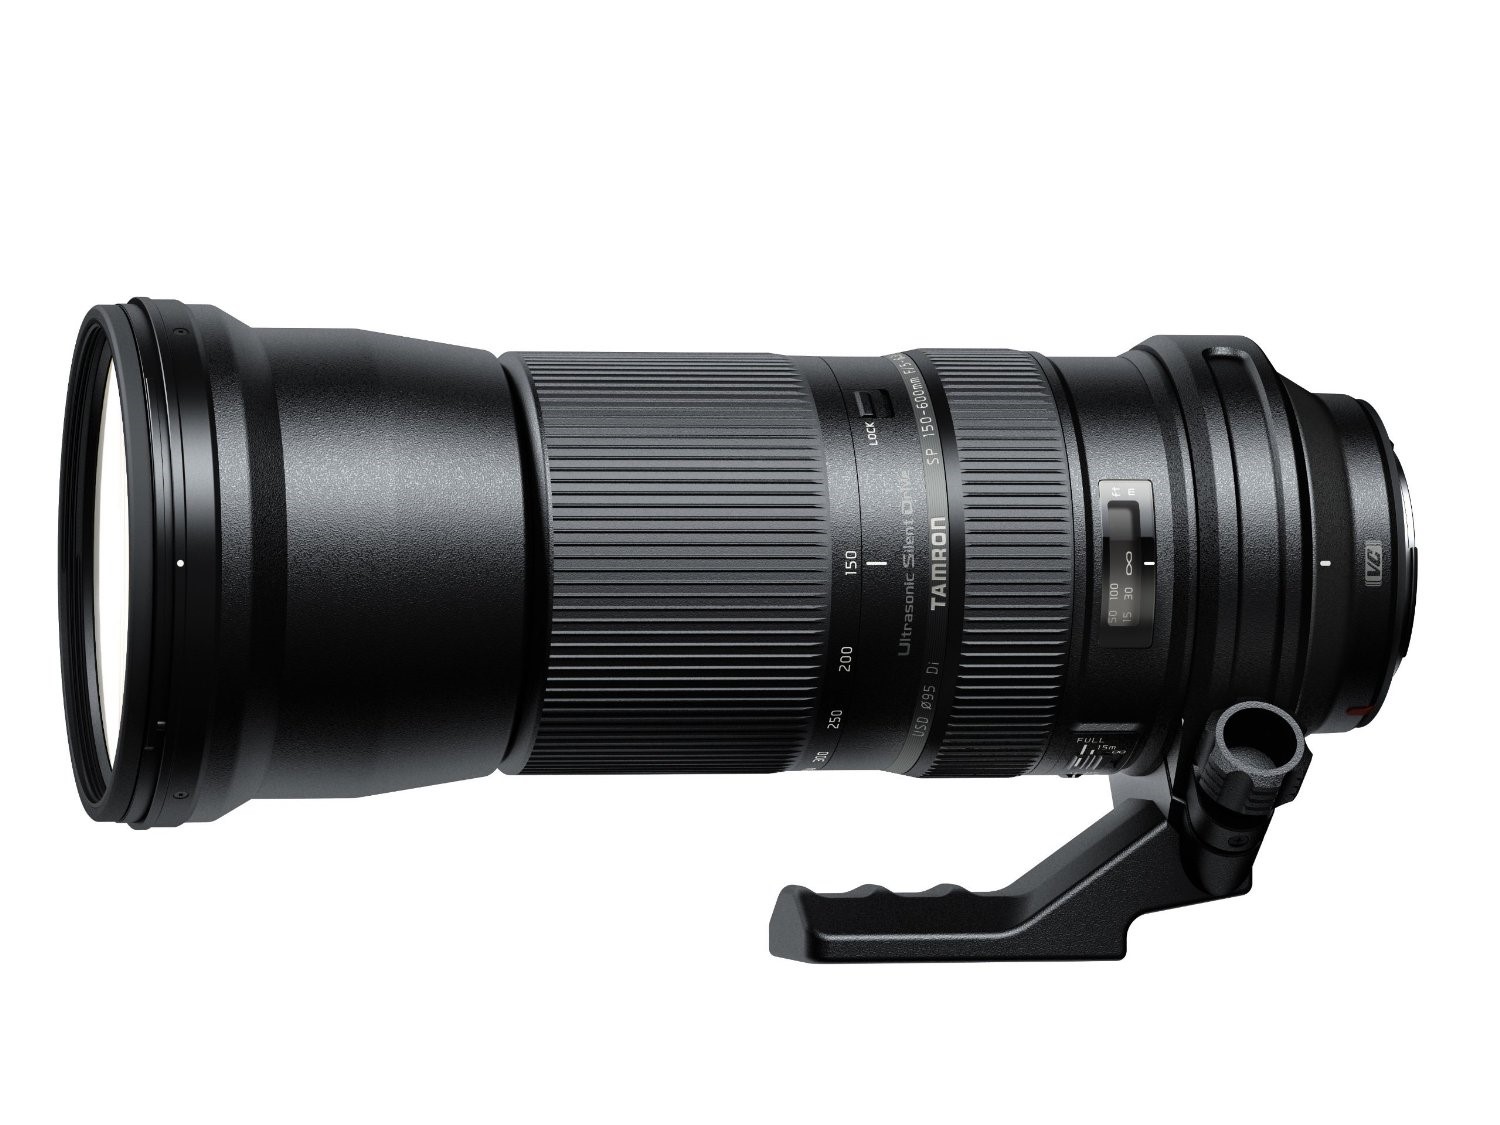
Tamron is a company that manufactures lenses so don’t let that word confuse you. Pay attention only to the focal length. It says 150mm-600mm.
That means with this lens you can zoom in till 600mm, which is a lot more than the basic 18-55 lens. So with such a lens, you’ll be able to get very close to things that are far away.
Lenses that allow for such big focal lengths are called as telephoto lenses.
On the opposite side is something called as a wide-angle lens.
These lenses allow for focal lengths that are very less, for example, a 14mm-24mm lens as shown below:
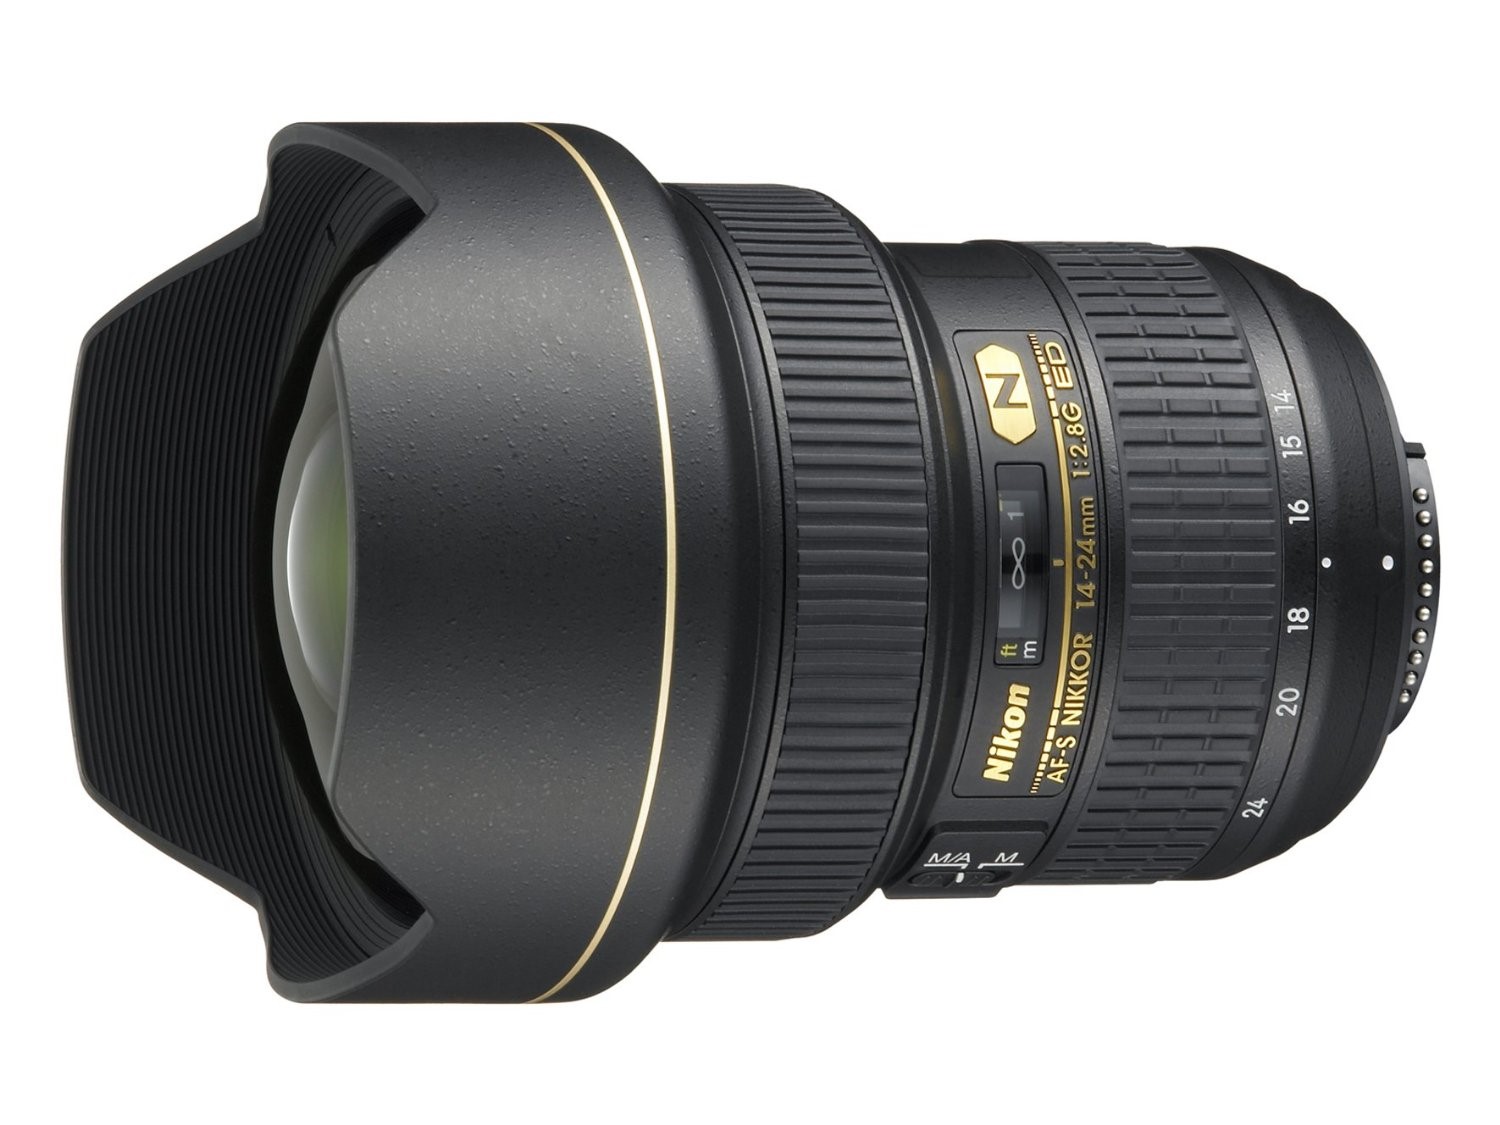
They are called wide-angle because at lower focal lengths you can see a lot of the scene as they allow you to zoom out more.
Where do you think such lenses will be used? If you guessed ‘Landscape’, then you are right. Since you can zoom out more and see more of the scene, landscape photographers love these wide-angle lenses.
There are lot of other type of lenses so we won’t go into that right now.
The purpose was to make you understand what focal length is.
Let’s move on to the next part of the camera, which is the mode dial.
Mode Dial
A mode dial is a circular dial that you see on top of the camera, as shown in the image below:

As the name suggests, a mode dial is used to select the mode that the camera operates in.
You’ll see a lot of different types of modes. But most of them are not of much use.
There are two important ones – Automatic and Manual.
When you are in the automatic mode, it’s easy to shoot as the camera does everything. But as the name suggests, it doesn’t give you full control over the camera. Manual mode gives you that control.
Now let’s move on to the next important component of a DSLR.
Live-View
Live-view refers to using the DSLR’s LCD screen to shoot, as shown in the image below:

All modern day DSLRs support the live-view function.
To activate the live-view, you have to press the live-view button. Let’s see how we can do this:
- Press the live-view button as shown below for Nikon D5300 and Canon 700D respectively:

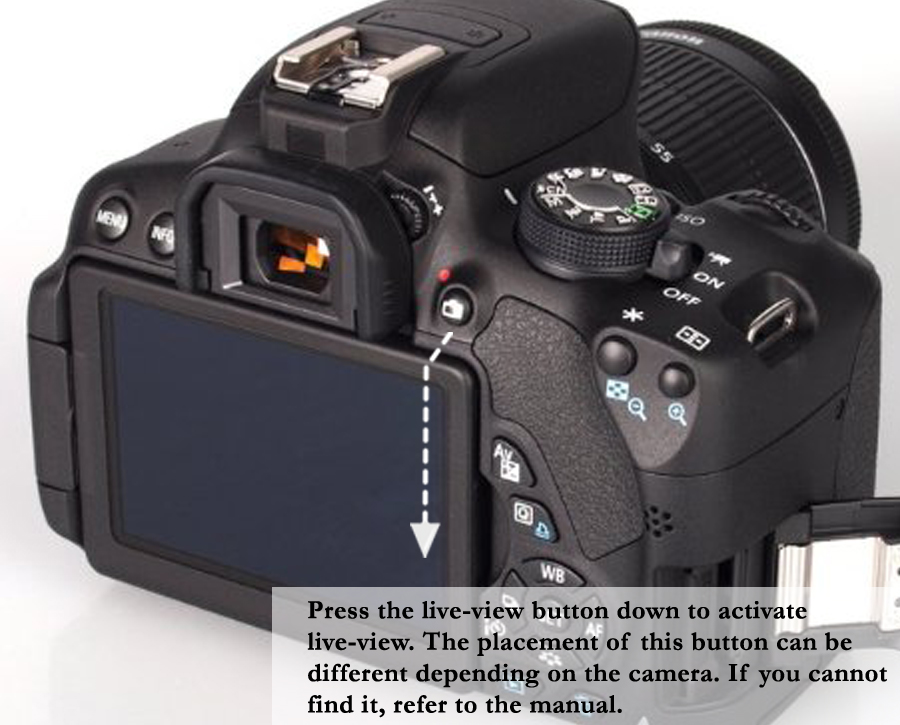
- Once you press the live-view button, you will see that the LCD screen gets enabled allowing you to see through it.
Note that the placement of the live-view button can differ from camera-to-camera, so I suggest you see your manual in case the button on your camera is located somewhere else.
The other way of shooting is through the viewfinder, which is the hole that you can see through, as shown in the image below:

Shooting through the viewfinder is generally faster and more convenient, especially when shooting moving subjects. Shooting through a viewfinder also provides shade from ambient light which lets the photographer see things more clearly.
Let’s move on to the next component:
Focus Point
As the name suggests, a focus point is a point that is used for focusing on a subject. Here’s how it looks:
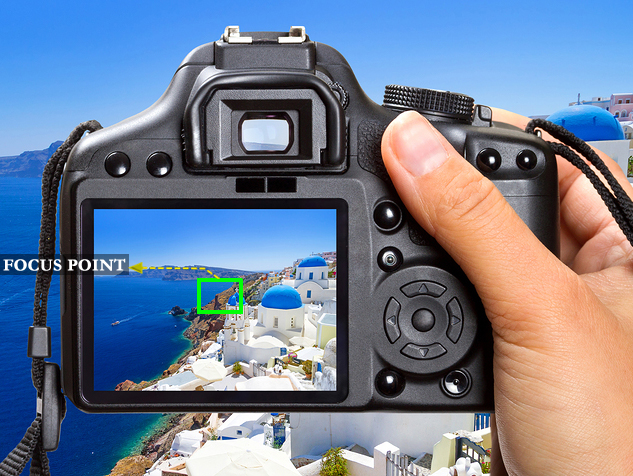
In live-view, it’s usually a square, like you can see in the image above.
Like you’ll soon be seeing in the video about taking your first shot, it’s important that the focus point touches on your subject.
For instance, in the upcoming exercise of taking our first shot, a cup will be our subject. To make sure that the camera focuses on the cup, the focus point has to lie on the cup. This will become clear when you do the exercise.
For now, let’s move on the next component.
Sensor
Even if you skip this part, it won’t make a difference at all. But since we’re on the basics, let’s cover it anyway.
A sensor is the most important part of the camera, which is located in the camera body. It receives light and converts it into the image you see (Actually it’s much more complicated than that but we won’t be going into it).
Just think of it as our brain. Our brain produces the image from the light that comes through our eyes.
Similarly the sensor uses the light that comes through the lens. So the sensor is like the brain of the camera.
The bigger the sensor, the better the image quality.
DSLRs have stronger sensors than the ordinary and cheap point and shoot cameras.
Look at the diagram below to understand all this:

You can see that the light coming through the lens. When you press the shutter button (the button on top of the camera) to take a shot, the mirror and the shutter give way so the light can reach the sensor.
Basic Things to Know When You Take Your First Shot: Auto-focus, Manual Focus and Focus Point
Getting a new DSLR camera is always an exciting. But knowing what to do with it can sometimes be a daunting task. Even though eventually you’ll be moving towards learning the manual mode, you should familiarize yourself with some basics which can be practiced even on the automatic mode.
So let’s do an extremely basic exercise that will give you some confidence.
Here’s what I want you to do.
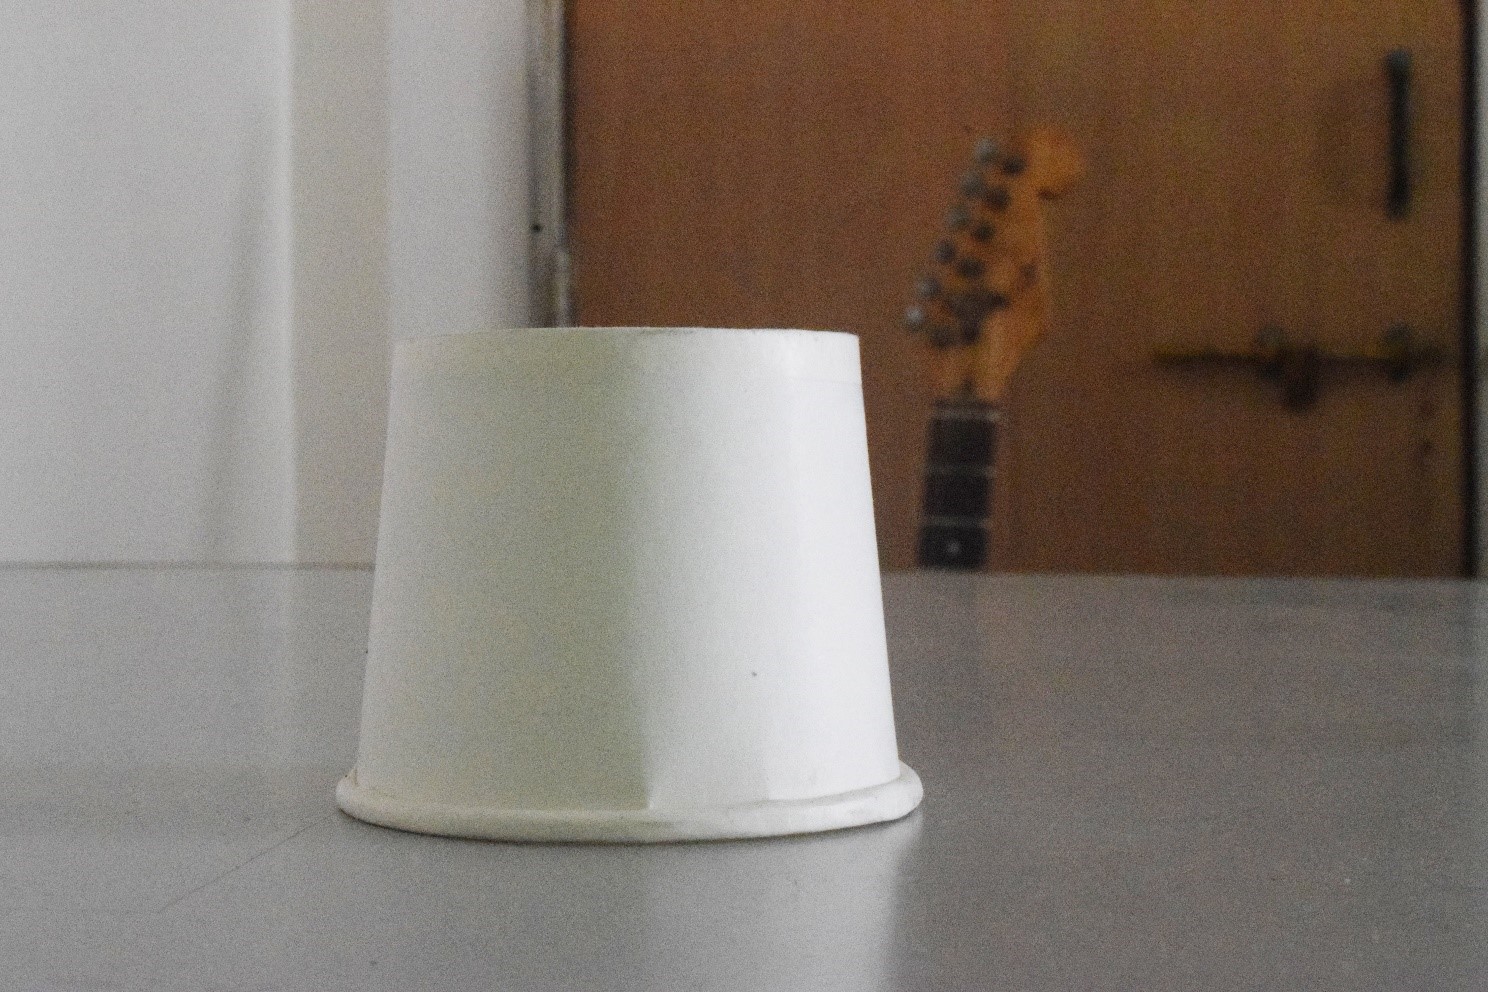
Find a small cup and keep it on a table in front of you, like shown below:
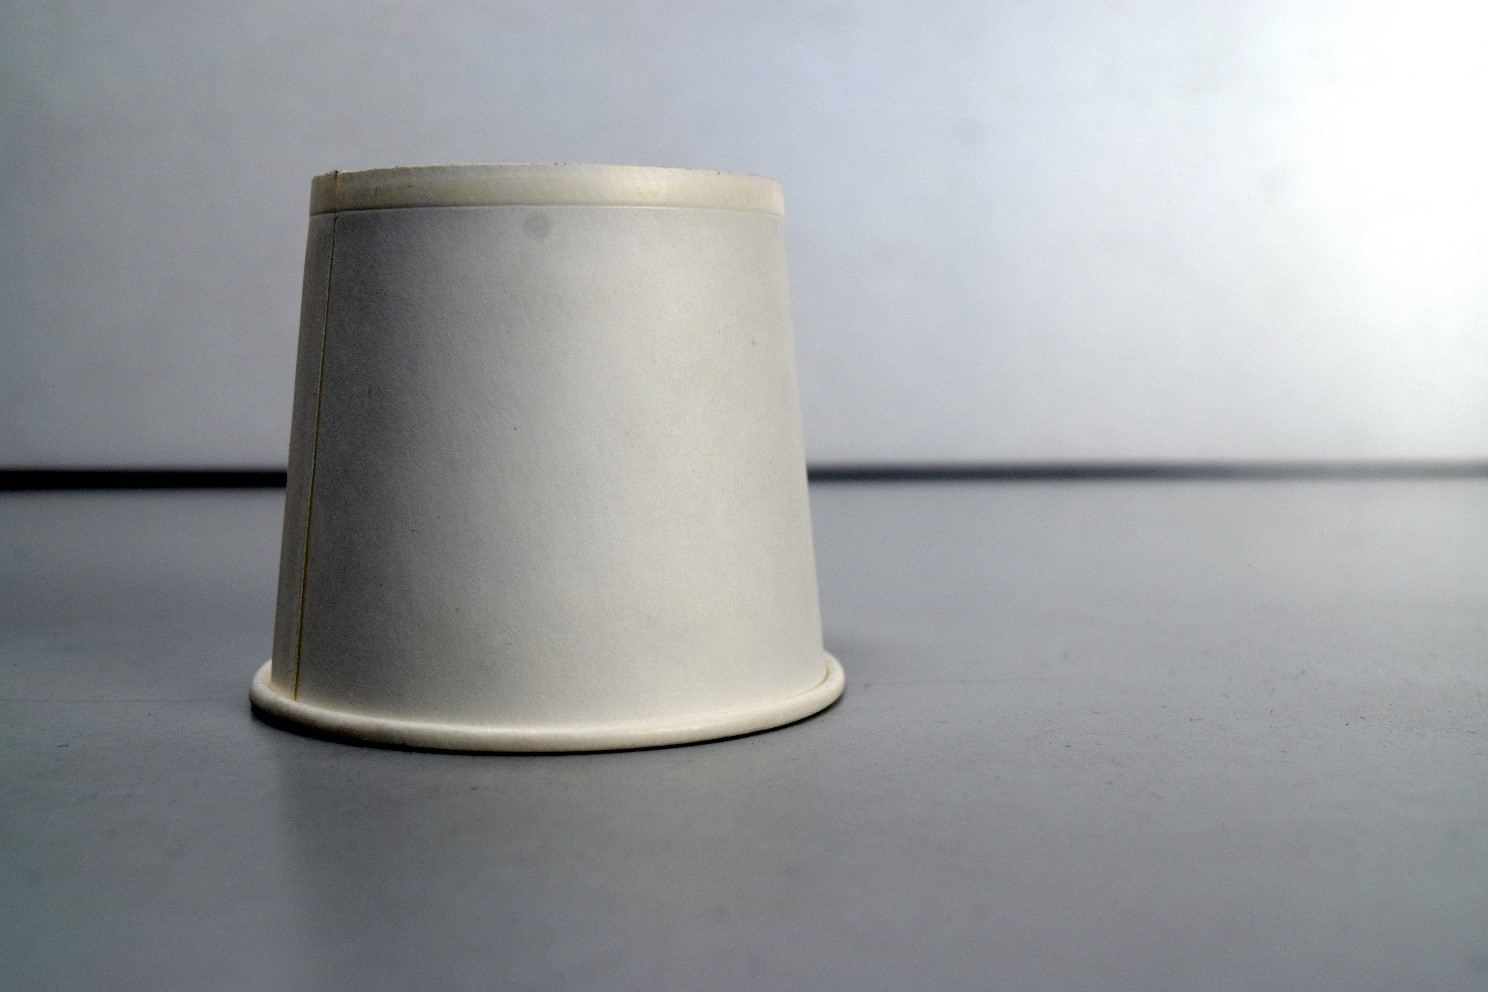
For this shot, we’re just learning how to focus and take a shot, so we’ll be using the automatic mode. So turn the mode dial to AUTOMATIC mode, as shown in the image below:

Before we go on and take the shot, here is a very important thing you have to know.
There are two ways of focusing in a DSLR camera.
One is called Auto-Focus (AF) and the other is called Manual Focus (MF).
Auto-Focus
AF is a faster way of focusing since the camera does the focusing for us. In MF, we need to focus manually.
What this exactly means is something that will become clear to you when we actually take the shot.
AF or MF can be activated using a switch that is on the lens. Look at the image to see this:

This can be represented as ‘A’ and ‘M’ also on some lenses.
We’ll cover manual focus slightly later as it’s not that important right now. So for now, make sure you have selected AF as shown in the image below:

Now we’re all set to take our first shot.
Watch the video below to see what to do. Alternatively, you can read the description too.
Taking Your First Shot (Video)
Video for Nikon Users
Video for Canon Users
Make sure the cup is front of your camera, so you see the cup through the live-view screen as shown in the image below:
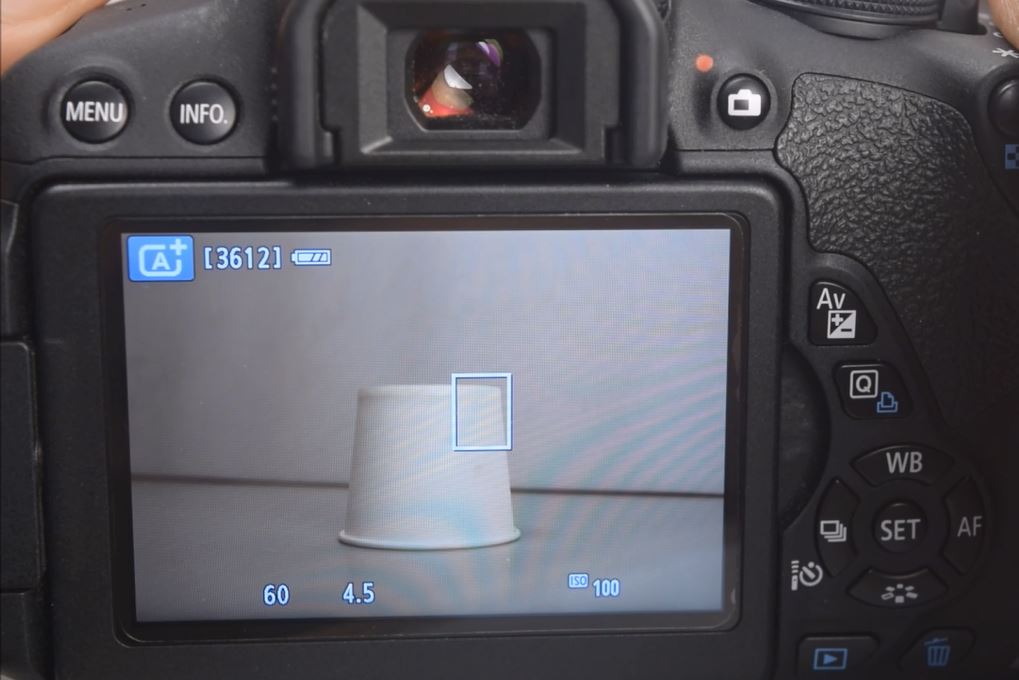
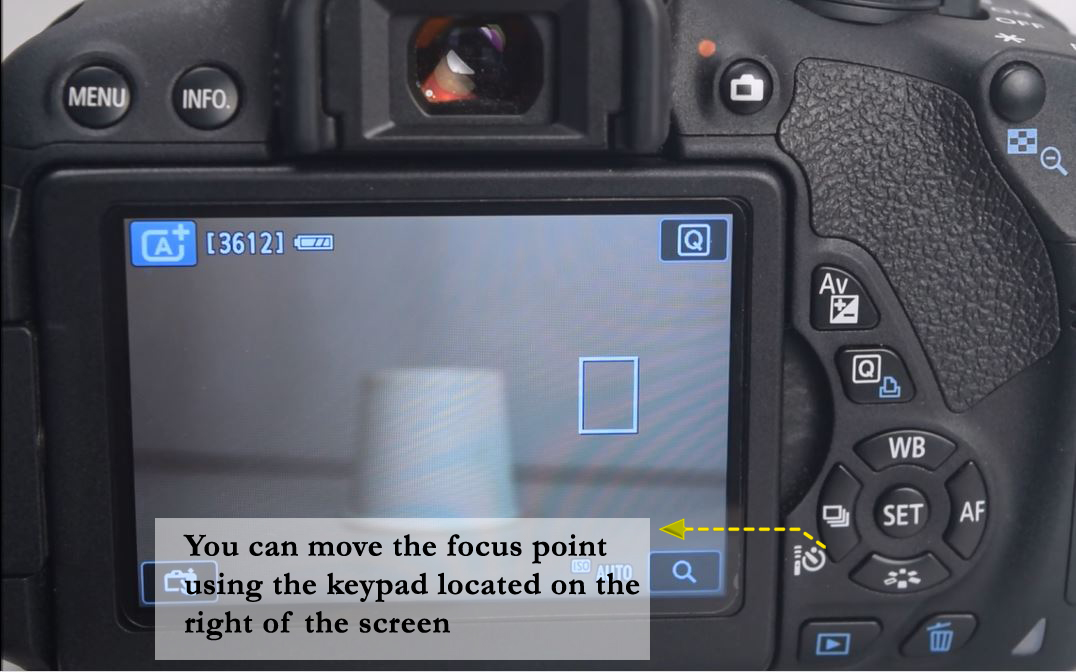
Next, make sure the focus point is touching the cup as shown in the image.
For Canon users, if you find that you’re not seeing a single square as the focus point, watch the video to see how to select a single focus point.
If you find that your focus point has drifted to the corners, you can move it by using the keypad and bring it in the centre as shown in the image below:
Now we’re ready to focus on the cup.
To focus, half-press the shutter button, as shown in the image below:
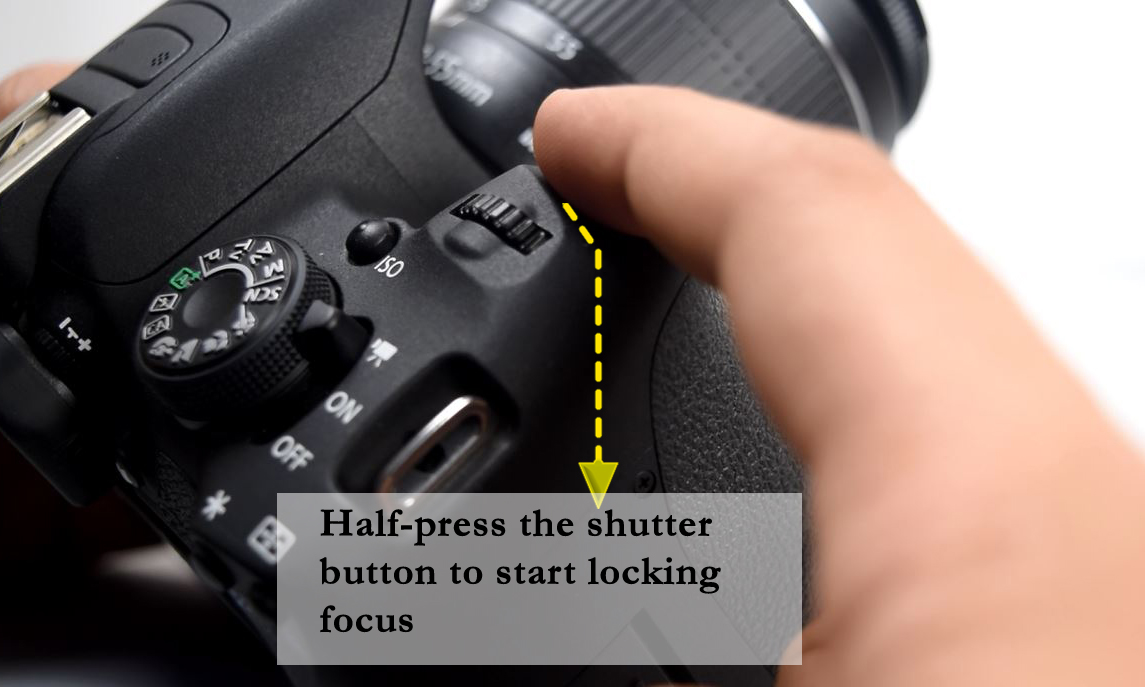
You’ll see that the focus point starts to hunt for focus.
Keep the shutter button half-pressed till the FOCUS LOCKS! When it locks, you’ll see that the colour of the focus point has changed to green and you’ll also hear a small beep. (If you don’t hear the beep, you can enable the beep through the settings in the menu. See the manual.)
Once the focus locks, press the shutter button all the way to take the shot.
Make sure you kept the shutter button half pressed after the focus locked. If you release it after the focus locks, the focusing process will start again.
There you have it! Your very first shot!
If you find that the camera is unable to focus, i.e. the focus point turns red, it can be because of the following reasons:
- You are too close to the cup. There has to be a little bit of a distance between the lens and the subject. So make sure you are not very close to it.
- You are focusing on something that is totally plain. For example, if the cup is totally white and plain, the camera may find it hard to focus on something as there is no contrasting point. In this case, you can put the focus point on something that stands out, like the edge of the cup. You can also draw something on a cup, like a big dot, and then focus on it.
Manual Focus
Even though manual focusing is not used too much, it’s always a good idea to know how it works.
So the first thing you would do is to switch the focus mode from AF to MF, as shown in the image below:

In the last shot, when the focus mode was set on Auto-Focus (AF), you saw that half pressing the shutter button started the focusing process and the camera focused on the subject.
Now when you are on MF, you’ll see that nothing happens when you half press the shutter.
This is because we are on Manual Focus now. So we will have to focus on our own.
And how you do that is by using the focus ring.
The focus ring is located right next to the zoom ring in most cameras, as shown in the images below for Canon and Nikon cameras respectively:


Some cameras can have the focus ring behind the zoom ring. You should be easily able to locate it.
When you rotate the focus ring, you’ll see that the camera’s focus changes as you rotate, like shown in the video below:
How to Use Manual Focus (Video)
Video for Nikon Users
Video for Canon Users
So your job is to rotate the focus ring till the time you see the object sharp.
When that’s the case, all you have to do is press the shutter button to take the shot.
You can see that it’s not an easy task to focus when you use manual focus. It’s time consuming and not that accurate if not done properly. Hence, majority of the times, we use AF. So switch back to AF now, like shown in the image below:
There you have it. You’ve taken your first shot and you’ve also learned about the different focus mechanisms that a DSLR camera offers. This will lay a good foundation for you to start learning how to shoot in the manual mode. So let’s go there.
Getting Started With Manual Mode and Learning How to Change the Values of Different Settings
A lot of people who buy a DSLR are unable to make the most of the camera because they don’t learn how to shoot in the manual mode. They mostly stick to the Automatic mode where all you have to do is to half-press the shutter button, lock focus and then press the button all the way down to take the shot. The camera takes care of everything else.
Manual mode is slightly different.
The initial process of taking a shot remains the same, i.e., you still have to half-press the shutter button, lock focus and then press the button all the way down to take the shot.
But this time there is no guarantee that the shot will be of the right brightness, sharpness, etc.
This is because the camera is no longer helping us in producing the correct image.
All the settings that go into making a shot are completely under our control now.
The first thing you should do is to use the mode dial to switch to the manual mode, which is represented by M, as shown in the image below:

Don’t confuse the manual mode with manual focus (MF). Manual mode is selected using the mode dial.
Manual focus and Auto focus are just focusing methods as seen before, which are selected by using the switch on the lens.
Right now, you should be on Manual Mode and Auto-Focus.
Alright then, we’re all set. But before we proceed, it’s important to know why we need to learn shooting in manual mode.
Why Learn to Shoot in the Manual Mode
Shooting in the automatic mode is easy but it will restrict you as a photographer.
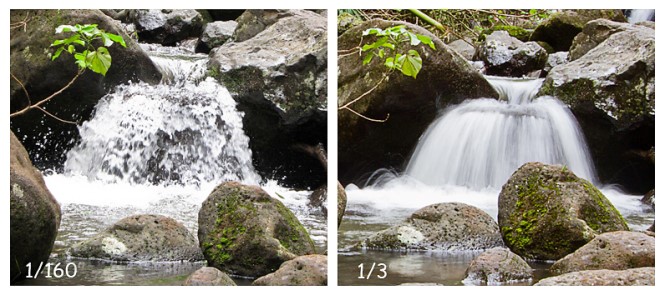
For instance, let’s take a look at these two shots:

The picture on the right looks much better even though it’s of the same waterfall.
That’s because the shot on the right has been shot in the manual mode where the photographer was able to change the shutter speed of the camera.
In the manual mode, there are three main settings – Aperture, Shutter Speed and ISO, which come under your control.
And once you know how to use these settings, you can create ANY kind of shot that you ever wanted to.
The silky waterfall shot above can NEVER be achieved when shooting in the automatic mode. In the auto mode, you will always end up getting the image on the left.
Similarly there are other types of shots that you can only get when you know the manual mode, like the shot below:

Here, you can see that the image on the right looks much better as the photographer has been able to blur the background effectively and hence there are no distractions.
Again, this may or may not result in auto mode.
But in manual mode, using the aperture setting, you can get this shot 100% of the times because you know exactly what you have to do.
These are just two examples. The possibilities of using the manual mode in creating artistic shots are endless.
How the Manual Mode Works
The Manual Mode of the camera depends on four things:
- Aperture
- Shutter Speed
- ISO
- The Light in the Area
Out of these four, the first three are related to the camera and this is where our focus will be.
One of the important things is to learn how to change the value of these settings in the camera.
So first of all, make sure you are on manual mode by using the mode dial to select ‘M’ as shown before.
Next, I want you to switch OFF your live-view so all the settings come on the screen, like the image below:

Now I want you to pay attention to the three values that you see on the screen as shown in the image below:

Keep an eye on these three settings.
Now it’s time to use the command dial. The command dial is a small black coloured wheel, located on the camera body, as shown in the image below:
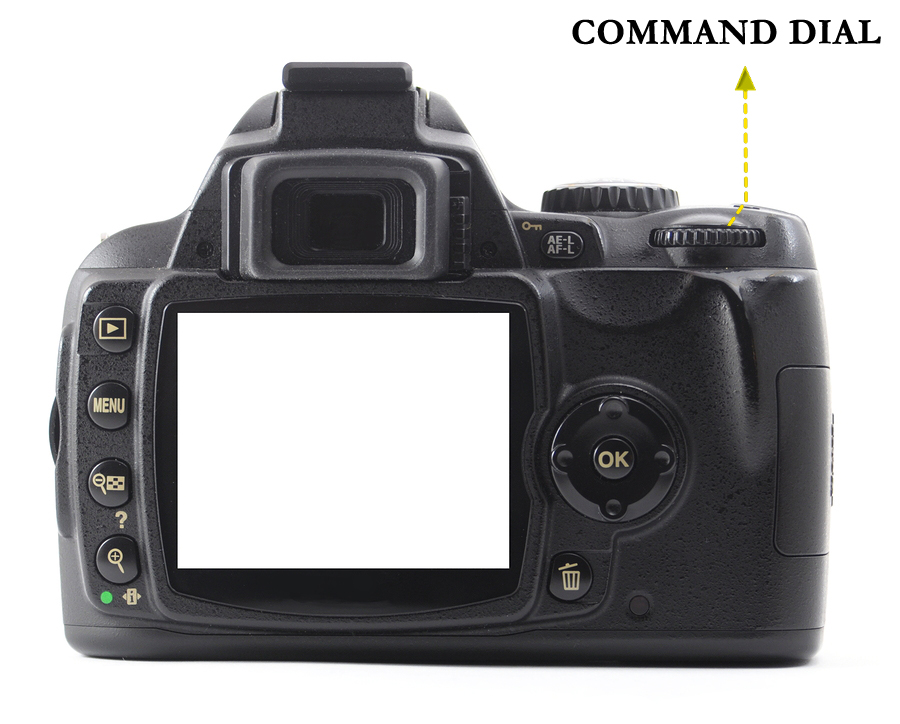
Note that the location of the command dial can change from camera to camera. On some cameras, it can be on the top too.
Let’s see how we can use the command dial to change the different settings.
Changing Shutter Speed
The first value that you see is called as the shutter speed, like shown in the image below:

Right now you don’t have to know what shutter speed means. We have covered that in other articles on our blog.
Right now we’re just learning how to change the value of shutter speed.
To change the shutter speed, all you have to do is to rotate the command dial, like shown in the video below:
How to Change the Shutter Speed Using the Command Dial (Video)
Video for Nikon Users
Video for Canon Users
Changing Aperture
The middle setting you see, i.e., the alphabet ‘f’ and a number (like f3.5) is the aperture setting, like shown in the image below:

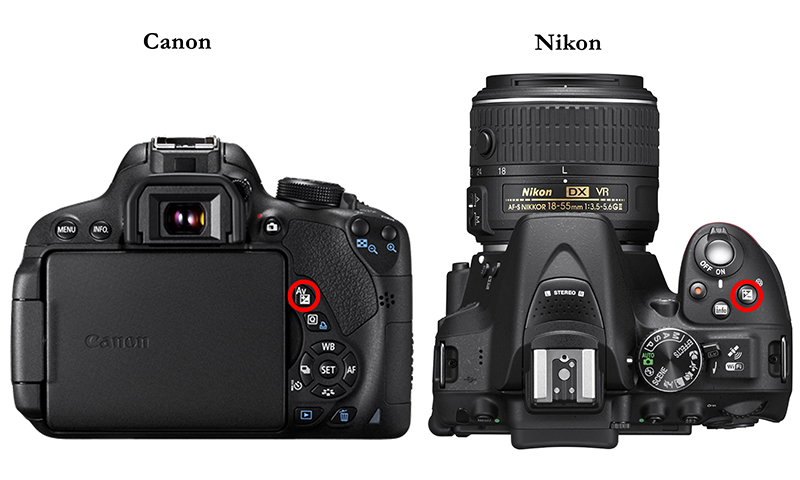
To change the aperture value, you again have to rotate the command dial but before rotating the command dial, you have to press a button which has the symbol +/- on it (called as the exposure compensation button).
See the images below to see where this button is located:
Once you locate this button, keep it pressed and then rotate the command dial. You’ll see that the aperture value changes. See the video below:
How to Change the Aperture (Video)
Video for Nikon Users
Video for Canon Users
Changing ISO
ISO is the third settings and changing it is very easy. For Canon cameras, you just have to look for the ISO button and then press it to select the ISO value you want. See the image and video below:
How to Change the ISO value (Video)
Video for Nikon Users
Video for Canon Users

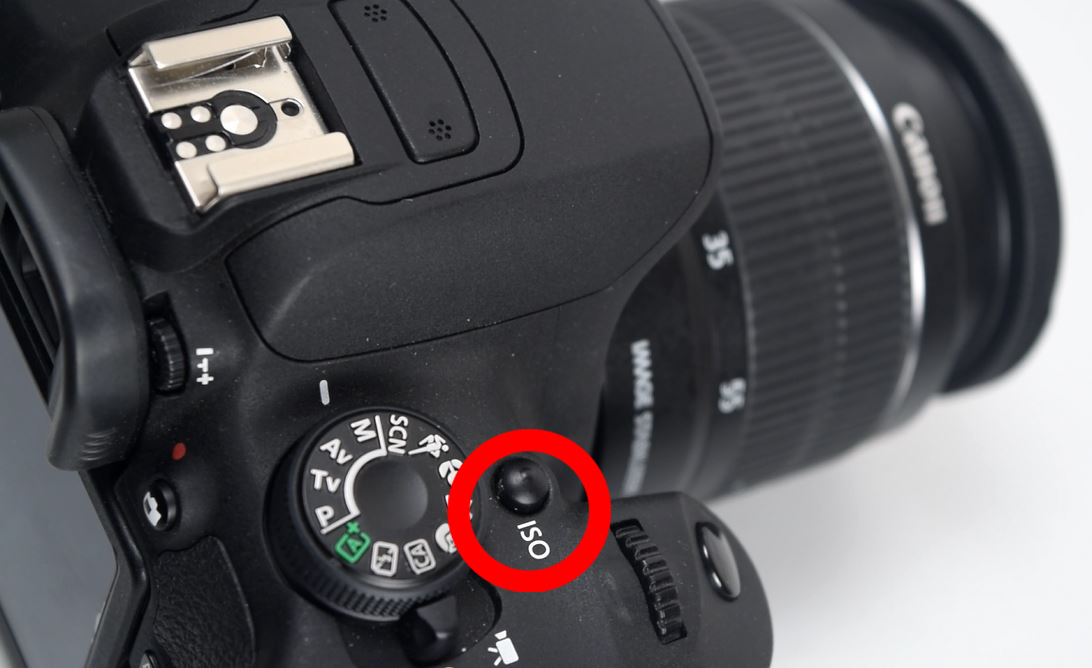
For Nikon cameras, you can press the ‘i’ button and then access the menu, select ISO and then select the value you want. See the image and video below:

Please note that different models may have the placement of the ISO buttons done a little differently. So I would advise you to look into your manual. But to be frank, it’s very easy to find out yourself.
Now that you know how to change these settings, it’s finally time actually dive deep into each setting and learn its usage and application.
Basic Settings in a DSLR Camera and Manual Mode
This is the part where things get really interesting. You’ll be learning about the all important manual mode and all the settings that go inside it. This is where you learn real photography. We’ll be starting off with the all important setting called Aperture. So let’s start:
Aperture
What is Aperture and How Does it Affect Our Shots? Understanding the Concept of Depth of Field
Aperture means the opening in the lens. It looks like the image below:
Don’t worry about the symbols and numbers for now. Just know that this opening can change in size. To understand where it is located in the lens, see the image below:
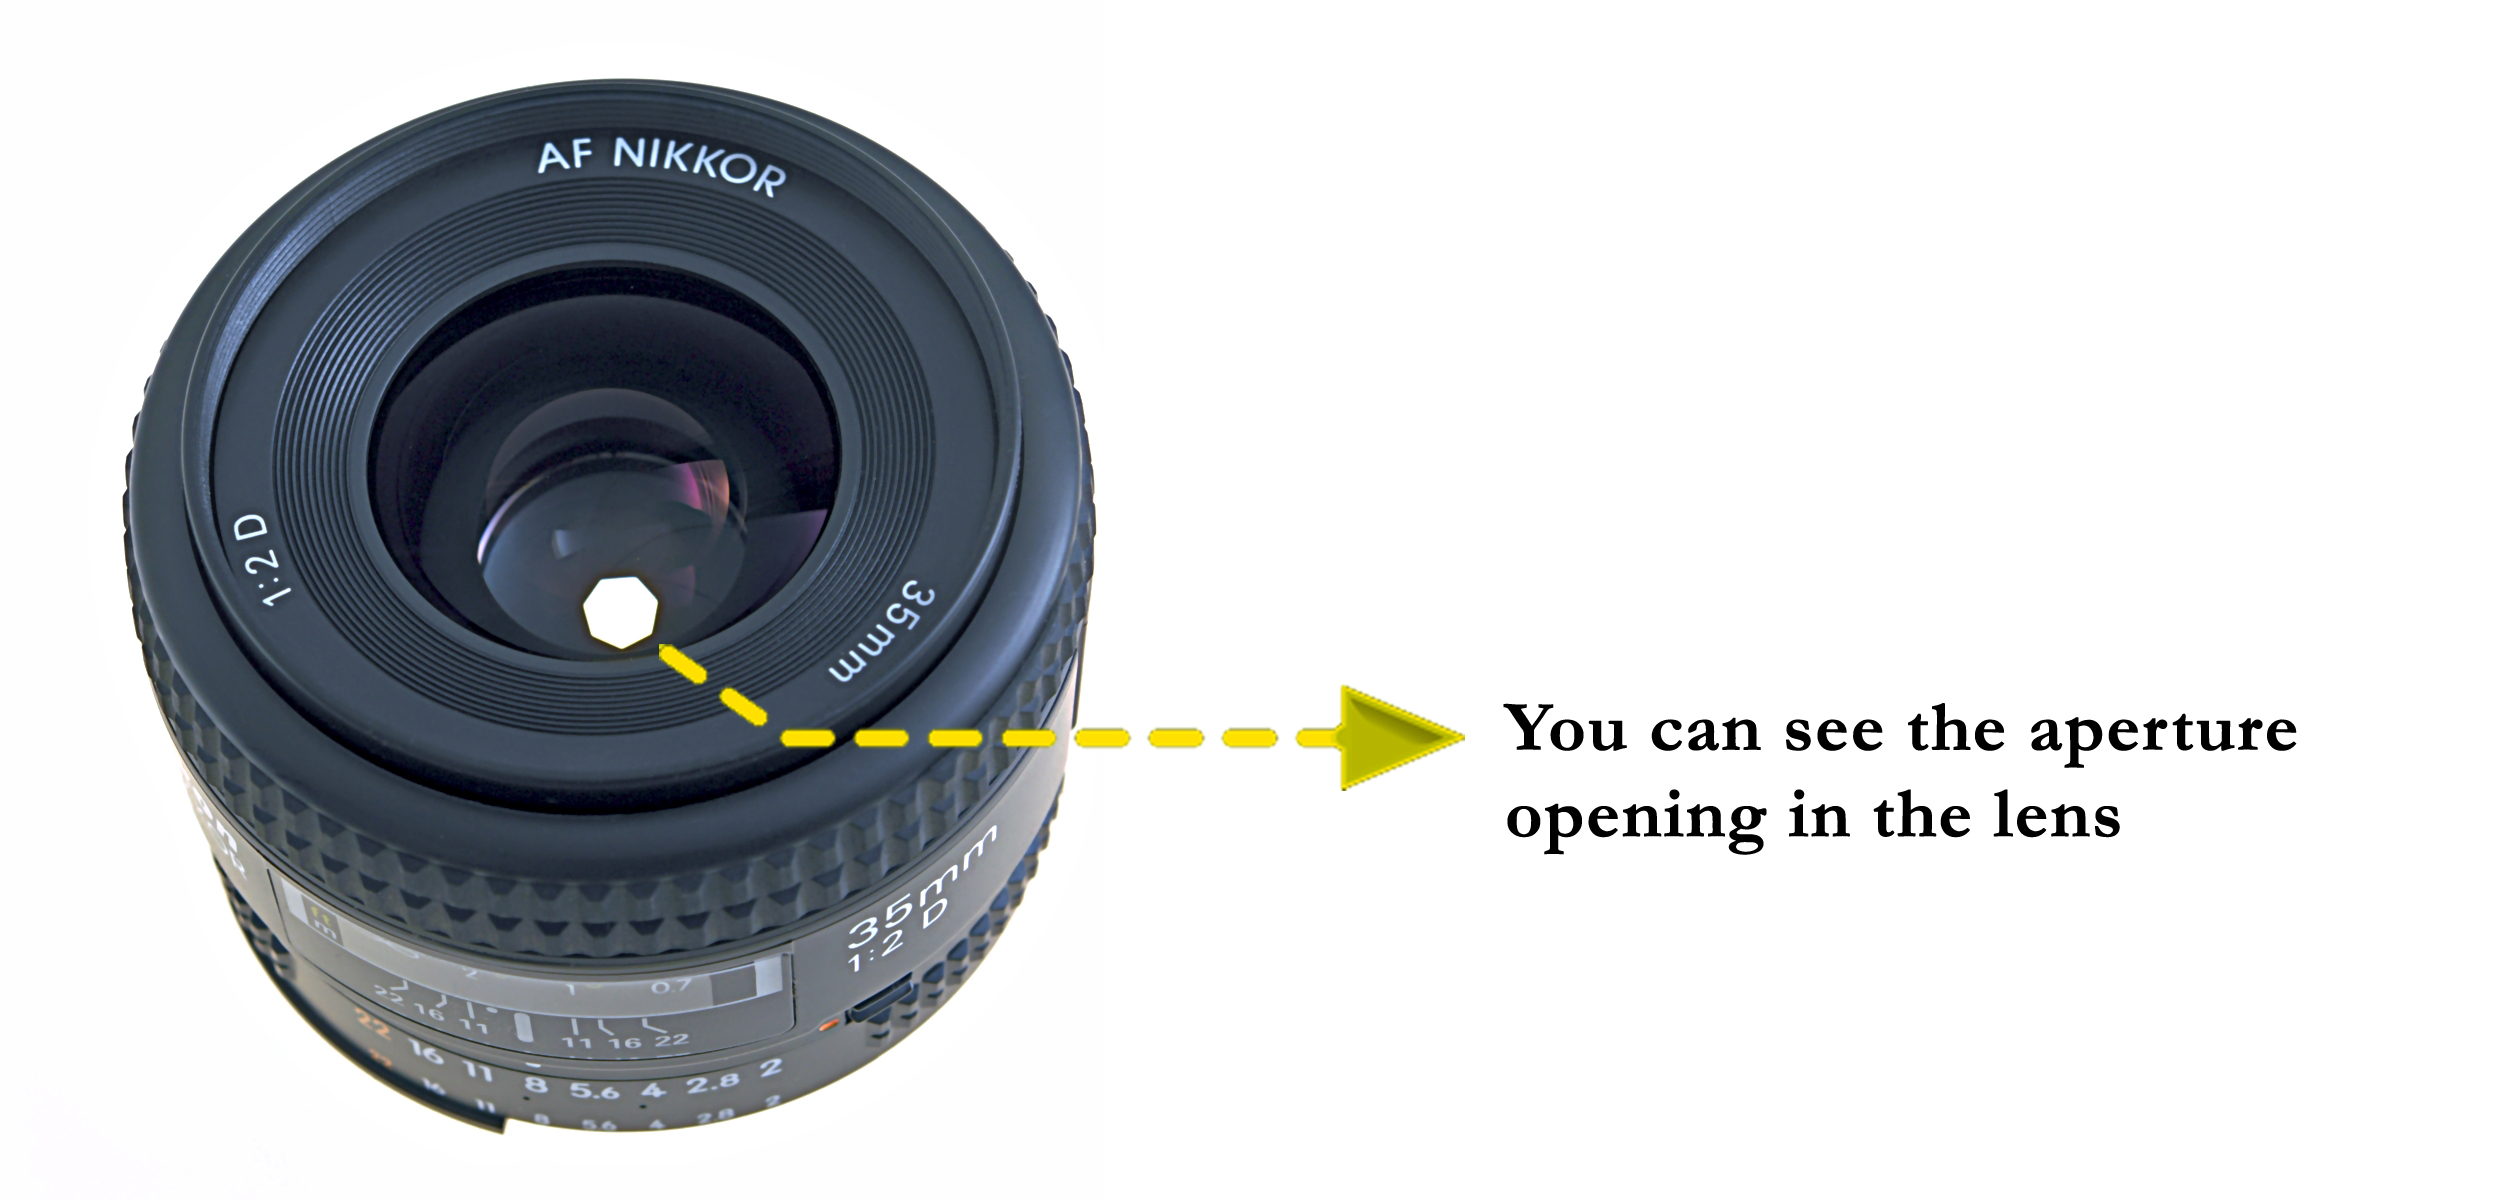
Now have a look at the first image again.
You can see that aperture can open up or close down, just like some kind of a cool looking circular gate.
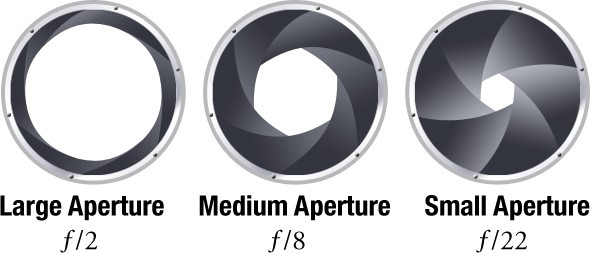
On our cameras, the aperture is denoted by the f-stop value, like f8, f16, f3.5, etc
This value refers to the size of the opening of the aperture. The bigger this value, e.g. f22, the smaller the hole. Conversely the smaller this value, e.g. f4, the bigger is the aperture hole.
Sounds confusing? No problem, have a look at a more elaborate image:

You can see that when the number next to f is small, the aperture is wide open. And conversely, when the number next to f is big, the aperture starts to close down and becomes narrow.
It can sound confusing because if you notice, the relationship between the value and the opening is an inverse relationship. Smaller the number, bigger the opening. Bigger the number, smaller the opening.
This aperture value is referred to as the f-stop number.
So in the image above, the aperture opening was open the widest at an f-stop of f2.8, and was most narrow at an f-stop of f22.
By now we know that a camera works by taking in the light from the surroundings. We also learned that light first enters the lens.
Light is allowed to enter the lens by this aperture opening that we have been talking about.
So can you guess what will be the relationship between the light entering the lens and aperture?
Relationship Between Aperture and Light
Yes you guessed right! The wider the aperture is open, the more the light that enters the lens and the camera.
Conversely, if the aperture opening is narrow, lesser light enters the camera.
We can also say that a smaller f stop number, like f2.8, results in more light and a bigger f stop number, like f22, results in lesser amount of light.
So can you guess, at what aperture, will you have a chance of getting a very bright photograph?
Yes, you guessed it right. At a smaller f-stop number. Because the aperture will be wide open and will allow a lot of light to come in.
Conversely, when the f-stop number is big, the aperture opening will be narrow, so lesser light will be allowed to come in the camera. So chances of a darker shot are higher.
In photography, we use the term exposure to refer to the brightness. An underexposed photo is that which is dark, and an overexposed photo is that which is too bright.
So now you know the relationship between aperture and light.
Relationship between Aperture and Depth of Field
I know what you’re thinking – What on earth is depth of field?
Don’t worry one bit. It’ll all be clear very soon.
First, I want to ask you a question.
Let’s assume there are two photographers – one who is just learning photography and another one, who has been shooting professionally.
They are both asked to take a shot of a person who is standing in a garden, with a lot of trees behind her in the background.
Let’s assume both these photographers take shots.
What difference are you likely to observe in both the shots?
Apart from the basic differences like the shot being sharper and other things, one major difference you’re likely to observe is that good photographers always manage to blur the background.
Because they know how to blur the background, their images look much better as the subject in the picture seems isolated from the background.
In addition to that, the distractions in the background are reduced because the background is blurred.
All this makes such a shot look very pleasing to the eye.
Let’s look at the scene we just talked about in terms of actual images.
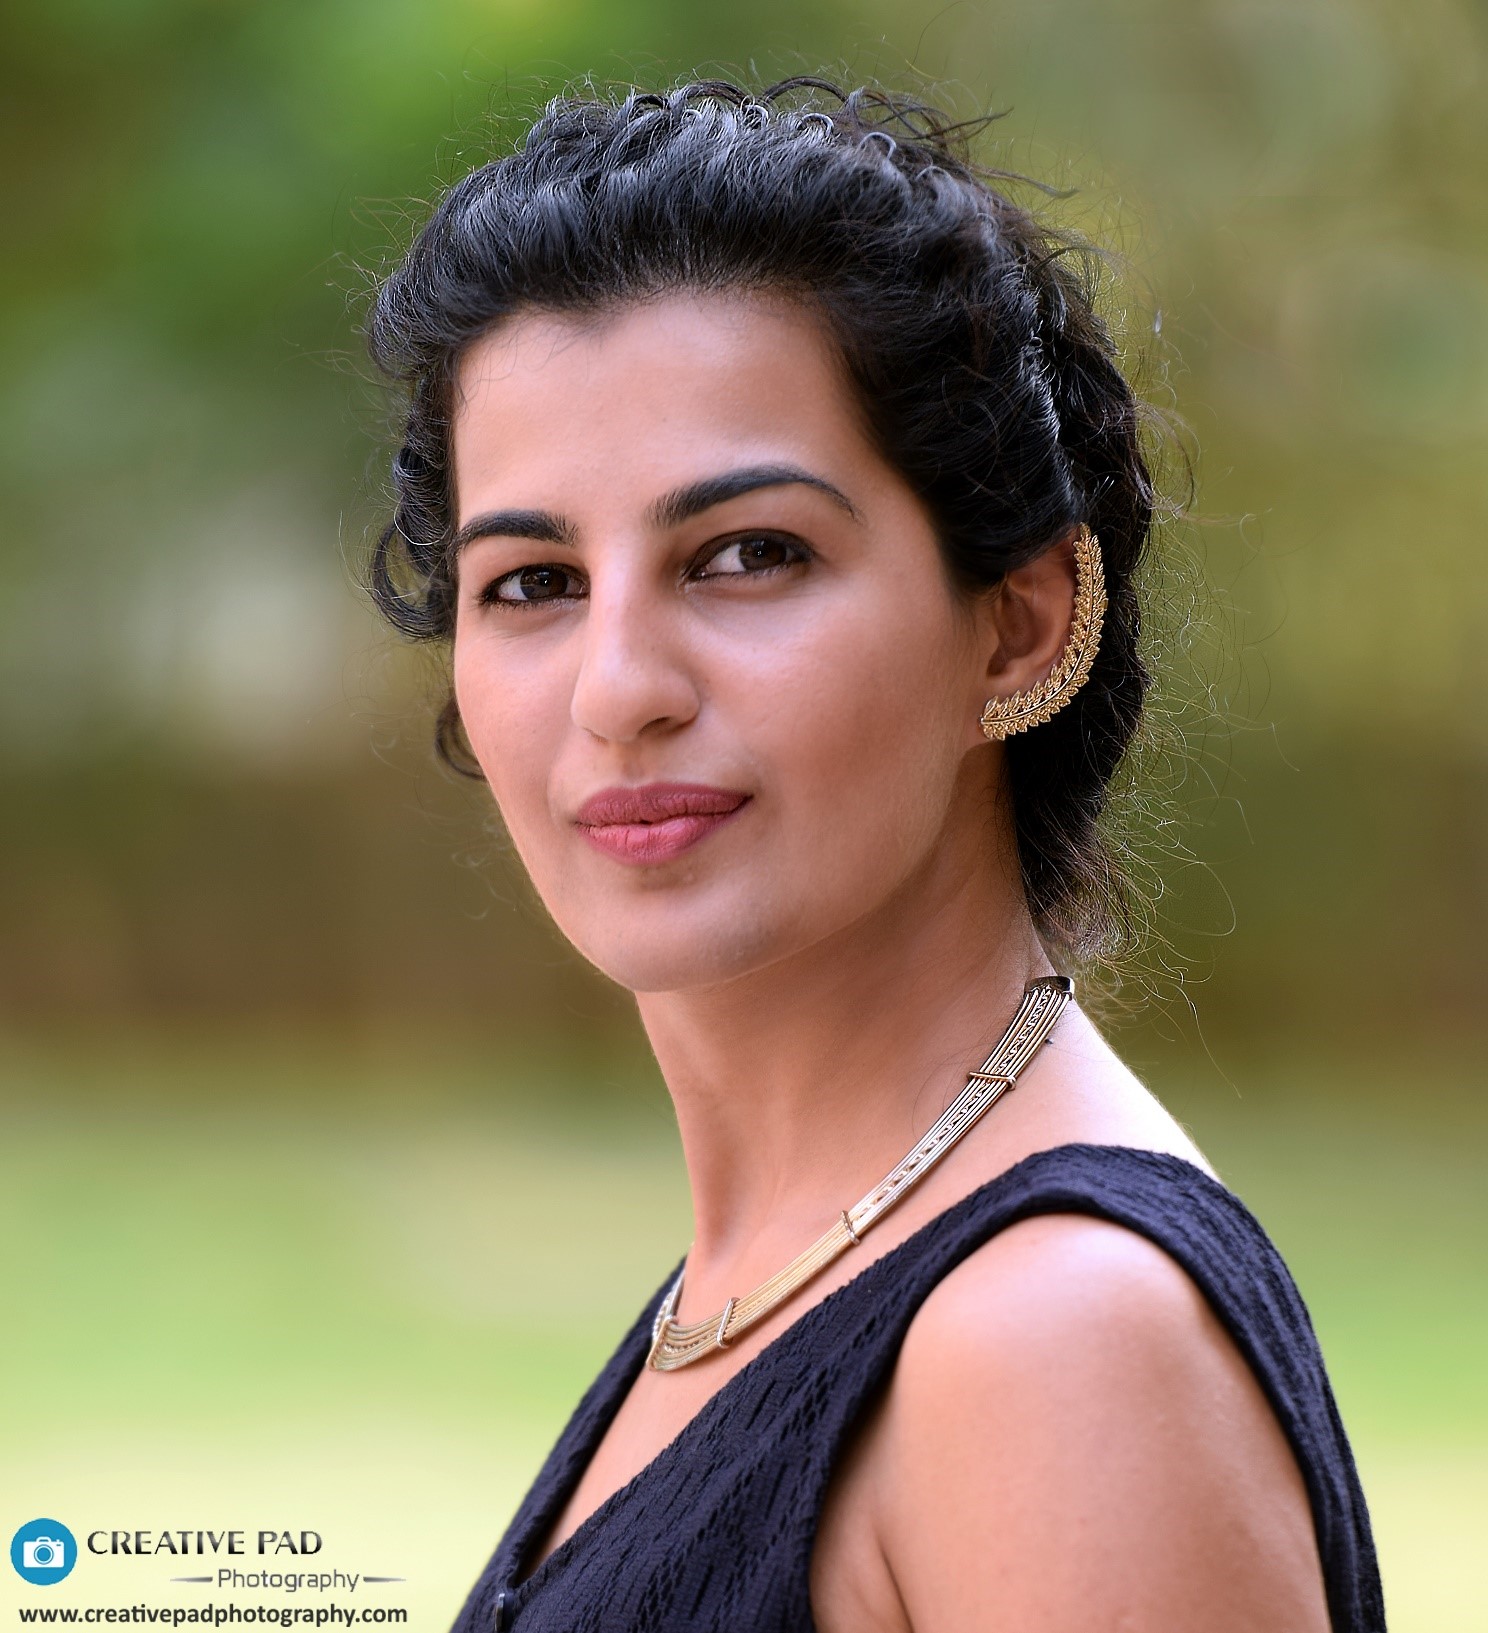
Let’s first look at the image an amateur photographer would take:

You can see that the background is visible. This makes for a shot with a lot of distractions as there are a lot of things that are seen in the background.
Now let’s look at the image a professional photographer would take:

In this image, you can see that the background is blurred. Since you can’t see anything in the background, the eye naturally goes straight to the subject of the photograph – in this case, the woman.
This blurring of the background is done by using the aperture.
Let’s get into how all this works.
Let’s try and look at the pictures above in the form of a diagram to understand this:
If we convert the first photograph into a diagram, it would look something like this:

You can see that area of focus (pink area) extends from in front of the model to all the way beyond the tree in the background. That is why everything in that picture was in focus. The model was not isolated.
Now let’s take a look at the second shot. It was something like this:

Now you can see that the area in focus is very small. It’s only in and around the area in which the model is standing. So the model would be in focus, but the background behind will be blurred as it’s out of focus.
This area of focus that we are talking about is called as depth of field. It develops around the subject on which we lock focus before taking the shot.
A shallow depth of field refers to the situation in which the area of focus is small, just like the second shot and diagram.
A deep depth of field is the opposite. It refers to the situation in which the area of focus is big, just like the first shot and diagram.
So if you think about it – if we want to blur the background in any shot, our job is to learn how to achieve a shallow depth of field or a smaller area of focus. Once we are able to do that, everything that does not fall within the area of focus will come out blurred.
So how can you control the amount of depth of field or area in focus?
You can do it by using the aperture.
So what’s the relationship between aperture and depth of field?
It’s a simple relationship.
The smaller the f-stop number, the more shallow the depth of field or lesser the area in focus.
Conversely, the bigger the f-stop number, the deeper the depth of field or more the area in focus.
For example, at f4, lesser area will be in focus than at f16. Hence, at f4 we will be able to blur the background more as compared to f16.
At this point I will advise you to not think of this relationship in terms of the size of the aperture opening as it can end up confusing you.
Just think of this relationship with the f stop number as it’s much easier to understand.
Smaller the f-stop number, more blurred the background. That’s what you have to remember.
So at a smaller f stop number, only the object that you lock focus upon will be sharp as the depth of field will form around that object. Anything away from it will start to blur out.
This will become clear when we do a small exercise.
Exercises for Aperture
Exercise for Shallow Depth of Field (Blurring the background)
Here’s what I want you to do.
Take the cup you used for the last shot and place it in front of you on a table.
We’ll be taking a shot of this cup again, but this time remember, we’re on the manual mode.
And unlike last time, this time we have a major objective in front of us – To blur the background and the keep the cup sharp.
So let’s get started.
Since you want the background to come out blurred, the first thing you would do is to change the aperture value to the minimum f-stop number possible.
Now through-out this e-book, we’ll assume that you are using the kit lens that came with your camera, which is the 18-55mm f3.5-5.6 lens.
Whenever you see the aperture setting written next to the name of the lens, it denotes the minimum most f-stop number that lens is capable of going.
Better (and usually more expensive) lenses can go below f3.5. A lower f-stop number is very important because first of all, as you learned, it is capable of reducing the area of focus or depth of field even more, hence blurring the background more.
Secondly, as you also know, the lower the f-stop number, the wider the opening of the lens. This lets in more light in the camera, something which is very important as it helps us keep a lower ISO.
For now, just remember that the smaller the f-stop number, the better it is as it helps us to blur the background effectively.
So what is the minimum f-stop number that we can go to on our kit lens?
See the name again: 18-55mm f3.5-5.6.
This means that the lowest f-stop number that it can go to is f3.5 when the lens is zoomed out at 18mm and f5.6, when the lens is zoomed in at 55mm.
And anything in between, you’ll get a corresponding f-stop value that will be between f3.5-f5.6.
Slightly confusing? No problem.
In order to understand this practically, do the following:
- Zoom out using the zoom ring till you are on 18mm
- Reduce your aperture f-stop value to f3.5
- Now, zoom in and go to 55mm.
- You’ll notice that the f-stop value goes up on its own to f5.6.
- Again go back from 55mm to 18mm and you’ll see that the aperture has gone from f5.6 to f3.5. (On Canon cameras, sometimes you have to half-press the shutter button to see this change)
See the video below to watch the above steps:
The effect of zooming in and zooming out on the aperture (Video)
Videos for Nikon Users:
Video for Canon users:
So this lens doesn’t have a fixed minimum f-stop number. Instead, it has a range of minimum f-stop number which depends on whether you are zoomed in or out.
Better (and usually more expensive) lenses can have a fixed f-stop number. For example, one the very popular lenses, the 70-200mm f2.8 has a fixed minimum f-stop number, which is f2.8. So in this lens, even if you zoom all the way in to 200mm, you can still use f2.8.
Does all this still sound confusing?
If it does, don’t worry a bit. As long as you have understood the relationship between aperture and blurring, we’re good to go. So just remember, lower the f-stop number, more the blurring. Rest of the things will fall into place when you start using the camera.
Let’s begin the exercise now.
Watch the video below to see what to do. Alternatively, you can read the description too.
Blurring the Background Using Aperture (Video)
Video for Nikon Users
Video for Canon Users:
- First of all, place a cup on a table in such a way that there is some background behind it, like shown in the image below:

- Next, make sure you are in a well-lit room.
- Next, make sure you are zoomed out all the way to 18mm.
- Rotate the command dial to change the shutter speed to 1/60. Similarly, change the ISO to 3200. These settings should be good enough for a room that is lit by an average amount of lighting but if you already know the concept of how the light meter works, then you can use the ISO value that gets the meter in the center.
- Since we want to keep the cup sharp and blur the background, make your f-stop value f3.5.
- Now you may think you are ready to take the shot, but just hold on for a moment. There are three important steps that we have to follow to make sure we get a good shot:First, make sure the immediate background behind the cup is far away from the cup. There should be nothing immediately behind the cup. Let the background be a few feet away from the cup like you can see in the image above.The second thing to remember is that you should try and shoot in such a way that the camera is line with the cup. That means you can either keep the camera on the table or bend down a bit so you can go lower. But avoid shooting from a completely up-to-down angle. The reason for doing this will be explained after you take the shot. Again, see the image above for a better understanding.The third thing to remember is that you should go as close to the cup as possible. You can do this either by physically going close or zooming in. Zooming in from far solves the problem of the lens not being able to focus when the subject is very close to the lens as we saw in the first shot we took. So your job should be to zoom in so much that you can make the cup appear very big in the frame (on your LCD screen in live-view). There should not be too much empty space around the cup. Again, the reason for doing this will be explained after you take the shot. See the image below to get a better understanding:

Now, we’re all set to take this shot. Make sure your focus mode is set to AF on your lens. Next, make sure the focus point is touching the cup as the cup is our main subject, just like shown in the image above.Next, half-press the shutter button to lock the focus. Once the focus is locked on the cup, press the shutter button all the way down to take the shot.You should get a shot which looks like this:

You can see that the cup is in focus and the background is blurred.You achieved this shot using the aperture.And now is the time to explain why we followed the additional three steps we took.
The first step was that you had to make sure the background was slightly far away from the cup. This is because the farther away the background is, the more blurred it will be because the more out of the area of focus it will be.
The second step was to make sure you are shooting in line with the cup. The reason I asked you to do this is so that you avoid shooting from an up to down angle. When you shoot from an up to down angle, most of the background becomes the surface of the table on which the cup is kept. Since this surface is very close to the cup, it comes within the area of focus, and hence seems sharp. The moment you move your camera in line with the cup, the background becomes something which is far away from the cup.
Hence these first two steps were carried out to achieve one objective – to make sure the background is far away from the cup so it gets blurred more.So remember whenever you are trying to shoot anything in which you want to blur the background, it always helps if the background is far away from the subject.
The third step we took was to make sure we moved in close to the cup so the cup appeared big enough in the frame. We did this either by going physically close or zooming in. The reason we do that is because the closer you are to the subject, the more blurred the background will be. That’s why whenever you are trying to blur the background, it’s advisable to fill the frame with the subject.
For example, if you’re shooing a person, make sure they are appearing big enough in the frame. If they appear very small in the frame, it means you haven’t got close enough to them and the resulting background won’t be too blurred. So zoom in and get them big in the frame and then shoot.
So if we have to summarize, there are three important things to remember when it comes to achieving a shallow depth of field to get a blurred background:
- Make sure the f-stop number is the minimum.
- Make sure the background is far away
- Make sure you are as close to the subject as possibleOnce you have accomplished these three things, you are bound to get a great shot.
Examples of Images That Use a Wider Aperture (Shallow Depth of Field)
Now let’s look at some images that make the use of aperture to blur the background. Make sure you go through the commentary presented under each image:


In food photography, it’s a usual practice to place the ingredients behind the main food item and blur them slightly. For instance, when shooting this mango cake, I’ve placed the mangoes behind it and used the smallest f-stop number to blur them. But the problem here, like in most food shots, is that the ingredients are very close to the food item. So there is a good chance that they can come within the area of focus even at smaller f-stops. Hence, for food photography, it’s a must that you use a lens that allows your f-stop number to go very low so you can decrease the area of focus considerably. Now your kit lens allows you to go down only till f3.5. This may not be enough. So a better option would be to use a lens like the 50mm f1.8. This lens will allow you to go to f1.8, thereby enabling you to blur something that is very close to the subject too.


Exercise for Deeper Depth of Field (Keeping everything in focus)
Till now, we’ve been using a shallow depth of field to blur things in the background or the foreground.
But aperture is also used to keep everything in focus in a shot.
Let’s repeat the exercise we just did for blurring the background.
But this time, there will be one difference. Instead of a small f-stop number, we will use a large f-stop number because we want the background to come sharp.
So make the following changes:
- Use a large f-stop number like f22
- Use a shutter speed of 1/40
- Increase ISO to 6400 (the reason for doing this will become clear when you learn about ISO later on in the book)
Now, make sure that you are in a very well-lit room. Then follow everything like last time around and take the shot. You’ll get an image like the one below:
You can see that this time the background is in focus. This is because we used a larger f-stop number.
So anytime you have a shot where you want most of the scene in focus, you use a larger f-stop number.
Examples of Images That Use a Wider Aperture (Shallow Depth of Field)
This is typically done for landscape shots like below:


In all the shots above, it’s important that everything comes in focus. So for landscape shots, we use a higher f-stop number like f11, f13, f16, f22, etc.
For example, look at the shot below:
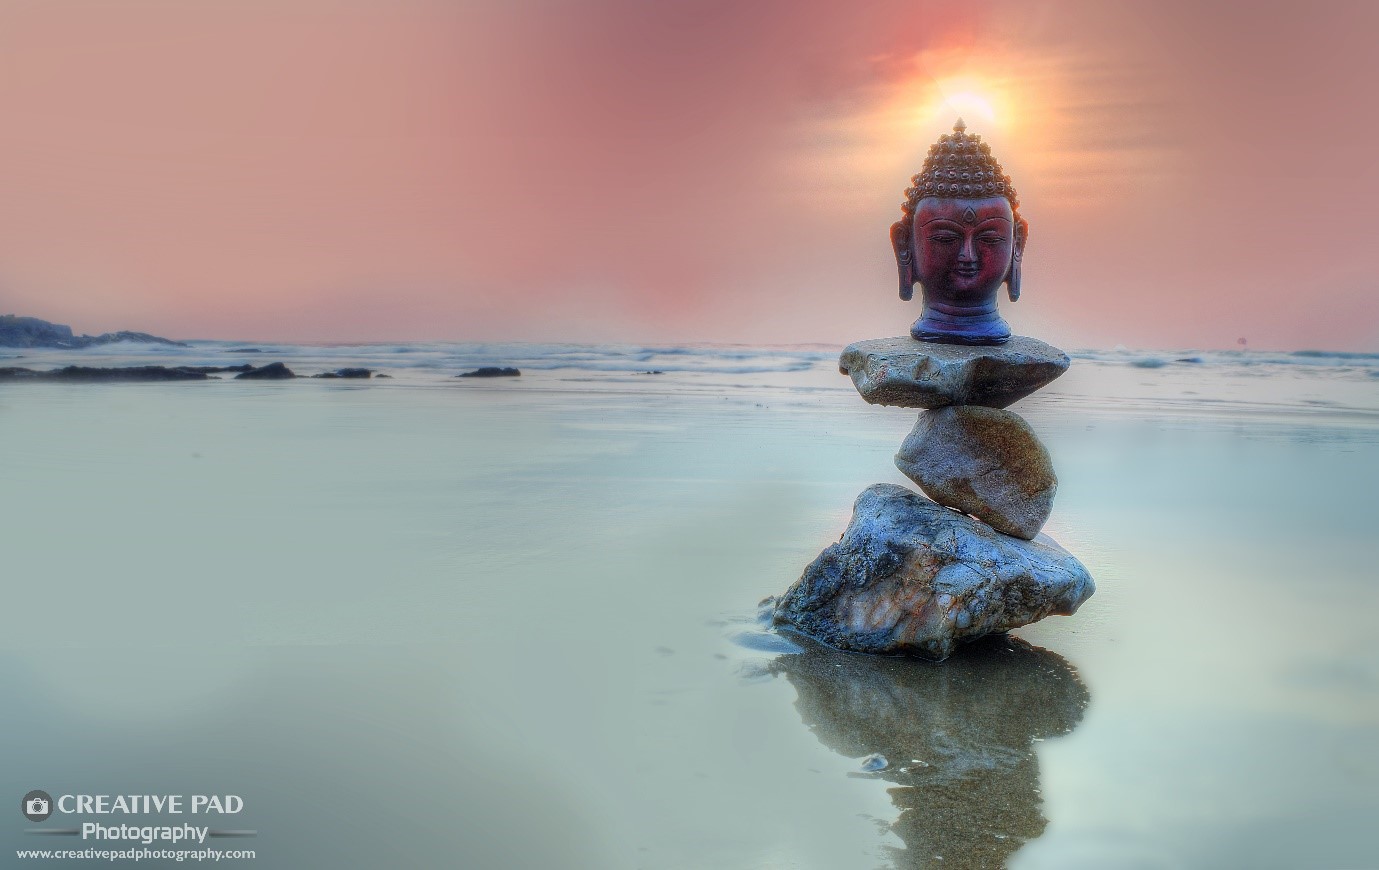
Here, if I use a small f-stop number and focus on the Buddha idol, the background will come out blurred. But since I want the whole scene in focus, I have to use a higher f-stop number. I have used f16 here.
Terminology Associated With Aperture
Here’s some terms that are frequently used in when it comes to talking about stuff related to aperture:
Bokeh
Bokeh refers to the blurred background we have been talking about. For instance, shots like the Diwali diya one that you saw before where the lights behind were blurred, are referred to as bokeh effect shots.
Shooting wide open
Shooting wide open refers to using a smallest f-stop number. Why? Because at smaller f-stop numbers, the aperture hole is open wide.
Depth of field
As we already learned before, this refers to the area that is in focus in a shot.
A fast lens
A fast lens refers to a lens which allows you to use a very low f-stop number, like f2.8, f1.8, f1.4. The reason they are called fast lenses is because they allow you to use higher shutter speeds.
So I hope this has given you a good grasp on what Aperture does.
Now let’s move on to the next important setting in the manual mode called Shutter Speed.
Shutter Speed
What is Shutter Speed and What Impact Does it Have On Our Shots?
In order to understand what shutter speed is, let’s look at the diagram below:

We had seen that the first barrier that the light coming through the lens has to cross is the aperture.
Depending on the f-stop number we use, the aperture hole can be wide open or closed.
So using a lower f-stop number like f3.5 allowed a lot of light whereas using a higher f-stop number like f22 allowed less amount of light to go in.
We also learned before that once this light goes through the lens, it reaches the sensor, which is responsible for creating the image.
But there is one more barrier in between the light allowed by aperture and the sensor.
And that is the Shutter.
What exactly is a Shutter in a camera?
In the diagram above, you can see that the shutter is represented in purple.
You can imagine it to be like a gate that opens and shuts.
When it opens, it allows the light that was allowed by the aperture to come in and finally reach the sensor. And then it shuts.
And when does it open and shut?
When you press the shutter button to take the shot.
It’s actually two curtains, one that goes up to reveal the light and another that follows it to shut everything.
But you really don’t have to worry about how the shutter actually works. Our focus is on shutter speed.
What is Shutter Speed?
So now you know that pressing the shutter button opens and closes the shutter. When the shutter is open, the light reaches the sensor.
But the shutter also has to close before the shot is complete.
And the time for which the shutter remains open is called as the shutter speed.
The unit of measurement for shutter speed is seconds.
For example, if the shutter speed is 1/30, then it means that when you pressed the shutter button to take a shot, the shutter will remain open for 1/30th of a second.
You already know how to change the shutter speed on the camera when it’s in the manual mode.
You have to rotate the command dial.
If you rotate it turning it rightwards, you’ll notice that the shutter speed starts to become faster and faster, like, 1/30 to 1/60 to 1/125 to 1/250 and so on. Please note that in some cameras, this figure may be denoted just by the denominator and not the whole fraction, i.e. 30, 60, 125, 250 and so on.
These are faster shutter speeds because the shutter remains open for an extremely short amount of time. For example, if the shutter speed is set to 1/250, it means when you press the shutter button, the shutter will open and close in 1/250th of a second. Can you imagine how fast that is? We’ll soon see how it impacts your shot too.
If you rotate the command dial leftwards, you’ll notice that the shutter speed starts to become slower and slower, like, 1/10, 1/5, 0.3, 1”, 2”, 3” and so on. The inverted commas mean that the shutter speed has gone into full seconds. For example, 1” means a shutter speed of 1 second.
These are slower shutter speeds because the shutter remains open for longer periods of time. For example, if the shutter speed is set to 3”, it means when you press the shutter button, the shutter will open and close in 3 seconds.
So what does shutter speed do to our photos?
Relationship Between Shutter Speed and Light
So now that we know what the shutter speed numbers mean, it’s time to see how shutter speed impacts the shots we take.
Just like in case of Aperture, shutter speed controls the amount of light coming in the camera.
At a faster shutter speed, something like, 1/250th of a second, the shutter closes down very quickly so it allows very little light to reach the sensor. So at a faster shutter speed, there is a good chance that the photo can come out underexposed.
Conversely, at a slower shutter speed, something like 1 second, the shutter closes down at a slow pace so it allows a lot of light to reach the sensor. So at a slower shutter speed, there is a good chance that the photo can come out overexposed.
But just as we saw in case of aperture, the relationship with light is of secondary importance to us at the moment.
What is more important is how shutter speed impacts a shot.
This is where the next relationship comes into play.
Relationship Between Shutter Speed and Movement
Shutter speed is responsible for freezing and blurring movement in a photograph.
A faster shutter speed freezes movement and a slower shutter speed blurs movement.
So let’s look at the shot below:
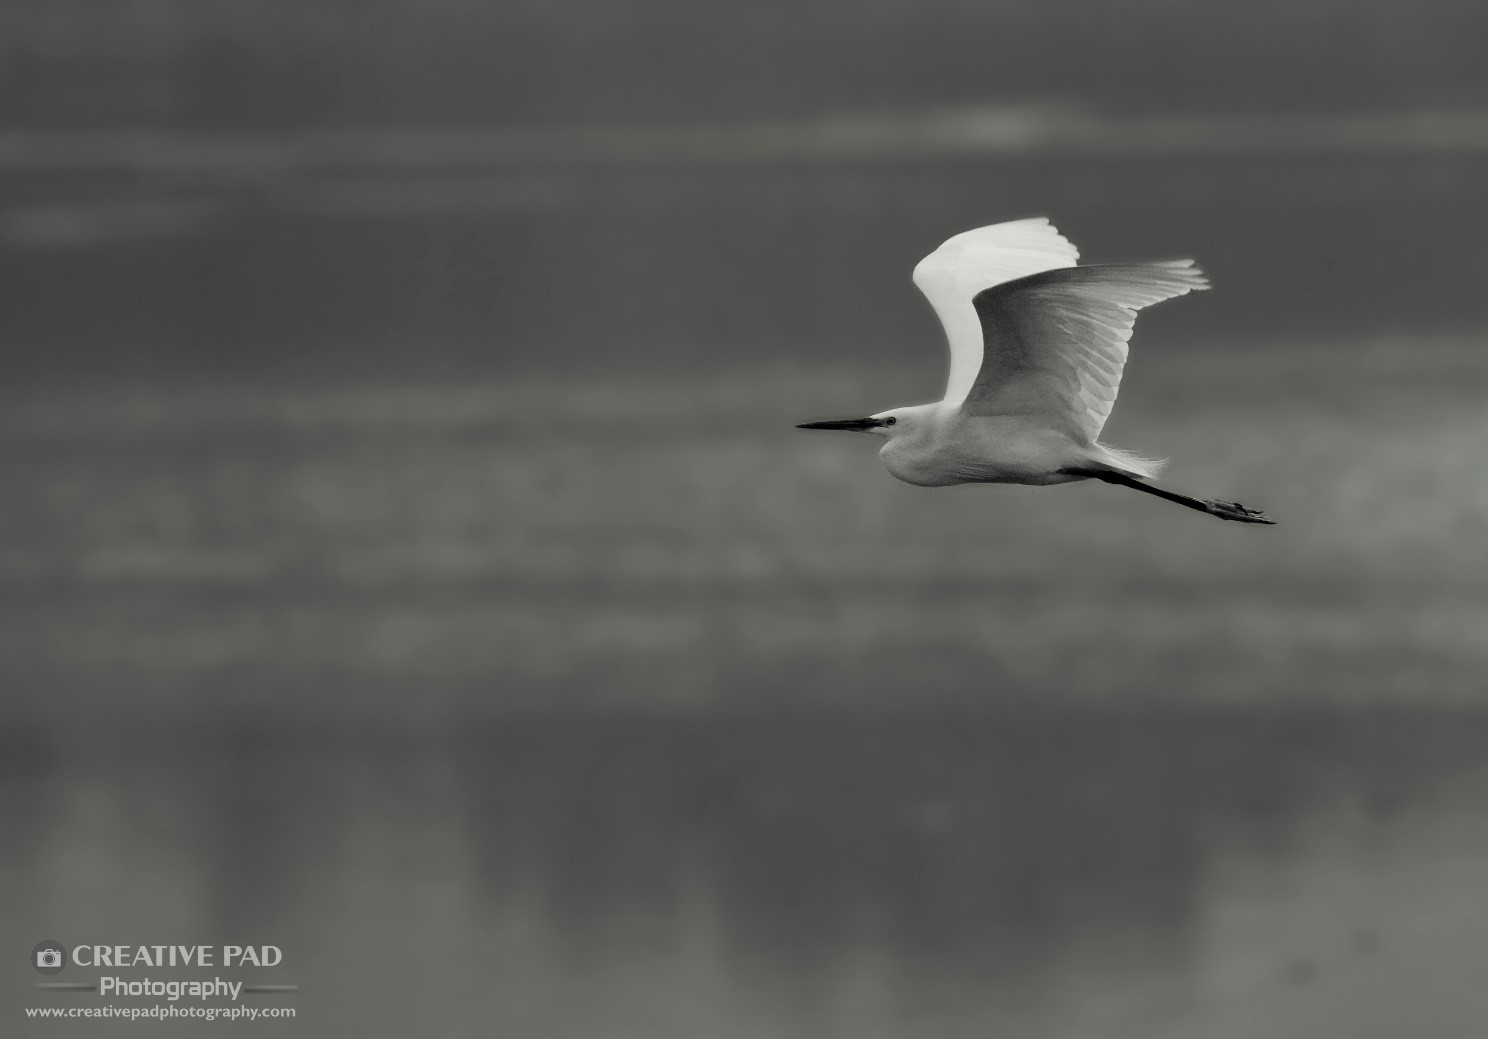
In this shot, I’ve captured a flying bird. To freeze the movement of such a fast moving subject, you have to increase the shutter speed. For instance, in this shot, I have used a shutter speed of 1/1250. This means that when I pressed the shutter button to take this shot, the shutter only allowed the light to pass through to the sensor for 1/1250th of a second.
Can you imagine how fast that is?
So you can think of it in this way – the sensor “saw’ this scene only for 1/1250th of a second and hence what it gave out was what happened for a fraction of a second.
So it results in freezing anything that was moving.
Later on we’ll be looking at more such shots.
But first let’s see what happens when the opposite is the case, i.e. when the shutter speed is slower.
Look at the shot below:
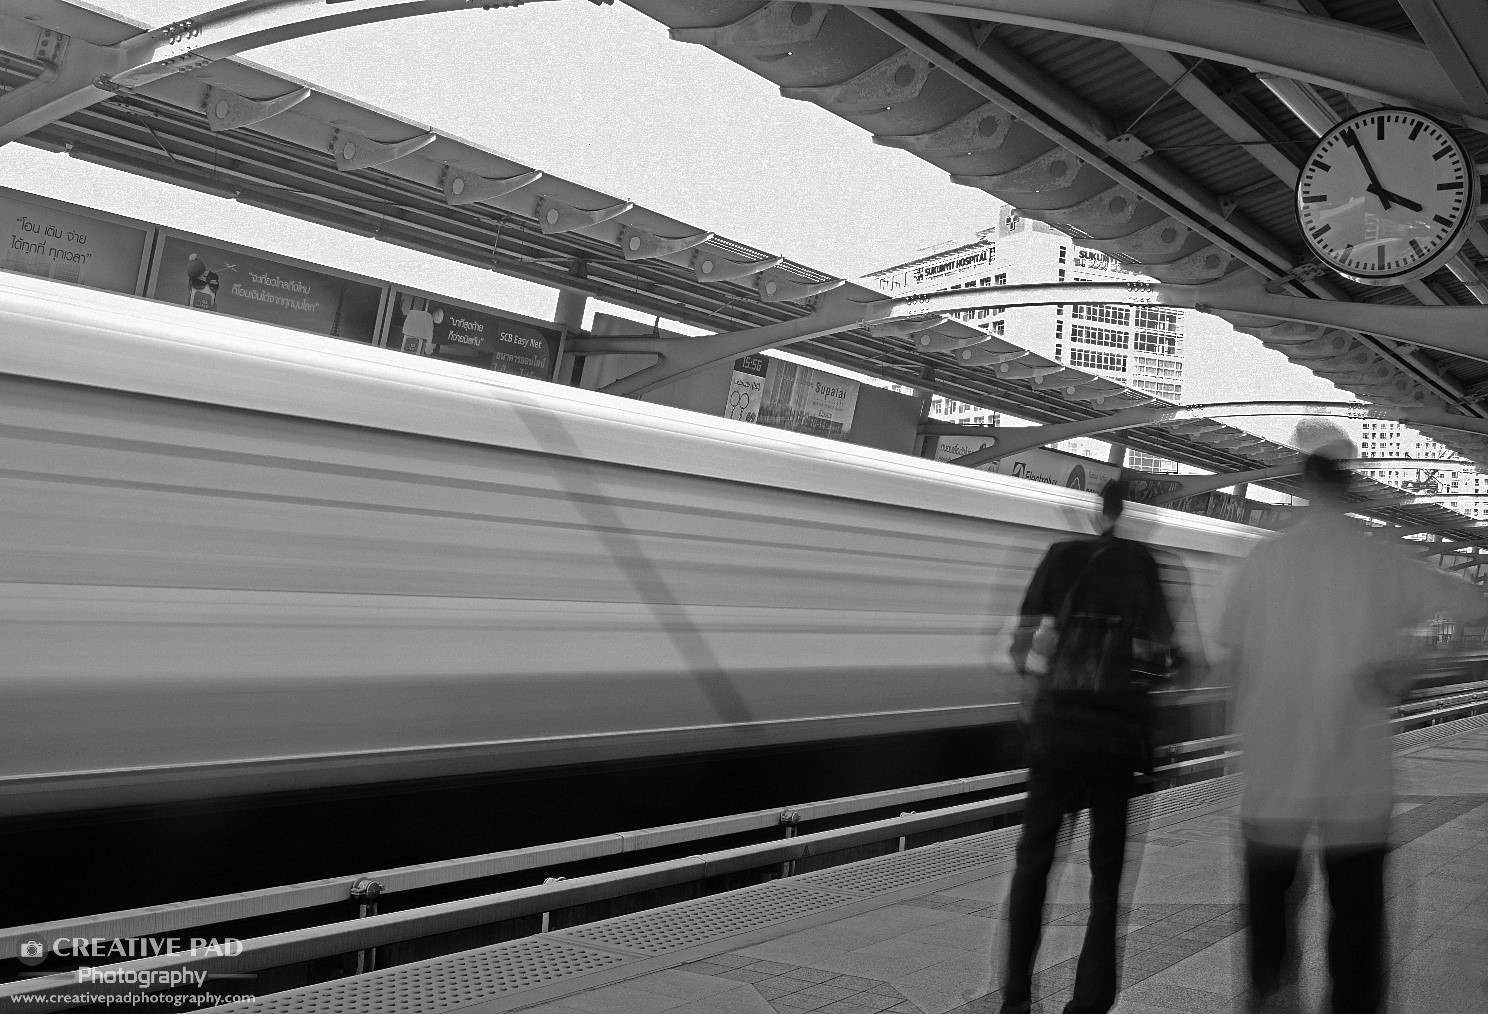
This is a shot I’ve taken at the Sky Train station in Bangkok, Thailand. For this shot, I have used a shutter speed of 2 seconds.
Now carefully see what has happened because of this shutter speed.
Just like a faster shutter speed freezes movement, a slower shutter speed blurs it.
If you see the two people in the shot, you can see that they are a bit blurred.
This is because they must have moved during the two seconds that it took the camera to complete the shot.
The same is the case with the train. You can see the blur effect on it. This is because it was moving for those 2 seconds that the shot lasted for.
But have a look at the clock on the top right corner. You can see that it’s tack sharp.
Why?
Because it wasn’t moving. So a slower shutter speed only blurs that object which is moving.
I’ll be showing you a lot of fast and slow shutter speed shots very soon.
But before that it’s time to do an exercise.
Exercises for Shutter Speed
Let’s do an exercise to understand how a fast shutter speed affects a shot.
Watch the video below to see what to do. Alternatively, you can read the description too.
Using a Fast Shutter Speed to Freeze Movement (Video)
Video for Nikon Users
Video for Canon Users:
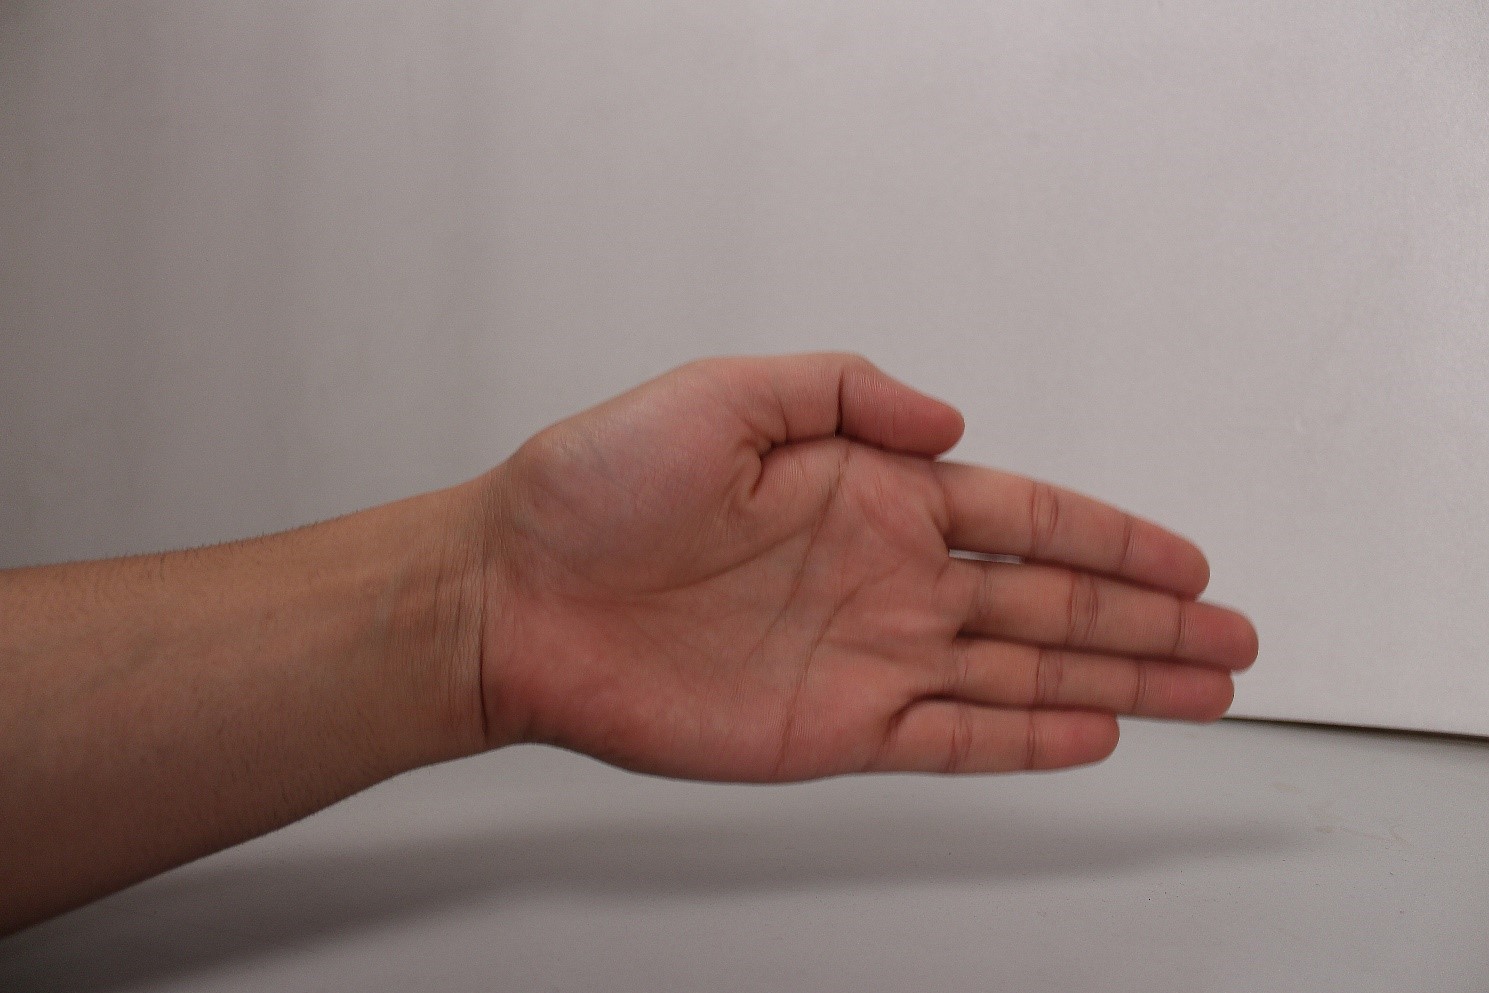
- First of all, make sure you are zoomed out all the way to 18mm.
- Next, change your shutter speed to 1/160 since this is a fast shutter speed shot.
- Change the f-stop number to f3.5
- Change the ISO so the value that brings the light meter in the center.
- Hold the camera with your dominant hand and put your other hand in front of the camera, like shown in the image below:

- Now half press the shutter button to lock the focus on your hand.
- Once the focus is locked, keep the shutter button half pressed and start moving your hand in an up and down fashion, like you’re waving.
- Press the shutter button all the way down to take the shot.
- You’ll see that the resulting shot looks like this:

- You can see that even though you were moving your hand, it came out frozen in the shot. This is because you used a slightly faster shutter speed.
- If you find that your hand came out blurred, then that means your hand movement was too fast for 1/160, so try it with even a faster shutter speed, like let’s say 1/200. There is no fixed shutter speed for any scenario. The adequate shutter speed always depends on how fast the movement is. The faster the movement, the faster the shutter speed that is required to freeze the movement. Also, if your shot came a bit underexposed (dark), just increase the ambient light in the room or increase the ISO value to something higher than what you used. You’ll soon be understanding the reason behind that when we learn about the exposure meter in the future chapters.
This time, let’s do an exercise to understand how a slow shutter speed affects a shot.
Watch the video below to see what to do. Alternatively, you can read the description too.
How to Blur Movement Using a Slow Shutter Speed (Video)
Video for Nikon Users:
Video for Canon Users:
- For this shot, everything is almost the same as the last shot, except for the shutter speed and ISO. Since this is slow shutter speed shot, I want you to change the shutter speed to 1/10. Change your ISO to 100 if you’re in a well-lit room or ISO 400 if you’re in a slightly dimly lit environment.
- As before, hold the camera with your dominant hand and put your other hand in front of the camera, just like we did before in the last exercise.
- Now half press the shutter button to lock the focus on your hand and take the shot of your moving hand.
- You’ll see that this time, the resulting shot looks like this:

- You can see that this time your hand came out blurred. This is because you used a slightly slower shutter speed.
- If you find that your hand did not come out blurred, then that means your hand movement was too slow for 1/10, so try it with even a slower shutter speed, like let’s say 1/5. Alternatively, try to move your hand a bit faster.
Fast Shutter Speed Examples
To start off, let’s look at some fast shutter speed shots. Go through the commentary below to get more details about the shots:


Using Burst Mode with Faster Shutter Speeds
Look at the following fast shutter speed shot that we saw before:

As explained before, I have taken this shot at a shutter speed of 1/1250. That means the camera captured this moment in 1/1250th of a second. That is why it’s able to capture the splash made by the falling ice cube.
But if you’ve got your thinking hat on, you must be wondering how is it possible to take the shot at the exact moment the splash took place.
The answer lies in using burst mode.
Burst Mode
Burst mode refers to the function that allows you to take multiple shots in one go.
So you all you have to do is to press the shutter button once and your camera will keep on taking shots till you keep the shutter button fully pressed.
This is really important in most of the fast shutter speed shots as the subject is moving fast and relying on one shot can be a recipe for disaster.
To switch on the burst mode, follow the steps below:
Watch the video below to see what to do. Alternatively, you can read the description too.
Using Burst Mode (Video)
Video for Nikon Users:
Video for Canon Users:
- Search for a button that has an icon that looks like
- The placement of this button may differ from camera to camera. The below images are for Nikon D5300 and Canon 700D.


- Once you press the button, select the burst mode option, like shown in the image below for Nikon and Canon cameras respectively:


- To test the burst mode, just lock focus on some object and keep your shutter button pressed after you take the shot. You’ll hear the camera taking multiple shots, which will almost make it sound like a machine gun firing.
- You can try the burst mode for doing the fast shutter speed exercise we performed with the moving hand (watch the video).
So burst mode really helps you in increasing your chances of getting a shot right and is really a must any time you want to take a shot where you have to freeze something that’s moving really fast.
Slow Shutter Speed
When it comes to slower shutter speeds, your first reaction may be that it’s not a good thing because it ends up blurring motion, just like we saw in the moving hand exercise before.
But you’ll be surprised that a slow shutter speed can be used so creatively that it is perhaps the most famous form of photography which is referred to as long exposure photography.
We’ll be learning about long exposure photography in detail in the future chapters, but for now, we’ll focus on understanding its basics.
As you’ve seen before, a slower shutter speed blurs movement. Normally, that can be a bad thing because it doesn’t result into sharp photos.
But sometimes blurring certain things can end up creating very beautiful photographs.
For instance, let’s take the example of water. Take a look at the following shots:
If you notice, both the shots are of the same waterfall. But the one on the right looks much better because the water looks silky and smooth.
The waterfall on the left has been shot using a shutter speed of 1/160, which is a fairly high shutter speed.
What that does is, it freezes the movement of the waterfall, resulting in a normal looking waterfall shot. That’s why in the auto mode, you will always get a shot like the one of the left because by default the camera likes to keep a higher shutter speed to avoid blurring anything.
The shot on the right uses a shutter speed of 1/3. Now this is a much slower shutter speed and the water is moving really fast. So what this does is, it blurs the moving water.
And when water is thrown into a blur, it actually ends up looking very good.
You can see that whatever was not moving, like the rocks, the branches and the trees have all come out sharp.
So in order to click such shots, all you have to do is to reduce the shutter speed. These kind of shots require the usage of a tripod, but that is something we won’t look into at this moment. It will be covered later on.
Slow Shutter Speed Examples
Slower shutter speeds can be used very creatively, just like we saw in the example before. Let’s look at a few more examples where using a slower shutter speed can do wonders to our shot. Do go through the commentary under each shot to understand the concept behind it. The exact step-by-step methodology behind taking these shots will be explained in the chapter Long Exposure Photography because by then you will have learned the usage of Tripod, something which is very essential in slow shutter speed shots. But for now, let’s look at the different types of shots in which a slower shutter speed can be used:
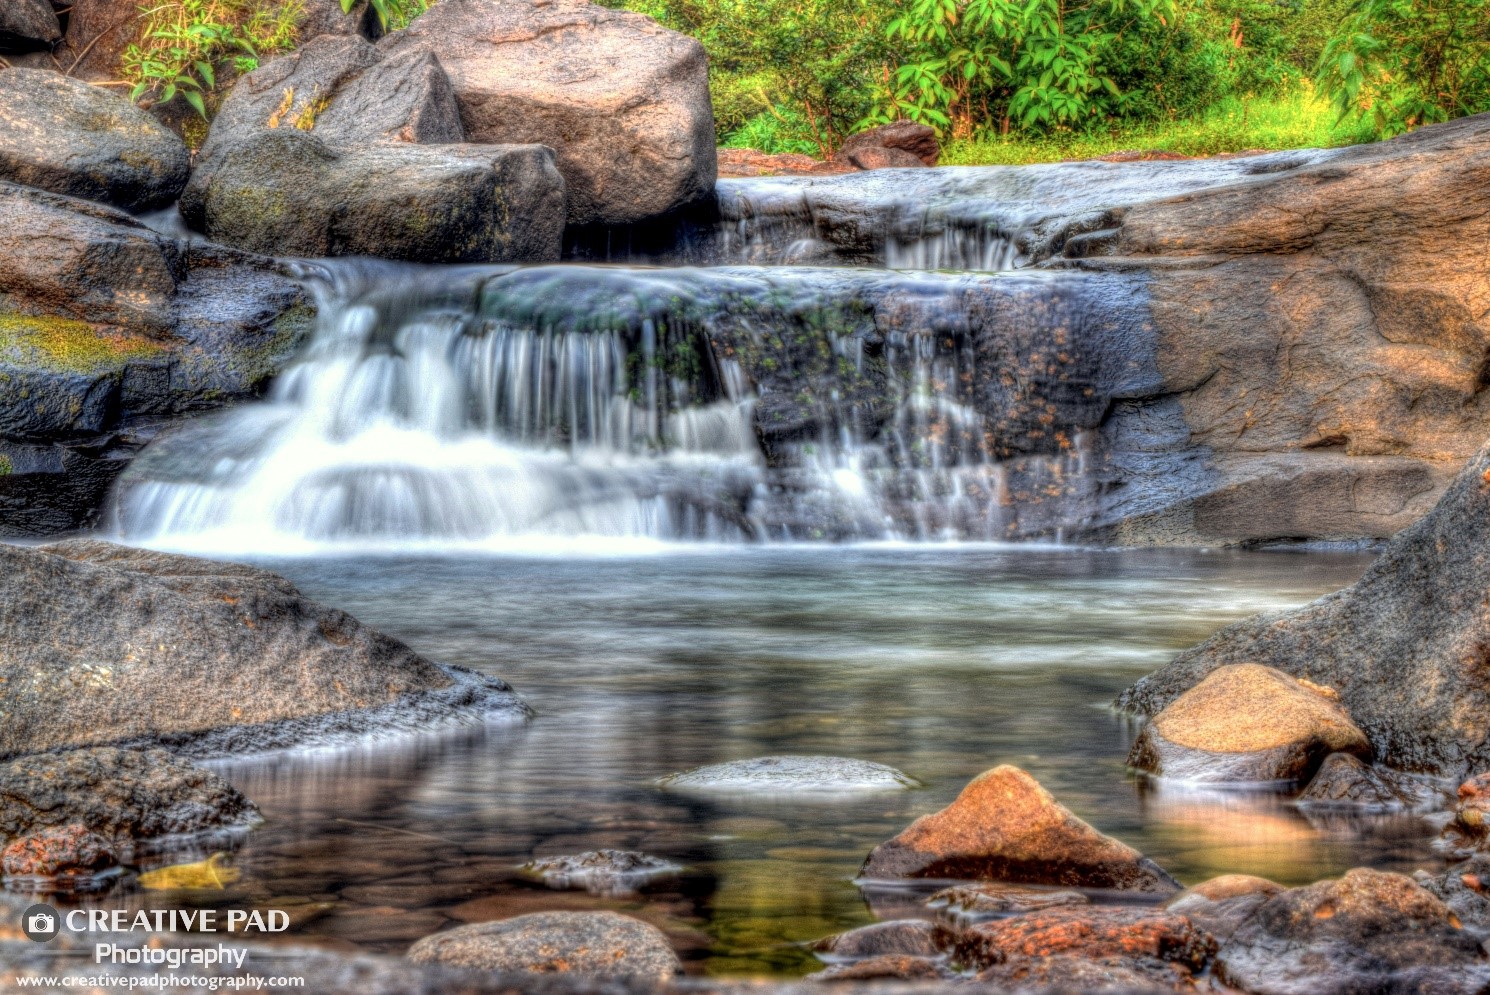
Shooting Waterfalls
As we just learned, waterfalls present a great opportunity to use a slower shutter speed. See the shots below:


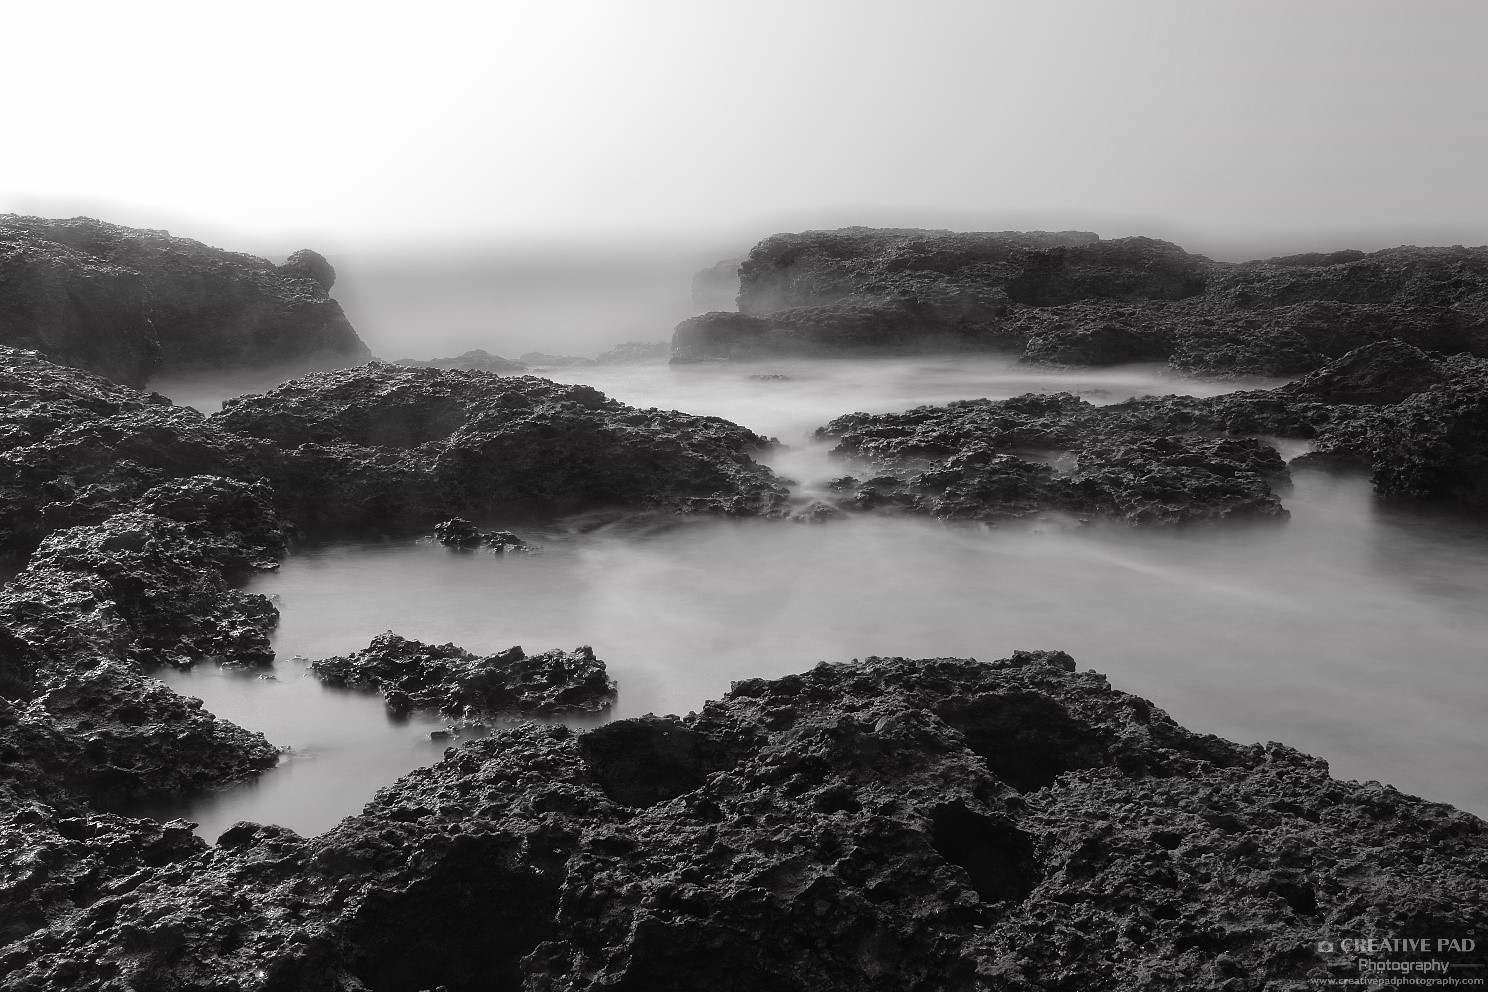
Shooting Seascapes
Just like waterfalls, seascapes present the perfect opportunity to make the water look smooth by using a slower shutter speed. Look at the shots below:

Shooting Light Trails
Light trail photography is perhaps one of the most popular type of photography where a slow shutter speed is used to create dramatic effects.
You know when the shutter speed is slow, the camera blurs movement. But when it comes to light, it does something even more dramatic.
It captures the entire movement of light for the duration for which the shutter was open.
For example, if the shutter speed is 5 seconds, and you take a torch and make a heart shape using the light, the camera will produce an image where you’ll actually see the heart shape you created. That is because it records the entire movement of any kind of light that comes into the scene. We’ll soon be doing an exercise for this too.
For now, look at the shot below:
For now, look at the shot below:

These type of shots are very popular in DSLR photography. Here, I have used a shutter speed of 30 seconds. These 30 seconds have captured the movement of the headlights and taillights of the cars that were going on the bridge. The exact step-by-step methodology to take such a shot will be explained in the section on long exposure photography.
Let’s look at a few more light trail shots:


I hope this has given you a good understanding of the concept and application of Shutter Speed.
There is one more very important setting in the manual mode, which is ISO. So let’s see what that is.
ISO
What is ISO and what relationship does it have with noise?
ISO (International Standards Organisation) refers to the sensitivity of the sensor to light and its ability to amplify or modify the light signal.
For instance, let’s assume the following situation:
Let’s say you are shooting at a place where there is less amount of ambient light with the following settings:
F22
Shutter Speed: 1/500
Now you know that both these settings are restricting the amount of light reaching the sensor. Because aperture is set to f22, the aperture opening is very narrow as we saw when we were learning how aperture works. So the amount of light entering the camera is low.
The shutter speed is 1/500, which means the shutter opens and closes in 1/500th of a second, which is very fast. So out of the very less light that came into the camera due to a narrow aperture, even more amount of light gets cut because the shutter closes immediately.
The result is that very less amount of light reaches the sensor.
We know that the sensor absorbs light to produce the image.
Since very less amount of light reached the sensor, the image is likely to be underexposed or dark.
But there’s still a way out.
And that is by changing the sensitivity of the sensor to light. If we can make the sensor more sensitive to light, then it can do its job even with a less amount of light by amplifying the light signal.
So the question is how to increase the sensitivity of the sensor?
The answer lies in changing the value of ISO.
If you increase the ISO value, the sensor becomes more sensitive to light and vice-versa.
This basically means that if you increase the ISO value, it will make your shot brighter and vice-versa.
Relationship Between ISO and Exposure
So ISO has a simple and direct relationship with exposure. The more the ISO, the brighter the shot.
Similarly if you decrease the ISO number, the shot starts to become darker as the sensor becomes less sensitive to light.
But this comes at a cost. And that cost is referred to as NOISE.
Noise is an annoying phenomenon in photography, which refers to the formation of bad looking grains in the photograph, like in the shot below:

So how does ISO relate to noise?
Relationship Between ISO and Noise
The higher the ISO, more the noise. That means if you use higher ISO values, you will start to get more grains in your shot.
ISO 100, which is usually considered the base (though some cameras can go below that too), results in the cleanest picture as the ISO is the lowest.
Look at the two images below:


If you look at the images, they are almost identical. The exposure of both the images is correct. That means they are of the perfect brightness, not too bright and not too dark.
But there is one significant difference – and that is that the second image contains a lot noise and hence, looks very grainy.
The first image looks nice and clean.
This is because, the ISO used in the first image is 100 and the ISO used in the second image is 6400.
Because of such a high ISO, the image is very noisy and it doesn’t look good.
Hence, in photography, one of the golden rules is that shooting at lower ISO is a good thing and shooting at higher ISO is to be avoided whenever in our control.
You’ll learn more about ISO as we move on.
Now the you have learned about all the three settings individually, let’s see how they all work together. For this you’ll have to understand the concept of an exposure triangle and one very important feature in your camera called the light meter. So let’s go there.
How Aperture, Shutter Speed and ISO work together – Understanding the Exposure Triangle
Aperture, Shutter Speed and ISO together is referred to as the Exposure Triangle because these settings help you take shots with the correct exposure.
And understanding this exposure triangle is the key to understanding how photography really works.
And the tool that will assist us in learning this is called as the light meter.
Light Meter
Look at the images below from Canon and Nikon cameras respectively:

The highlighted part is the light meter.
It basically looks like a number line with different markings.
As the name suggests, the light meter determines how much light is coming into the camera.
Basically, that means it tells you whether the shot that you are about to take will come out overexposed (too bright), underexposed (too dark) or of the perfect exposure (not too bright, not too dark).
What Does the Light Meter Signify?
When the meter is pointing to the right (positive side), like shown in the image below, it means that there is lot of light reaching the sensor and the shot that you are about to take will come out overexposed.

So you can get a shot that looks like the one below:
he more away from the centre it is, the more overexposed it will be.
Note that in some cameras, the positive and the negative sides are the other way round. Also, in Canon cameras, you have to half press the shutter button to activate the meter pointer.
When the meter is pointing to the left (negative side), like shown in the image below, it means that there is less amount of light reaching the sensor and the shot that you are about to take will come out underexposed.

So you can get a shot that looks like the one below:
The more away from the centre it is, the more underexposed it will be.
What you have to aim for is for the meter to be in the centre like in the image below:

When it’s near the centre, you will get a well exposed image which will neither be too bright nor too dark.
How to Change the Reading on the Light Meter?
Watch the video below to see what to do. Alternatively, you can read the description too.
How the Light Meter Works (Video)
Video for Nikon Users:
Video for Canon Users:
The reading on the meter changes when you change the value of any of the following: Aperture, Shutter Speed and ISO.
Depending upon whether that change resulted in letting more light into the camera or less light into the camera, the meter will move accordingly.
For instance, let’s say the f-stop was f11 and we decided to open up the aperture by lowering the f-stop number to f3.5.
This will mean more light is coming into the camera. Hence the meter will start to move towards the positive side.
Similarly, let’s say the shutter speed was 1/500 and we made it 1/1000. This meant that the shutter now closes at even faster than before. So this will cut out the light reaching the sensor and hence the meter will move towards the negative side.
Going by the same logic, any changes in ISO make the meter react in a similar way. Suppose the ISO is 1600 and you change it to 400. As a result, the sensor becomes less sensitive to light, which as we learned before, basically means the shot is going to be darker than before. Hence, the meter starts to move to the negative side.
Just play around with the settings and see how the meter reacts. You’ll start to understand that the meter is basically reacting to the light coming inside the camera. More specifically, it is reacting to the sensor’s reaction to light.
I want you to try one more thing.
Just point your camera somewhere where this is a lot of light, like at a bright window or a tube light.
You’ll see that the meter moves towards the positive side. This because when you are pointing your camera towards something bright, more amount of light comes into the camera.
Next, point your camera towards something that is in shadows or in a dark area, like the inside of a cupboard.
This time you’ll see that the meter starts to move towards the negative side.
This will make you understand that everything in photography revolves around four things: Aperture, Shutter Speed, ISO and the environment you are shooting in.
Goalkeeper Case Study
Just to make your understanding of the light meter better, let’s look at an example here.
Let’s assume that the editor of a sports magazine has approached you to take a few shots of a football match that they want you to cover for them.
The goalkeeper of one of the teams playing in the match is a renowned professional. They’ve specifically asked you to take a lot of shots of him when he’s in action, most preferably when he has jumped in the air to stop a shot.
The editor tells you that as long as the goalkeeper is sharp in the shot, nothing else really matters.
So let’s say we are talking about a shot that looks like the one below:
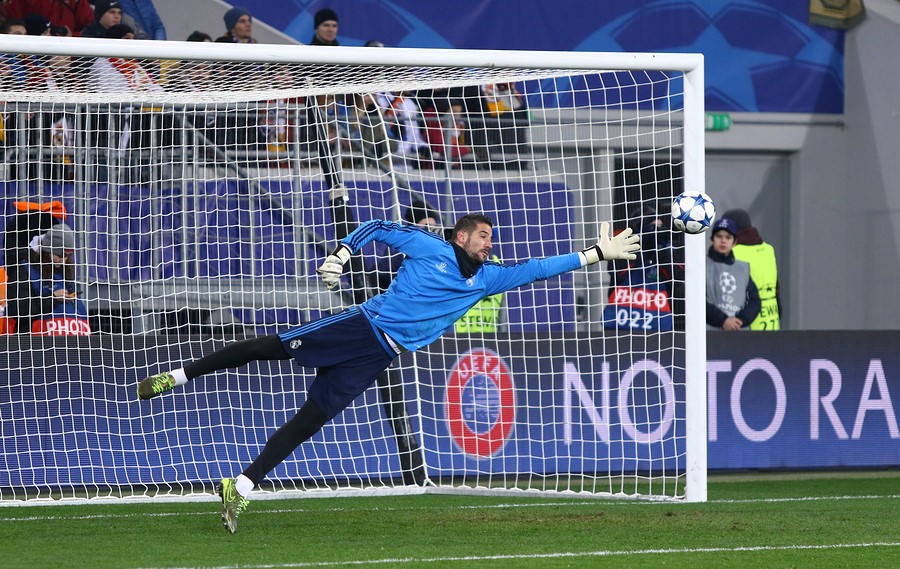
Can you guess what will be the most important setting here?
If you guessed shutter speed, then you’re correct!
Because we have to freeze the goalkeeper in flight, shutter speed is the most important setting.
Let’s say we are getting ready to take this shot and our camera is set to the following settings:
Aperture: f22
Shutter Speed: 1/10
ISO: 400
You know that you cannot go ahead with these settings and take the shot because a shutter speed of 1/10 will end up blurring the goalkeeper as he’s moving very fast.
Let’s say that for this particular shot, we need a shutter speed of 1/1000 to freeze the keeper.
So the first thing you would do is to increase the shutter speed to 1/1000.
Now how will this impact the light meter?
Because you went from 1/10 to 1/1000, the meter will start to move towards the negative side, indicating that you are losing light.
So if you were to take the shot right now, you would be able to take the shot but it would come out underexposed, like shown in the image below:

So how can you solve this problem?
You will have to use some other setting to raise the exposure of the shot.
An amateur photographer may straight away jump to increasing the ISO.
Even though that can solve the problem, ISO should not be the first thing that should come to our mind because increasing the ISO also increases noise.
So a better way to let in more light into the camera would be through aperture.
Right now the aperture is set to f22. This means that the aperture hole is really narrow and therefore, restricting a lot of light from coming into the camera.
So if we go from f22 to f3.5, we can save a lot of light.
But before doing that, you have to think of the impact this will have on the look of your shot.
You know that at a smaller f-stop number the background will get blurred.
So you have to ask yourself the question – Is blurring the background here a good thing or a bad thing?
The answer to that will lie in the objective of the shot.
Remember that the editor told us that the most important thing in the shot is that the goalkeeper comes sharp.
So we have the liberty to blur the background. In fact blurring the background will make the goalkeeper appear even sharper as he will be more isolated.
So going from f22 to f3.5 will help us in two ways – blur the background and save light.
As you go from f22 to f3.5, you’ll start to see that the meter starts to move towards the positive side.
Let’s say at f3.5, the meter comes in the centre.
Now you are ready to take this shot. The shot will look something like this:

You can see that the background has got a bit blurred but that’s fine because the goalkeeper is still sharp and that was our main objective. (The shot here looks unreal because I’ve added the blur in Photoshop just to make a point).
More importantly, it’s a clean looking shot because we never had to raise our ISO as we used aperture to save light.
Now, let’s add a little twist to this plot.
Let’s say that the editor tells you that the viewers need to see the surroundings, so getting the background sharp is equally important.
Now this spells trouble. Why? You’ll soon come to know.
Your shutter speed is set to 1/1000.
The aperture is f3.5.
The ISO is 100 and the meter is in the centre.
But you cannot go ahead and take shot because of the new requirement that has been put forth by the editor.
You know you have to get the background sharp too this time.
So the first thing you will do is to increase your f-stop number. Let’s say we go from f3.5 to f16.
F16 should do the job, but what impact does it have on the meter?
Since we just made the aperture hole narrower, the meter will start to move towards the negative side.
Now, if we take a shot, it’ll have the goalkeeper and the background sharp, but will again be underexposed.
So we have to get somehow increase the exposure. So what can we do?
Can we let in light by reducing the shutter speed? The answer is no. Even though reducing the shutter speed may let in more light, we cannot risk blurring the moving goalkeeper. There is no point in having a clean looking shot if the subject itself is blurry.
Can we open up the aperture by using a low f-stop number? The answer again is no. Doing that will blur the background like in the last shot. But this time we want the background in focus so we cannot save light by aperture.
So there is only one option to bring the meter in the centre. And that is by increasing the ISO.
So you increase the ISO value till the meter gets in the centre.
Then you take the shot. It will most likely end up looking like the image below:

It’s not a desirable image as it contains a lot of noise but there’s not a lot that you could have done about it.
Just one more thing before we end this case study.
Let’s say you are the kind that just won’t give up. So you take it as a challenge to improve the last shot we took.
Let’s assume that you can ask the editor for ANY favour? What would it be?
You still have to get the goalkeeper as well as the background in focus so you definitely cannot do anything as far as the camera settings are concerned.
But can you do something about the ambient light?
Yes, you can.
Remember I said ANY favour.
So one thing you can ask is if it’s possible to direct a floodlight right in the direction of the goalkeeper.
This would increase the amount of ambient light present in the area.
This would in turn push the meter towards the positive side, thereby allowing you to reduce the ISO to get it back in the centre.
Hence, you will be able to achieve a cleaner looking shot.
Alright so now you know how Aperture, Shutter Speed and ISO work together to form the exposure triangle.
But there’s one important you need to know which is that often times you won’t have so much time to set each setting to make sure the light meter is in the middle and then take the shot. You may end up missing the shot. So you also need to know how to shoot in a quicker way. For this we will discuss about the some settings and modes like Auto-ISO, Aperture Priority Mode and Shutter Priority Mode. So let’s go there. We’ll start with the setting of Auto-ISO first.
Using Auto-ISO Can Enable You to Shoot Faster and Effortlessly
Let’s imagine a situation.
Let’s say you are out in the wild trying your hand at some bird photography. You spot a nice bird and you are all ready to take the shot.
You set a low f-stop number for the aperture because you want to blur the background.
Next, you notice if the bird is moving or not and accordingly you increase or decrease the shutter speed.
Once you’ve done that, you see where your meter is pointing at. Let’s say it’s towards the negative side.
Then all you have to do is to increase the ISO value till the time the meter is in the centre and you’re ready to take a shot.
From all the steps above, which one did you find to be the most boring and unproductive?
The answer is the last part, i.e. watching the meter and changing the ISO part.
It might be boring and unproductive, but you know that it’s essential.
But what if we could outsource this whole task of watching the meter and changing the ISO value to the camera so that it does this automatically.
Wouldn’t that save us so much time and effort?
This is where the Auto-ISO function comes into play.
Using Auto-ISO
Auto-ISO is a feature which enables you to let the camera select the correct ISO on its own.
It’s a feature which is provided in all modern DSLRs.
How it works is that the camera selects the ISO value based on the aperture and shutter speed that you have chosen.
Before we see how we can activate this feature on your camera, let’s look at another example:
Suppose you are required to shoot a dancing competition. When you start off, your camera is showing the following settings:
Aperture: F5.6
Shutter Speed: 1/40
ISO 100
The first thing you would do is to increase your shutter speed since you want to freeze the movement of the dancers. Let’s say you go from 1/40 to 1/250.
Next, let’s assume, that there is a group of dancers that you are shooting. Since you want them all in focus, you cannot use a very a small f-stop number. So let’s say you change your aperture from F5.6 to F11.
Now assuming you are shooting indoors with less light, the meter will most likely be pointing towards the negative side, thereby indicating that you need to correct the situation or else the resulting shot will be underexposed.
Now ideally in such a situation you would use the flash but flash photography is something we won’t be covering. It’s something that can be easily learned once your understanding of the exposure triangle is good.
So let’s go to ISO. We will increase the ISO till the meter comes in the centre and then shoot. Let’s assume that when we went from ISO 100 to ISO 2000, the meter came in the centre.
You would get a decent looking shot but the whole process would be a little time consuming.
Using Auto-ISO would make the last step automatic, i.e. the camera will select the ISO of 2000 on its own. There will be no need to look at meter and manually select the correct ISO. The camera would do that on its own.
If later on you take a shot where no one was moving and you decreased the shutter speed, the camera would automatically lower the ISO as lowering the shutter speed allowed in some light which helped to lower the ISO.
So all you will have to do is select the right aperture and shutter speed and then just take the shot.
The whole part of watching the meter and selecting the ISO would not need to be done manually and thus it would make your photography effortless and faster.
Exercise for Auto-ISO
Let’s do an exercise for Auto-ISO.
First of all, let’s see how to set the camera to Auto-ISO.
Watch the video below to see what to do. Alternatively, you can read the description too.
Activating Auto-ISO (Video)
Video for Nikon Users:
Video for Canon Users:
Just select Auto-ISO from where you have been selecting the ISO values, as shown in the image below:

Here’s how to do it on Nikon Cameras:
- Go to Menu
- Go to Shooting Menu
- Go to ISO Sensitivity Settings
- Turn on Auto-ISO like shown in the image below:
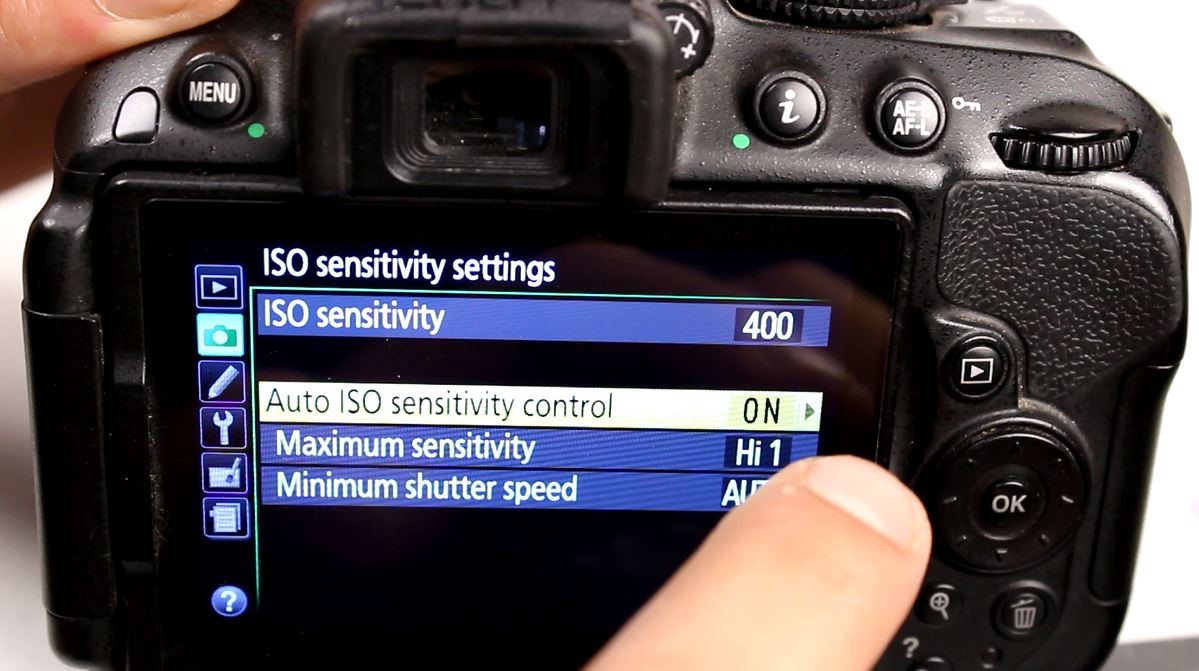
- Set maximum sensitivity to the maximum value that your camera allows.
If you have a camera belonging to any other manufacturer or brand, I request you to use the manual to see how to select Auto-ISO on your camera. It’s not a difficult task at all.
Once you’ve successfully selected Auto-ISO on your cameras, we’re ready to perform an exercise. Here’s what I want you to do:
- Set you f-stop to f8 and shutter speed to 1/30.
- Take a shot of your room
- You’ll notice that the camera selected the ISO on its own and that your shot came out of the right exposure. You did not have to watch the meter and select the right ISO.
- Next, keep everything the same, but change your shutter speed to 1/200 and then take the shot.
- Again you’ll notice that the camera automatically increased the ISO and your shot came out of the right exposure. This is because when you increased the shutter speed, the camera lost light and therefore ISO had to be increased. It’s exactly the same thing that you would have done manually. After increasing the shutter speed to 1/200, you would have noticed that the meter had gone to the negative side and then you would have increased the ISO till the meter came in the centre. But now all this was done quickly and automatically by the camera.
- Next, try changing the aperture and taking the shot. If you decreased the f-stop number, you’ll see that the camera decreases the ISO and vice-versa.
- Also, try pointing your camera to a bright source of light, like a tube light and you’ll notice that the camera automatically decreases the ISO. So basically, whatever you do, the camera increases or decreases the ISO based on whether light was decreased or increased. It’s exactly what we were doing but now we have outsourced that task to the camera.
Also you’ll notice that every shot you are taking is of the correct exposure, not too bright and not too dark. That is because when we are handling things using manual ISO, sometimes we can forget watching the meter and click a shot. In that case it can come out over or underexposed. But when we use Auto-ISO, the camera always makes sure that the right ISO is selected and that the meter is always brought to the centre. Machines don’t forget. In fact, on Auto-ISO you’ll see that the meter doesn’t move at all. That’s because it’s always fixed at the centre because the camera responds immediately to whatever you do by changing the ISO at that very moment.
So can you imagine how easy and fast Auto-ISO makes things for you? Just imagine the following situation.
Let’s say you are learning photography and you tell about this to your friends.
One of your friends is getting married soon and she asks you to cover her wedding.
In the excitement of receiving your first ever shooting job, you say YES!
But then you go back home and your become nervous. You are worried if you’ll be able to do a good job at the wedding. After all you’ve just learned how to shoot in the manual mode.
You worry if you’ll be quick enough to take the shots.
But the truth is that it’s not that difficult.
Let’s see how you can, with your current knowledge, make things very easy.
Suppose you reach the wedding venue and are getting all ready to take the shots.
Now here’s what you will do.
First of all, for most of the shots that you will be taking in the wedding, you will want to blur the background and the foreground. So basically, you’ll be using a shallow depth of field. That means you’ll be using a low f-stop number.
Though you’ll never be using a kit lens for covering a wedding in real life, let’s assume you are using it because as of now that’s the lens you are used to the most.
So you have your 18-55 f3.5-5.6 lens with you.
First thing you would do is that you would reduce your f-stop number to f3.5 so you can get a shallow depth of field. If you zoom in it’ll change to f5.6 and if you zoom out it’ll change to f3.5, but it’ll always stay in your lenses’ minimum f-stop range. So you’ll always be getting the shallowest depth of field that your lens is able to provide you.
Now you can take your mind off aperture totally.
Next, you set your camera to Auto-ISO. Now the camera will always select the right ISO for you. So your mind is taken off the meter and ISO.
That’s two important settings completely taken care of.
Now only shutter speed remains.
All you have to do now is to keep your thumb on the command dial that changes the shutter speed and start shooting.
Whenever you see a lot of movement, you increase your shutter speed and take a shot.
Whenever you see someone relatively still, you decrease the shutter speed and take a shot.
How easy is that? It’s almost as easy as shooting in automatic mode, but with one difference – and that is that unlike in the automatic mode, the shutter speed and aperture are fully under your control.
That’s why shooting in manual mode is not that difficult.
Auto-ISO should be used in any situation where you need to shoot a little quickly like in events, wildlife, sports, portraits, etc.
You can switch it off when you are in situations where you have lot of time, like in a landscape shot where you are using a tripod.
Even though here too you can use Auto-ISO, but it’s just more convenient to manually set ISO to 100 and then change the remaining settings.
Let’s move on now to the next part where you’ll be understanding the usage of one of the most important accessories in photography – The Tripod.
Using a Tripod and its Importance

A tripod is one of the most essential accessories in photography. As you’ll learn now as well as in the later parts of this book, some of the best looking and most artistic of shots cannot be taken without the usage of a tripod.
A tripod is a three legged device that allows the camera to be fixed at the top on its head, like in the image below:
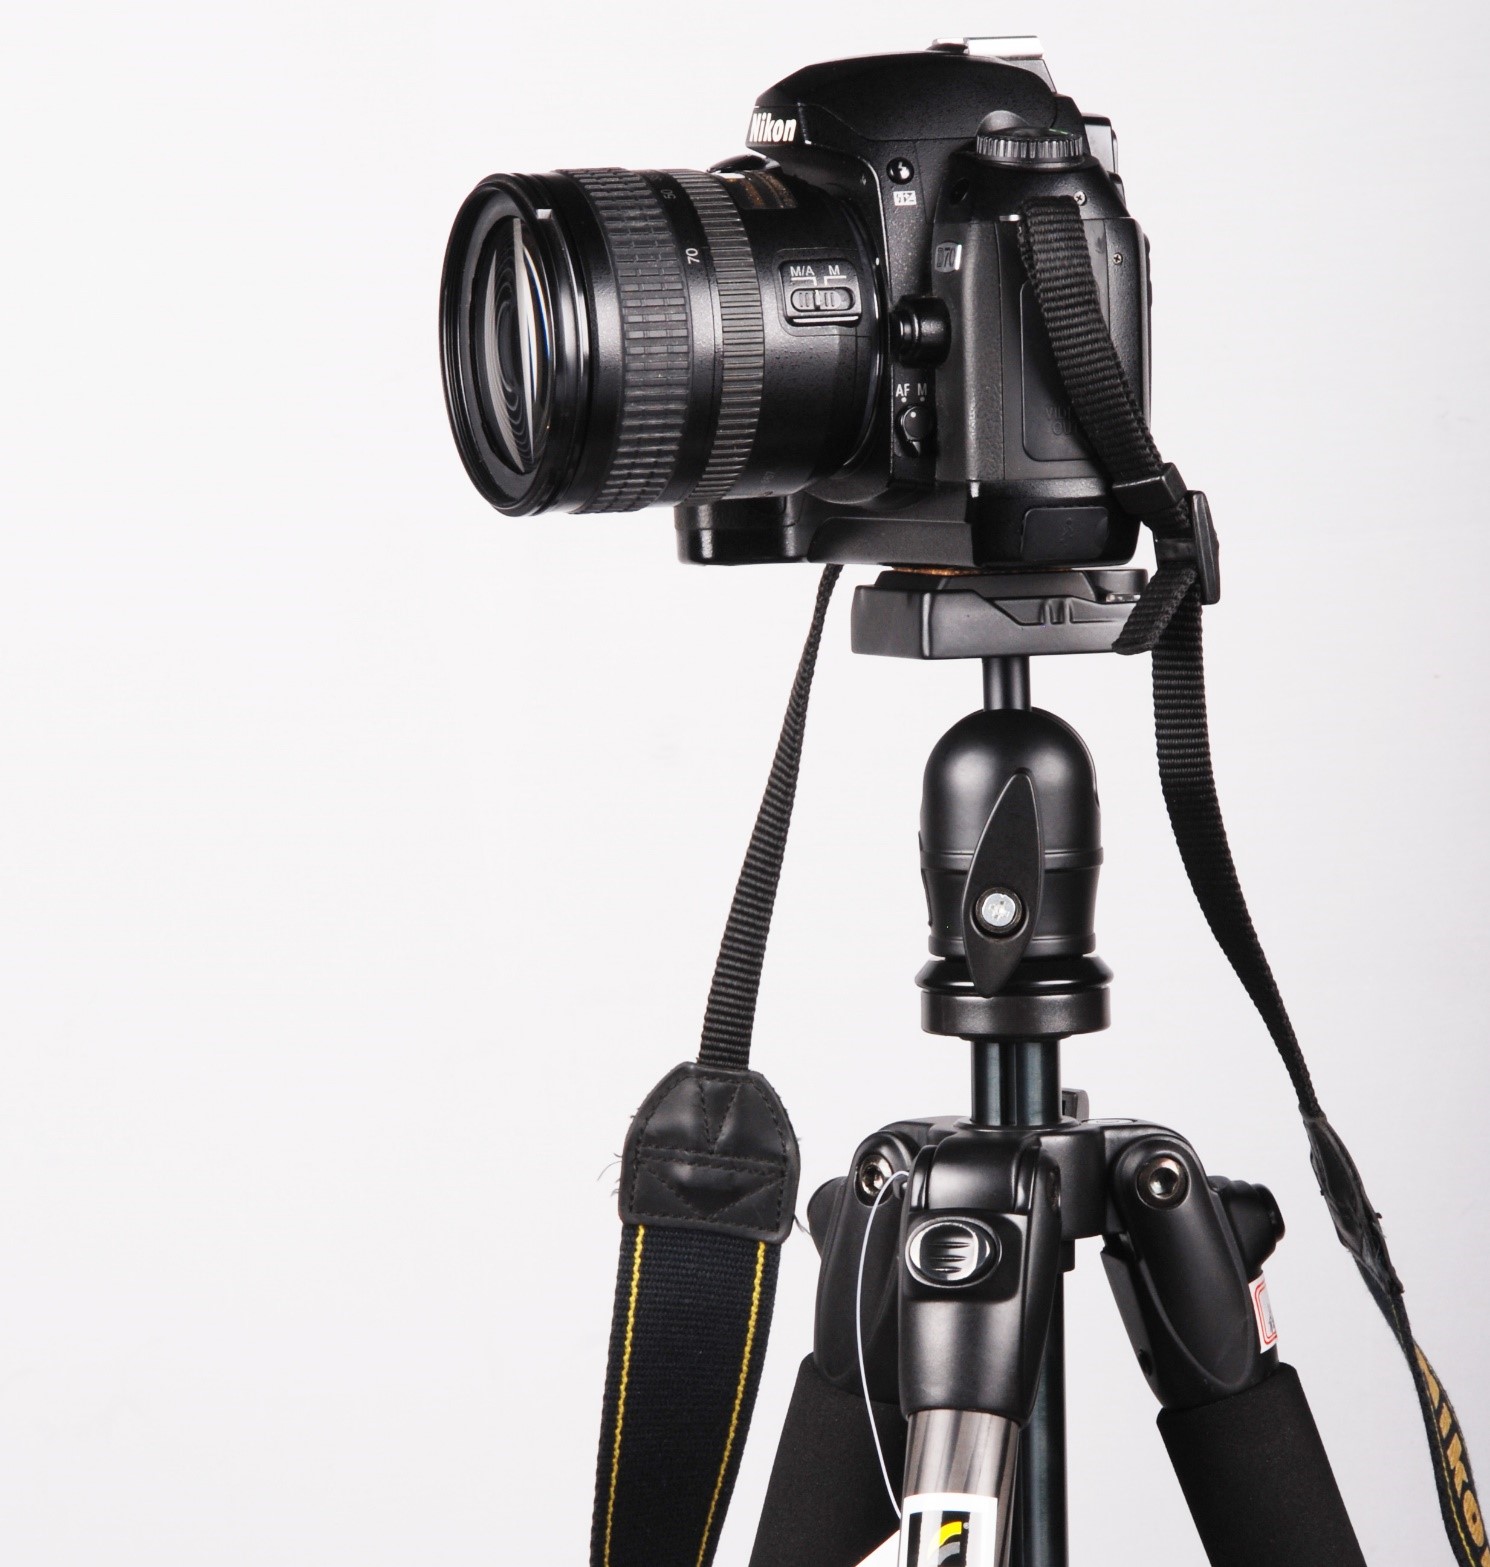
Because the camera is fixed, it allows the photographer to use as slow a shutter speed as possible provided nothing is moving in the scene.
This is because since the camera is fixed firmly, there is no camera shake.
And this is extremely important because it allows us to save light in low-light situations entirely by reducing the shutter speed and not resorting to increasing the ISO.
To understand this point and show the importance of a tripod let’s do an exercise.
Exercise to Understand the Importance of a Tripod
For this exercise, I’m assuming that you don’t have your tripod. So you can just use a plain surface like a table for now.
We are going to take two shots, one handheld and one with the tripod.
Let’s get started with the first shot:
Handheld Shot
For the first shot, I want you take a shot of your room.
- I want you to switch off the lights in your room so it it’s very dimly lit (not very dark though because you still need to be able to lock focus).
- Since you are capturing the entire room, let’s use a moderate aperture, like f11.
- Next, can you guess what shutter speed you’ll be using? Since nothing is moving in your room, you can afford to reduce the shutter speed but only up till 1/40, as you are shooting handheld.
- Now is the time to notice the meter. Provided the room was really dimly lit, you’ll notice that the meter is pointing slightly towards the negative side, like shown in the image below:

- So you increase the ISO till the meter comes in the centre. In this case, I increased the ISO to 10000 (some older cameras do not even go to that high an ISO). and then the meter came in the centre, like shown in the image below:

- Then take the shot.
- You’ll get a decent looking shot, like the one below:
Now it’s time to take the shot with a tripod and see the difference.
Tripod Shot
The first step is to of course mount the camera on the tripod.
Different tripods can have different ways to attach the camera, but it’s fairly easy to understand, so I’ll leave it up to you.
Even if you don’t have a tripod, you can still follow the steps below. In Step 10, it will be explained how you can manage without a tripod:
- Continue shooting in the same conditions as before with the room dimly lit.
- We want to take the same shot as before so point your camera to where you took your first shot.
- Set your aperture again to f11 like in the shot before.
- But this time, the first thing you should be doing is to set your ISO back to 100, like shown in the image below:

- Again, you’ll notice that the meter is pointing to the negative side.
- But this time we won’t increase the ISO to get the light in. This time all we have to do is to keep reducing your shutter speed till the meter comes in the centre.
- It doesn’t matter how slow your shutter speed is because since the camera is on a tripod, there is no risk of a camera shake.
- So in this case I started reducing the shutter speed till the meter came in the centre. This happened at a shutter speed of 2.5 seconds as shown below:

- If you have a tripod, then go ahead and lock focus and take the shot. While it’s ok to take a shot by pressing the shutter button, you can also use a remote to press the shutter button so you don’t have to touch the camera at all and minimalize any little chances of a shake also. Usually in shots that require usage of very slow shutter speed, it’s a good idea to not touch the camera at all and use a remote. Here’s how a remote looks like:

- In case you don’t have a tripod, just place the camera on some plain surface like a table and then use a self-timer. Using a self-timer is important in case you don’t have a tripod because without a tripod, your camera is not locked onto anything so it will shake when you press the shutter button. In order to activate the self-timer, use the same button that you used to activate the burst mode when we were learning about shutter speed. From there select the 10 second self-timer. This will ensure that the actually shot is taken after 10 seconds of pressing the shutter button, thereby resulting in a shake-free shot. In most cameras, you can activate the self-timer from the same place where you activated the burst mode earlier on.
- Once you take this shot, it will look something like this:

On the face of it, both the shots look similar.
But here’s what I want you to do.
I want you to put both your shots on your computer so that you can see them full size.
You’ll notice that the second shot looks much better than the first one.
This is because it has been shot at ISO 100 and hence is much cleaner and looks a lot sharper than the first one.
To illustrate this, see the two images below. Both are zoomed in parts of from the first and the second shots respectively.


You can see how much clear is the second image.
That is the advantage of using a tripod. It helps us to use very slow shutter speeds, which in turn enable us to shoot at ISO 100, which ultimately results in cleaner images that are free of noise.
Now that you know how to use a tripod, we are coming to a point where we are coming to the end of the technical side of things. In the next part, I want to discuss about what happens when you make some mistakes while using these settings. Making these mistakes can result in what we call as soft shots. So let’s go there:
What are the causes of soft images and how to achieve sharper images?
A soft image refers to an image that is not sharp and crisp, like the shot below:

You can see that the bird doesn’t look sharp at all.
The opposite of a soft image is a sharp shot. Look at the shot below:
This time you can see the bird is tack sharp.
Of course the second image looks better to the eye because it is crisp and sharp.
A soft image is something that is obviously to be avoided. However, it’s easier said than done.
And that is because sometimes the photographer is not aware as to why an image is coming up soft.
So in this article, we’ll discuss the different factors that can cause an image to become soft.
Causes of Soft Images
Wider Aperture and missing focus
First, let’s see how aperture and missing focus can cause an image to be soft.
We know that the main use of aperture is to decrease or increase depth of field.
Aperture can result is soft images when we are dealing which shallow depth of fields when we use a small f-stop number.
Let’s see how this can happen. Look at the image below:
Here you can see that the bird appears very soft. But if you look at the wild plants in the background, they have come out sharp.
This has happened because I have mis-focused this shot. My intended focus was the bird, but accidently, I have focused on the background.
Because I am using a small f-stop number, the area of focus or depth of field has formed around the background, since that’s where the focus locked.
Because of this, the bird is out of the area of focus and has come out soft.
So using a wide aperture or a small f-stop can result in soft shots when there is a case of misfocusing because the main subject will be out of the focus cage.
Apart from mis-focusing, it can also happen that the point where you focused was correct but still the shot came out soft. How? Because the shot demanded a large f-stop number or a deeper depth of field, and you used a small f-stop number. To understand this, look at the image below:

This is a group shot that we take after every photography workshop that I conduct here in Pune.
You can see that starting from me in the front, there are at least four rows behind.
This shot is always a ‘selfie’, so I adjust the settings, then join the group and then use a wireless remote or a 10 second timer to take the shot.
When I’m adjusting the settings, I lock focus roughly on one of the people in the centre. So let’s assume in this case, I locked focus on the gentleman directly behind me in the dark t-shirt.
So the area of focus will develop around him. Since there are people behind him and ahead of him (when I join in), I cannot use a small f-stop number like f2.8 or f3.5. Because that can cause the last row and the front row to be blurred because the area of focus will be very small.
So whenever there are a 3-4 rows, I’ll always use something above f8 so that the depth of field is deep enough to cover everybody.
Shooting such a shot a very small f-stop can result in some parts of the image being soft since they will be out of focus.
It’s also worth mentioning that this doesn’t mean that you can afford to misfocus at larger f-stops. Yes it will be a slightly better image because you would have most of the scene in focus due to the deeper depth of field but if you misfocus your main subject will still not as be as sharp as you want. So always remember to get the focus spot on, irrespective of what f-stop number you are using.
Slow Shutter Speed Can Cause Images to be Soft
Though aperture does cause soft images, it is still not the main reason why people get soft shots.
Majority of the shots which come out soft are because of problems related to shutter speed.
For instance, let’s look at the shot of the bird we just saw:
Now let’s try to figure out what went wrong here.
First, let’s assume that the bird was moving its body a bit.
If it was moving its body, what can be the cause of this blurriness?
If you answered – a slow shutter speed, then you’re correct!
You know that when the subject is moving, we should use a high enough shutter speed.
Let’s say that the shutter speed in this case was 1 second.
Such a shutter speed will be too slow for a moving subject. Hence, if the bird was moving and shaking, it will result in blurring the bird, just like you see in the shot above.
But let’s assume that the bird was not moving and that it was absolutely still.
Then can you get such a soft looking shot?
Yes, you can!
Because even if the bird was not moving, 1 second is too long for your own hand movement.
When shooting handheld, we should not avoid using a slow shutter speed and anything below 1/40 starts to present danger.
So even if the bird was not moving, a slower shutter speed can make the image look blurry because our camera moved.
And this is what many beginner photographers fail to understand.
Because they always associate shutter speed with only the subject and not their own movement, they assume that shutter speed does not matter if the subject is not moving.
But now you know that it does matter, because it also counters your own hand movement while taking the shot.
In fact if you are using medium sized and bigger sized lenses (called telephoto lenses), sometimes even 1/30 and 1/40 is not enough to stabilize the shake. This is because these lenses produce more of a shake, which needs even a higher shutter speed to counter the shake.
For instance, if you are using a 70-300mm lens and you are zoomed in all the way to 300mm, you may find that at a shutter speed of 1/40, your shot is not coming sharp enough even when the subject was not moving.
So you’ll need to use a higher shutter speed than 1/40, like maybe 1/100 or even higher and then try the same shot.
The Reciprocal Rule
There is even a rule for this, which is referred to as the RECIPROCAL RULE, which states that the minimum shutter speed that you use at any given moment to counter your own shake should be 1/focal length that you are using. So if you are shooting at 300mm, it should be 1/300.
But that’s something you should just keep in your mind for understanding purpose and not really deliberately follow because it can make things very mechanical.
Image Stabilization
These days all lenses come with stabilisation mechanisms, which reduce the effects of a camera shake, so you don’t have to really stick to the reciprocal rule.
In Nikon, this mechanism is referred to as VR (Vibration Reduction) and in Canon, it’s called IS (Image Stabilization). Other brands have similar names, like Shake Reduction or Vibration Compensation. But they all mean the same thing.
When you are shooting handheld, you should always switch on these stabilization mechanisms as shown in the images below for Canon and Nikon cameras respectively:

When the stabilisation mechanism is switched on, it will allow you to shoot at slower shutter speeds, which will in turn enable you to use a lesser ISO.
For instance, going by the example above, if you were shooting zoomed in at 300mm, according to reciprocal rule, you should be using a shutter speed of 1/300.
But if the stabilisation mechanism is on, it will help you to cancel out a lot of the shake, thereby allowing you to break the reciprocal rule and shoot at shutter speeds lower than 1/300, like let’s say at 1/100.
Can you imagine how much light you can save by going from 1/300 to 1/100. All that saved light can help you in using a lesser ISO, which will help you in achieving a cleaner looking shot.
Conclusion
So that’s it for this free photography course for now. I really hope this course helped you out in learning photography.
If you want to get more practical learning, then don’t forget to check out my photography and videography online courses, which are video-based courses so you learn in a much more efficient way by watching.


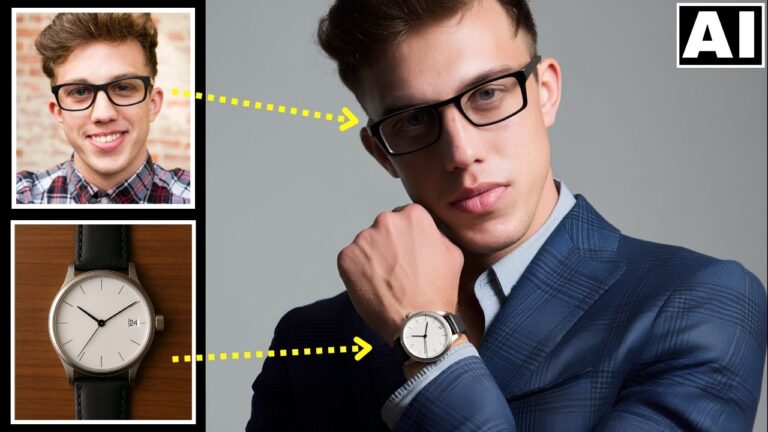


NICE POST!
THANK YOU FOR SHARING……