What is the Use of Color Balance in GIMP? – A Beginners Tutorial
Welcome to this beginner’s tutorial on Color Balance in GIMP! In this video, we’ll explore how to use the Color Balance tool to enhance your images and correct unwanted color casts. Using a portrait example, we’ll focus on achieving natural-looking skin tones with simple adjustments. Whether you’re fixing lighting issues or refining colors for better accuracy, this tutorial will give you a solid foundation to start mastering color correction in GIMP. Let’s get started!
This video is from our GIMP Photo Editing Course.
Video Summary
In this tutorial, the instructor demonstrates the final stages of Color Correction and the transition into Retouching using GIMP (or similar photo editing software). After an automated color correction flattened the red tones in the skin, the instructor manually reintroduces them using the Color Balance tool to achieve a more natural look.
The lesson also introduces the Healing Tool for skin retouching, emphasizing a subtle, permission-based approach to removing imperfections.
Time Stamps
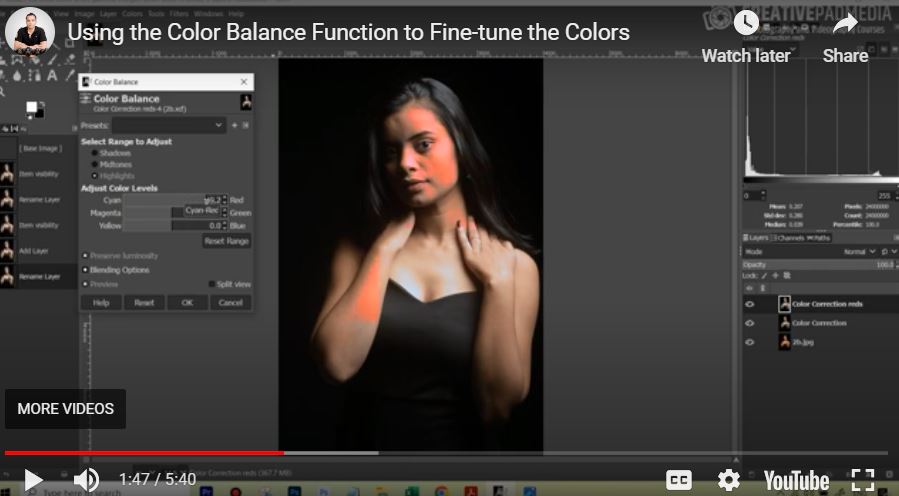
- 0:00 – Post-Correction Analysis: Identifying that previous edits “flattened” the reds in the skin tones.
- 0:18 – Color Correction (Reds): Creating a new layer specifically for fine-tuning red tones in the skin.
- 0:29 – The Color Balance Tool: Choosing Color Balance over Hue/Saturation for better control over highlights and midtones.
- 0:58 – Targeting Midtones: Adding red to the midtones to warm up the skin naturally.
- 1:38 – Highlight Correction: Adding red/yellow to the highlights to ensure consistent color across brighter areas of the face.
- 2:56 – Real-World Comparison: Comparing the manual edit to a “perfect” version shot in-camera with a gray card to verify accuracy.
- 3:46 – JPEG vs. Raw: A reminder that highlight recovery is more limited in JPEG images compared to Raw files.
- 4:08 – Transition to Retouching: Duplicating the layer and naming it “Retouching” to keep edits non-destructive.
- 4:45 – Retouching Philosophy: Advice on “permission-based” retouching—keeping it natural and checking with clients first.
- 5:18 – Healing vs. Cloning: Introducing the Healing Tool (found in the same menu as the Clone Stamp) for removing skin blemishes.


