Learn to be a Photographer – Complete Course
So you want to learn to be a photographer?
This guide will teach you all the steps you need to take to become a photographer. It’s a one-stop resource on how to learn photography.
First of all, who am I?
About Me

I’m Kush Sharma. I’ve been teaching Photography since 2013. I have over 30 online courses related to Photography, Videography and Editing. I have taught Photography to over 45,000 students from over 165 countries.
I have created this guide for you. So let’s get started and see how to learn Photography 🙂
Step 1 – Choose the Type of Camera
The most popular type of choice of camera for photography is a DSLR or a Mirrorless Camera. Right now don’t worry about what these terms exactly mean or how these cameras work. Just know that they look like the cameras below:

Throughout this guide, the terms DSLR and Mirrorless Camera might be used interchangeably since a Mirrorless camera is nothing but a DSLR camera without a mirror system inside the body (that’s why Mirrorless cameras are smaller in size).
The other choice you have these days is to use a Phone camera. But to be frank, if you really want to learn to be a photographer in a serious way, then you need to be using a DSLR or Mirrorless camera.
The number one reason which separates a DSLR camera from other cameras is that you can change the lens. This allows you to do different types of photography. We will learn more about this in Step 2.
Another important reason to use a DSLR or a Mirrorless camera is that these type of cameras allow you to shoot in the Manual Mode. Manual mode means you have complete control over three important settings – Aperture, Shutter Speed and ISO. We will learn about these settings in Step 3.
Let’s go to Step 2.
Step 2 – Understanding the Lens
Understanding the lens of a DSLR camera is one of the most important things towards becoming a photographer because it’s the most important part of the camera.
Like mentioned before, in a DSLR or Mirrorless camera, you can change the lens. So first of all, let’s see how you can change the lens.
The video you are about to see is from my DSLR Photography for Beginners Course.
Different lenses have different focal lengths. Focal length is just a fancy term for how much you can zoom in and zoom out. A lens will with a larger focal length will allow you zoom in a lot and reach subjects which are farther away.
For instance, a lens with a focal length of 600mm will be good for wildlife photography. And a lens with a smaller focal length, like 16mm, will allow you to shoot with a wider field of view which can be helpful in genres like Landscape photography.
Another classification of lens is according to their ability to change the focal length. Zoom lenses have a variable focal length, like 18-55mm, which means you can move the zoom ring to change the focal length.
The other type of lenses are called Prime lenses, in which the focal length is fixed, like 85mm.
Now that you know this let’s try to understand how a lens is named. Let’s take an example.
One of the most popular lens out there is the 70-200mm f2.8. So the first part of the name of the lens represents the the focal length. Since in this case it is 70-200mm, it means we are talking about a lens in which you can zoom out till 70mm and zoom in till 200mm.
But what about the f2.8 part? That’s a setting called Aperture. We will learn about that in the next step so let’s go there.
Step 3 – Understanding the Settings of Aperture, Shutter Speed and ISO (Exposure Triangle)
There are three important settings in the camera which make up all of Photography – Aperture, Shutter Speed and ISO.
Together these form what we call as Exposure Triangle. Again, this is just a fancy term. Don’t let it confuse you. What is more important is you know what each of these settings do. Let’s look at this in brief.
Aperture
Aperture is actually a physical element inside your lens, like shown in the image below:

It’s the hole in the lens which allows the light to come in the camera.
You can control how wide this hole is by changing the Aperture setting on your camera. This setting is represented as the f-stop number.
The lower the f-stop number, the wider the hole is. The larger the f-stop number, the narrower the hole is.
For example, at f2.8, the Aperture will be wide open. And at f22, it will be very narrow. the image below will make this relationship clearer:

At wider apertures, the shot that you take will have a shallow depth of field, which means only the area you focus on will be sharp and rest everything (like the background) will be blurred. And at a higher f-stop number, everything will be sharp. Look at the image below to understand this:
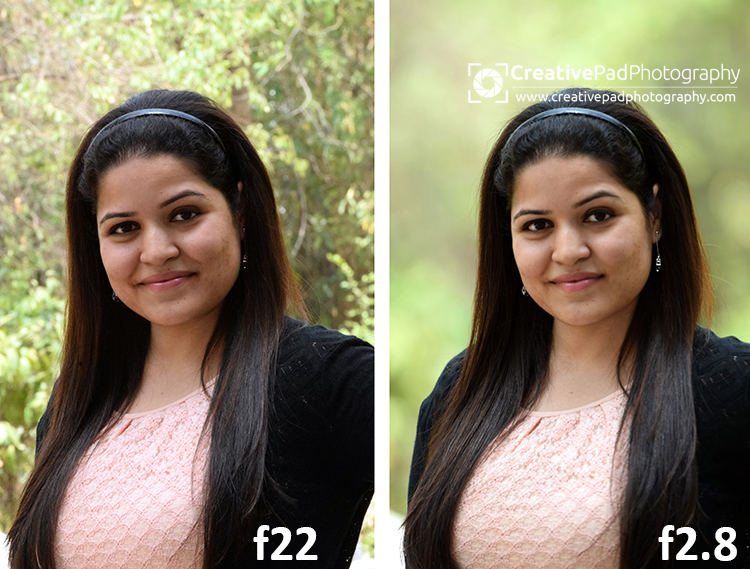
You can see in the image above that at f2.8 (wider aperture), the background behind the subject is blurred. But at f22, the background is sharper and in focus.
Portrait shots are usually shot using a wider aperture so we can get a blurred background. And Landscape shots are usually shot at a narrower aperture so everything in the scene is sharp.
Aperture also controls the amount of light coming in the camera but that is something we will understand in Step 4.
Shutter Speed
Just like Aperture, the Shutter is also a physical element inside your camera.
It opens and closes like shown in the video below:
Every time you press the shutter button of the camera to take a shot, the shutter opens and closes and to allow the light to come in and hit the sensor of the camera which ultimately results in the final image you get.
Shutter Speed just means how long the shutter remains open.
A shutter speed of 1/1000 will mean the shutter opens and closes in 1/1000th of a second. Since this is very quick, such a shutter speed is referred to as a fast shutter speed.
Similarly, a shutter speed of 1/10 will mean the shutter opens and closes in 1/10th of a second. Since this is slower, such a shutter speed is referred to as slow shutter speed.
Using a fast shutter speed freezes the subject and using a slow shutter speed blurs the movement of the subject, like shown in the image below:

Faster shutter speed is used in situations where a fast moving subject needs to be captured, like in sports photography.
A slower shutter speed can be used in creative shots. Shots in which a slower shutter speed is used are called as Long Exposure Shots. To see what all types of shots you can get using a slow shutter speed, check out this article.
ISO
Unlike Aperture and Shutter, ISO is not a physical element inside your camera.
The ISO value refers to how sensitive the sensor of the camera is in absorbing the light falling on it.
You can change this value.
A higher ISO value (like ISO 6400) will make the sensor more sensitive to light and therefore increase the brightness of the shot.
A lower ISO value (like ISO 100) will do the opposite and make shot darker.
But one of the things to keep in mind is that a higher ISO value also results in a lot of noise like shown in the image below.

Noise refers to the grains you can see in the shot.
This happens because at a higher ISO value, the sensor is artificially amplifying the light signals that are falling on it. This amplification results in artifacts/impurities called noise.
Therefore it’s a good practice to avoid shooting at very high ISO values.
In the next step you will learn how it’s better to increase the exposure using Shutter Speed and Aperture instead of relying on a higher ISO value.
For this you first have to understand how Aperture, Shutter Speed and ISO work together.
Step 4 – Understanding How Aperture, Shutter Speed and ISO work together
If you want to learn to be a photographer in a serious manner, then understanding the relationship between these three settings (Exposure Triangle) is very important because taking a shot depends on using all the three settings together in the correct manner.
So first of all, let’s see where all these settings are on a camera and how you can change them.
In the video below I have shown how to do this on both the Nikon and Canon cameras. But you will be able to easily figure this out no matter what brand of camera you have.
So now that you know how to change the values of Aperture, Shutter Speed and ISO, it’s time to see how they relate to each other.
For this you need to understand two things:
- How these settings impact the light coming in the camera
- A tool inside your camera called as Light Meter.
The two detailed videos below will help you understand both these things. Both these videos are from my Basics of Photography and Shooting in the Manual Mode course:
So now that you know how these three settings (Exposure triangle) work together, you are ready to go to the next step.
Step 5 – Figuring out the type of Photography you want to do
What you learned in this guide are the basics of Photography.
These basics stay the same no matter what type of camera you have.
Now to go the next level, you have to determine what type of Photography you want to get into.
Because even though the basics in each genre remain the same, the techniques to shoot and the gear needed will differ.
As a beginner is’ts completely fine to first try all the different genres like Portrait Photography, Landscape Photography, Food Photography, Product Photography, etc to get a taste of things.
But ultimately I always tell my students that if you want to learn to be a photographer in a serious way, then choose one or two genres to focus on because each genre requires the need to go in-depth into its details.
The best part is that I have got detailed online courses on almost all genres of Photography which can help you learn to be a Photographer in a serious manner.
Going through these courses will really take your learning to the next level.
So that’s it for now. I hope you liked this guide and that it really kick starts your journey towards becoming a photographer.
Don’t forget to share this with your friends too.
I hope to see you inside one of my premium courses.
Good luck!