Evaluative (Matrix) Metering vs. Spot Metering: A Comparison
Understanding the metering system in a camera can help you get the correct exposure very quickly. The two most common types of metering systems are – Evaluative (Canon)/Matrix (Nikon), which is the default metering system and Spot Metering.
When you take a shot, the camera works by taking into account the exposure for a certain part(s) of the frame. In the default metering system (Evaluative/Matrix), the camera gives weightage to all the elements in the frame. Let’s try to understand this with the help of an example. Let’s look at the image below:
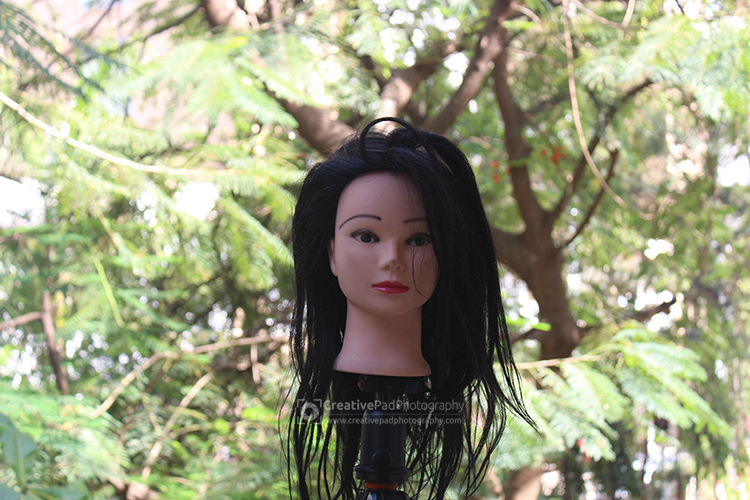
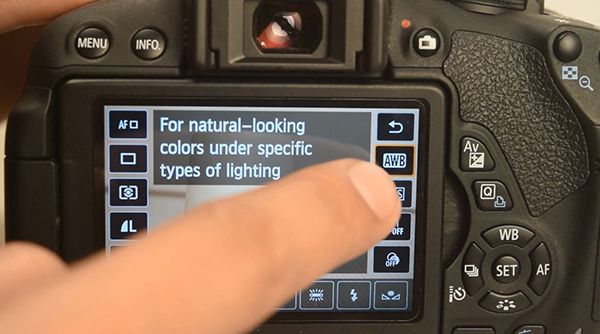
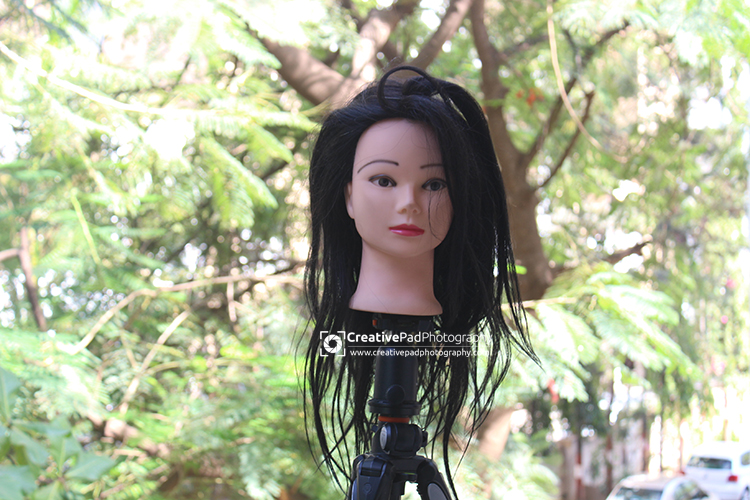
Here I’m shooting the mannequin against a bright background. For this shot my camera is set to the default metering mode, which is called Evaluative Metering Mode in Canon, like shown in the image below:

In this mode, the camera is determining the exposure by giving importance to all the elements in the frame. So since it mostly notices brighter elements (because the background is occupying more space than the subject), it gets tricked into thinking that this is a very bright scene and therefore reduces the average exposure of the image. This results in an underexposed subject (the mannequin).
To correct this, I can switch the metering mode to Spot metering, as shown in the image below:

In spot metering, the camera will determine the exposure of the image by giving more importance to the part where your focus point is on. Let’s take another shot of the mannequin against the bright background to understand this. Here’s how the shot looks in spot metering mode:
You can see that this time the exposure of the mannequin is much better. This is because when I took this shot, the focus point was on the eye of the mannequin. Since we were in spot metering mode, the camera ignored the bright background and only gave importance to the subject. It noticed that not enough light is falling on the subject and hence increased the exposure.
Let’s look at the reverse scenario where the subject is against a dark background, like shown in the image below:

For this shot, I’ve again used Evaluative Metering. Since a lot of parts of the frame are dark (including the hair of the mannequin), the camera gets tricked into thinking that this shot needs more exposure and hence raises the average exposure of this image. This time this has resulted in a very bright subject.
Let’s see what happens when we switch over to spot metering. Here’s the result:

You can see that this time the camera has given importance to only the mannequin’s face (where the focus point was placed). Now there was already enough ambient light falling on the face and on top of that, the skin of the mannequin is very fair. Since the camera is only considering the parts around the face, it gets tricked into thinking that everything is very bright and therefore decreases the exposure of the frame. This results in a better exposure for our subject but the background, which was already dark, becomes even darker.
Let’s look at some more examples:
Here’s a phone shot I took while on board a ferry:
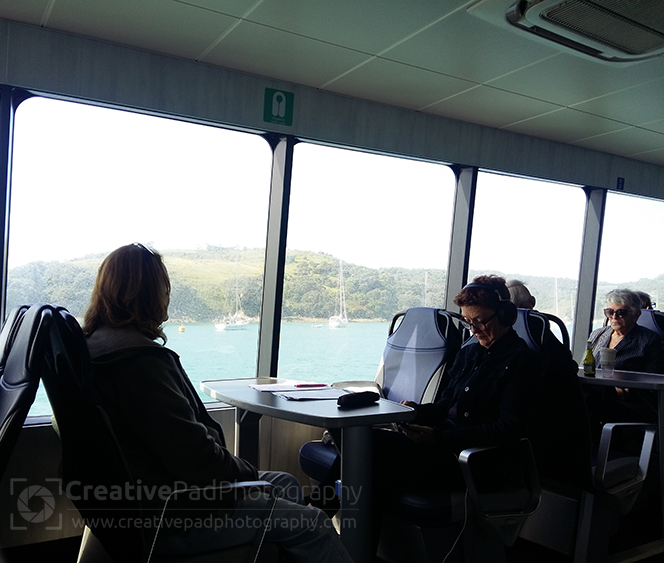
For this shot, my phone camera’s metering mode is set to evaluative, so it’s giving equal weightage to all the elements in the frame when determining the exposure.
Since the sky in the background is very bright, it reduces the exposure. But since the inside part of the ferry is darker, it gives importance to that too and raises the exposure too. Since the bright and dark parts in the frame are pretty much of equal size, the resulting image is a 50% bright and 50% dark image. So no part really “wins”. You get a decent exposure for both the parts but you can still see that we are not able to see the details in the sky properly and neither are we able to see the details in the inside parts of ferry.
Now to correct this, I switch over to spot metering. And I place the focus point of my phone’s camera to somewhere inside of the ferry. Let’s look at the result now:

You can see that this has instantly resulted in a better exposure for the inside of the ferry. That’s because the inside of it was dark and since I placed the focus point in that part, the camera got tricked into thinking that I am clicking something really dark and therefore cranked up the exposure. Of course, this means that the outside part, which was already bright, gets completely blown out from overexposure.
If I want the outside part, then all I have to do is to place the focus point on the windows and not inside in the ferry. Doing this results in the following image:

This time we’ve got a great exposure for the sky and other elements outside the ferry. You can see that this time we can even see the clouds in the sky as opposed to the image taken on evaluative metering. This is because the camera has set the exposure exclusively for the sky since that’s where we pointed it.
There is another type of metering system called as Centre-weighted metering, which is somewhere between the evaluative and spot metering systems. In a centre-weighted system, the camera will give importance to the area near the center of the frame and not just on the particular spot where the focus point is.
Now, there is no right or wrong system. As can be seen from the examples above, the right metering system would be dependent on what you’re looking from the shot. If only the subject or one part of the image is important, spot or centre-weighted metering systems can be used to great effect.
A lot of photographers don’t even bother with metering systems because most of it can be corrected in post processing. For instance, if you used evaluative metering and got a shot in which your subject was slightly underexposed, it’s usually not a big deal since you can open up the image in Photoshop/Lightroom and raise the shadows a bit to correct the exposure for the subject.
But if you don’t edit your shots at all and only rely on what you get from the camera, then selecting the right metering system can be very important.
Another way out is to not change the metering system but to use the exposure compensation system provided in most cameras. So if you’re getting an image with an underexposed subject, you can always dial in a positive exposure compensation value so your camera will increase the exposure of the next shot you take.
But there’s one thing for sure. You can’t get the best of both the worlds. In high contrast situations (where some part is very bright and some part is very dark, like the ferry shot), the camera’s dynamic range usually will not be so good that it can capture both the parts equally well.
Full frame cameras have a better dynamic range but even with those, you will be required to bracket your shots and then blend in different exposures to get the best of both the worlds. This technique is referred to as HDR (High Dynamic Range) Photography.
I hope this article helped you out in understanding the different metering systems.