Best Focal Length for Portraits – Comparison and Discussion
“What is the best focal length for portraits?” – This is one of the most common questions asked by beginner photographers.
First of all, let me clarify one thing – There is no single answer for this because it really depends on what type of a portrait you are shooting.
So the correct question to ask is not “What is the best focal length for portraits?” but to ask “How does focal length affect a portrait?“
Because understanding how focal length impacts a portrait is perhaps the most important principle you’ll ever learn about portrait photography. It will not only make you understand which focal length is best for you, but it also give you an idea of which lens is the best for the type of portraits you want to shoot.
Later on in this article, we’ll also be comparing the different popular portrait lenses and seeing which one comes out on top.
Before I get started, I do want to point out that I have a very detailed course on portrait photography called Portrait Photography for Beginners. It has 24 videos and 4 hours of content, where we take a level based approach and you go all the way from shooting a basic portrait at Level 1 to getting some amazing looking portraits at the higher levels because at each level we add something that the previous level did not have. Of course, the impact of focal length on portraits is covered in detail too.
Now let’s get back to this article.
The Importance of a Larger Focal Length
First of all, before we begin, you should know what a larger focal length means. A larger focal length means a higher focal length number.
For instance, if you are using your 18-55mm kit lens, the largest focal length number would be 55mm.
If you are using a 70-200mm lens, the largest focal length number would be 200mm.
So it basically means you are zooming in.
But referring to it as zooming in might not be too accurate because there are many lenses where the focal length is fixed, which are referred to as prime lenses, like the 85mm f1.8 lens. But it still is a large focal length even though you cannot zoom in and out.
A lesser focal length would mean using smaller focal length number, like 18mm. It can also be called as a wide focal length.
So let’s say you have to shoot a person standing in front of you. If you shoot them using a wider focal length like 18mm, then you’ll have to go close to them. And if you’re shooting them using a larger focal length, you’ll have to go far from them and then zoom in.
In this lesson, we’ll be seeing why using a larger focal length is better than using a wide focal length to shoot portraits.
In other words, we’ll be seeing why it’s more effective to go far away from your subject and then zoom in and shoot as opposed to going close and using a wide focal length.
So let’s see how this works:
Comparison Between Two Extreme Focal Lengths
I’ll be taking two shots of a person. The first shot will be using a wide focal length and the second one will be using a larger focal length.
Our job is to take these two shots at different focal lengths but by keeping the composition the same. That means that in both the shots we’ll get the same body parts in the frame. For this exercise, we’ll be shooting in such a way that the person’s head and shoulders come into the frame in both the shots. So let’s get started:
- For the first shot where we have to use a wide focal length, let’s use a focal length of 18mm. So put on your kit lens and zoom all the way out.
- Next, go close to the subject till the time only their shoulder and head appear in the frame. Lock focus on their eyes and then take the shot. You’ll get an image like the one below:

- For the second shot, I want you to use a zoom lens in case you have one. Zoom lenses are those that will allow you to go above 100mm at least. Nowadays most camera companies give a zoom lens along with the kit lens. For example, Nikon gives the 55-200mm lens and Canon gives the 55-250mm lens. These lenses allow you to go zoom in more than kit lenses. So in case you have such a lens, I want you to attach it on your camera, then go far away from the subject, and then zoom in till only their shoulders and head are in the frame, just like the previous shot. Try to be above 100mm at least. If you are not above 100mm, go further away and zoom in more. Now what if you don’t have a zoom lens? No problem. You can use your kit lens. Just go slightly far away and zoom in all the way to 55mm.
- Now lock focus on the eyes/ face, and take the shot. You’ll get a shot like the one below:

- Now it’s time to compare these two images.
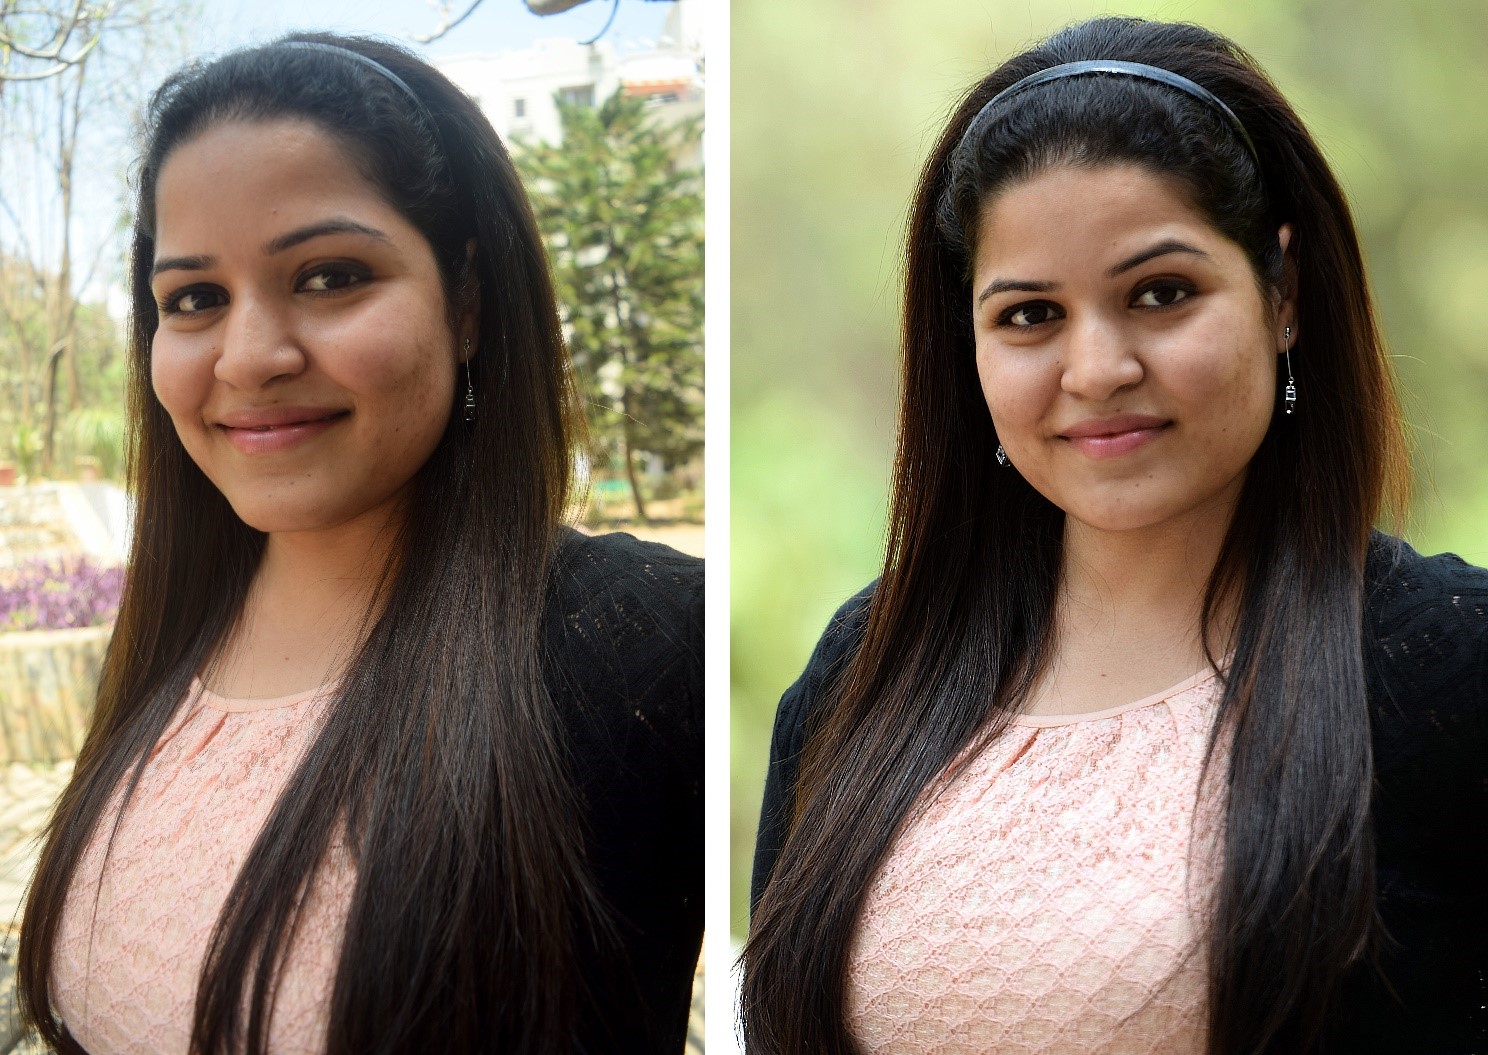
Let’s put these two images side by side for comparison:


Look closely. What differences do you observe in both the shots?
First of all, let’s talk in terms of the subject.
Do you notice that in the second shot, the subject looks more natural? And in the first shot the subject’s face appears slightly stretched and unnatural.
This is because for the first shot we used a wide focal length. When you use a wide focal length and go close to the person you are shooting, it stretches the subject.
This ends up making the subject look “weird”.
The second shot makes the subject look natural because when you zoom in and use a larger focal length, it compresses the subject.
So if you want the subject to look natural and pleasing, it’s always preferable to use a larger focal length by going away and zooming in.
But that’s not the only reason. There is another important change that will make it clear which is the best focal length for portraits.
Look at the images again:
This time see the differences as far as the background is concerned. What do you observe?
You’ll notice that in the shot where we used a wide focal length, more of the background is seen (you can see the building, trees, sky, etc.) which increases the amount of distractions.
And in the shot where we zoomed in, less of the background is seen. This reduces the distractions and the subject seems more isolated, which is great for the viewer.
Again, this is because a wider focal length shows more of the scene and a larger focal length compresses the whole scene.
So you can see that going away and zooming in results in two benefits:
- It makes the subject look better and natural.
- It shows less of the background, thereby making the subject stand out.
Comparison Between Different Focal Lengths From 18mm to 200mm
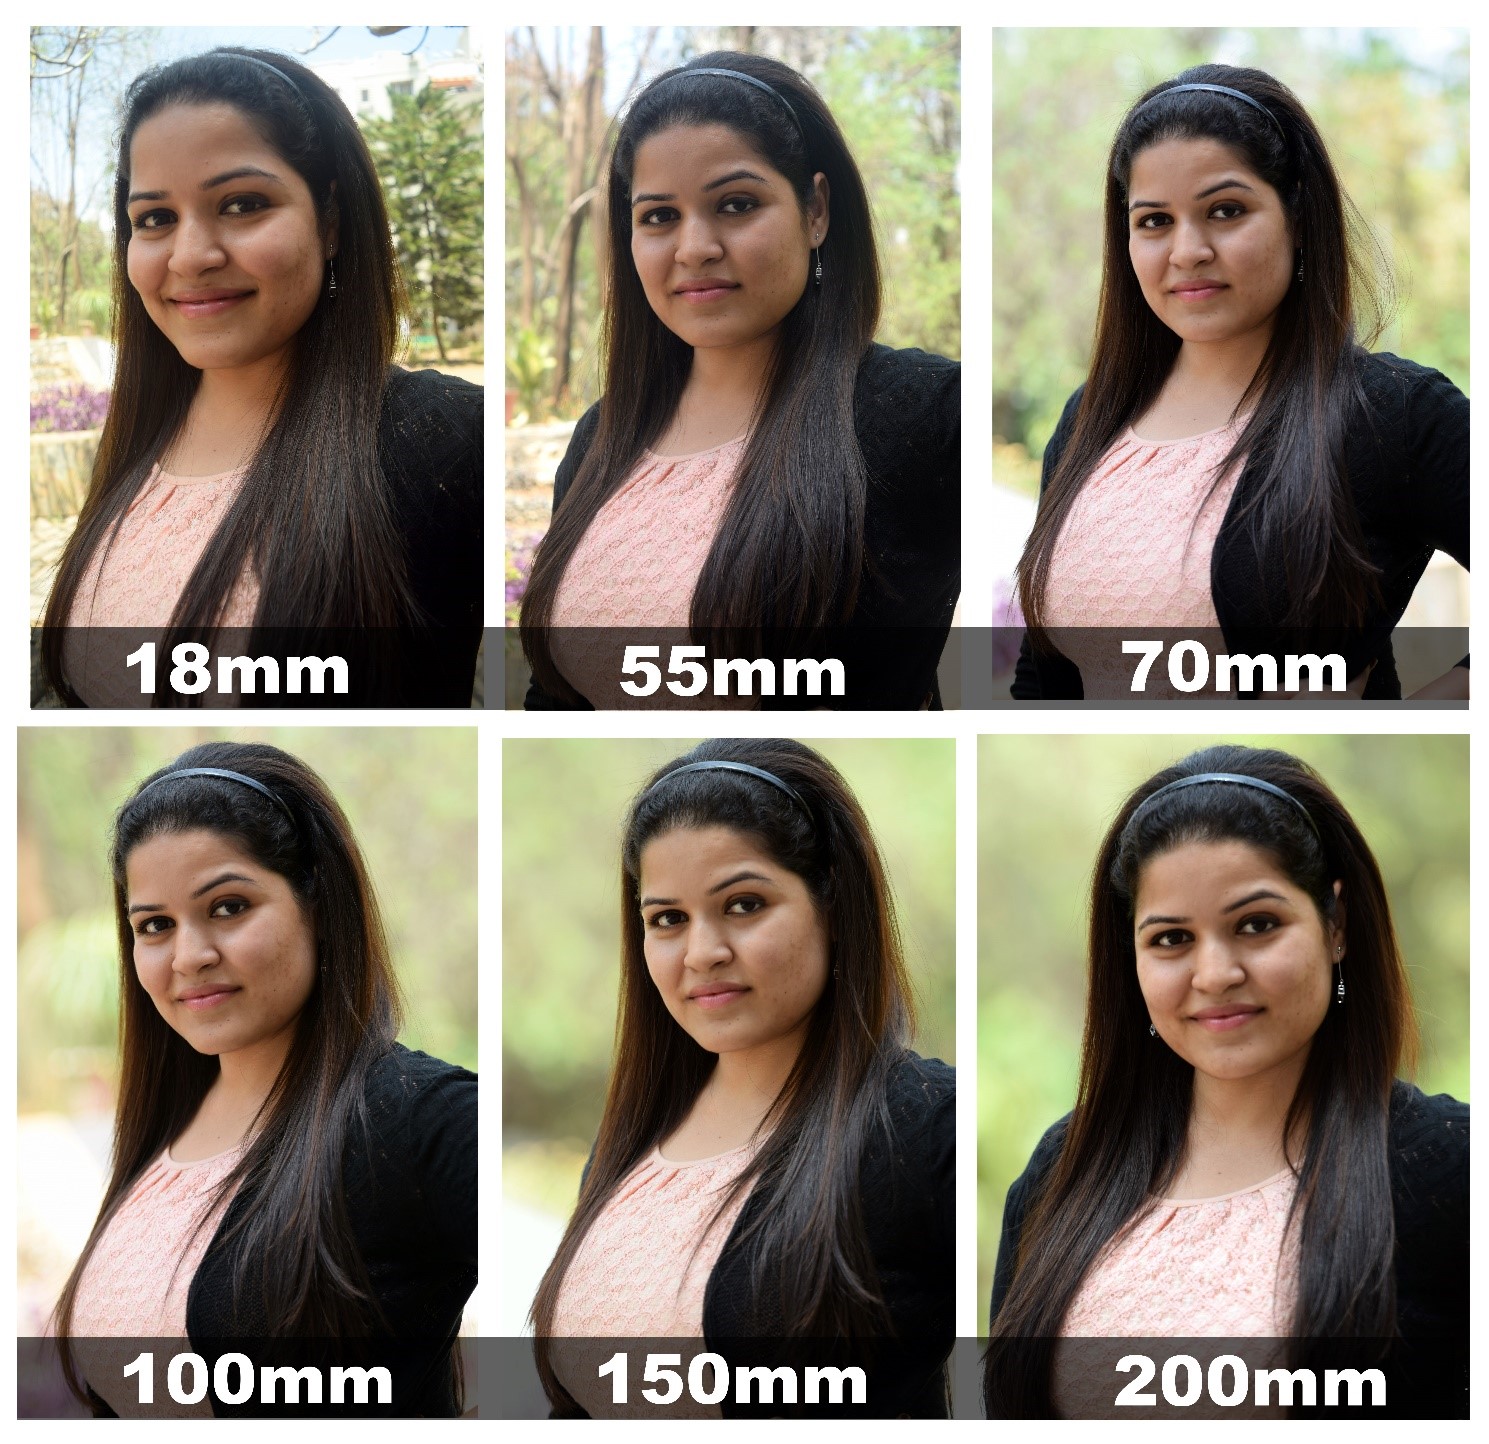
See the image below to see the comparison of different focal lengths:

You can see that the first image on the top left (18mm) looks the most inferior because the subject appears stretched and you can see more of the background. As the focal length is increased, the image starts to look better as the subject starts to look more natural and the background is compressed.
Even if you want most of the body in frame, you still have to move away and zoom in so that the background compresses, like in the shot below:

Here I could have taken the easy way out and just used a wide focal length since it would have made it easy to get her in the frame.
But it would have also resulted in a lot of the background being visible.
Since I have moved away and zoomed in, the background has compressed and you can hardly make out anything even though there were lot of distractions behind her.
So this means that in case you don’t have a zoom lens on you, it’s time to buy one. You can have a look the recommended equipments and accessories section for details.
So now that you know the importance of zooming in, it’s time to discuss few exceptions to this rule. Here are some situations where it’s better to use a wider focal length:
In situations where you want the background to be seen and where stretching the subject adds to the image. For example, see the shot below:

Here, I had two choices. Either I could use my zoom lens and go away and zoom in, or use a lens like the kit lens, to go close to this woman and shoot at a wider focal length.
Going away and zooming in would result in a better image for the woman, but not for the shot.
This is because if I would have zoomed in from far way, I would have been able to compress her face so it looks natural, but the background would have got compressed too and you would not have been able to see her friends in the background.
Since I want to show her entire group, it’s necessary that the background comes into the scene. So I have used a wide focal length.
Now this results into stretching her face wide. But if you actually see, it doesn’t look bad for this type of shot. Because this isn’t really for a glamour portrait purpose. This is more of a candid street shot, where it’s good if the subject dominates the shot.
So it’s a win-win situation, both from the subject as well as the background point of view.
Now what if you want the background to be seen, but you don’t want to stretch the subject?
In that case, use a wider focal length but make sure the subject you are shooting is not too close to the camera. The closer the subject, the more stretched their face will be. So make sure that there is sufficient distance between the camera and the subject, like in the shot below:

I’ve taken this shot at 18mm since I wanted the background to come into the shot. But since I did not want the face to be stretched, I have moved away from her and taken the shot.
Also, let’s look at some more questions that are usually asked about focal length and portraits.
Which is the best lens for shooting portraits? 35mm vs 50mm vs 85mm vs others
Again, like mentioned at the start of this article, “best” is subjective as photography is a subjective art. So just like before, let’s change the question to a better one – Which is the most popular lens for shooting portraits?
The most popular prime lenses for shooting portraits are –
And the most popular zoom lenses are –
Now I want you to guess which lens will give the best portrait?
Now first of all, there cannot be an objective answer to this since photography is a subjective art. But I’ll still tell you which of these lenses, on an average, is the most popular when it comes to portraits.
The answer is the 85mm f1.8 when it comes to primes lenses because it has the highest focal length and therefore will compress the background a lot. And obviously, the 70-200 f2.8 amongst the zoom lenses.
There are even 135mm prime lenses and 200mm ones which some people like better than the 85mm ones but usually they are very costly and are mainly used for outdoor portraits only because 135mm and 200mm focal length needs more space between the subject and the photographer.
Overall though the winner is 85mm f1.8, simply because it is a whole lot cheaper than the 70-200 f2.8, while still offering the benefit of a higher focal length.
The same can be said when the 85mm f1.8 is compared to 85mm f1.4. Yes, the latter will be better for shooting portraits since f1.4 (wider aperture than f1.8) blurs the background more. But it is still not as popular as the 85mm f1.8 simply because it costs way more. But if money is not an issue for someone, then of course the f1.4 version will be better. My answer above was given on the basis of keeping both the output and budget in mind.
Let me show you a video from one of my Photography for Beginners Course, where I do an entire shoot with the 85mm f1.8 lens. As a bonus, you’ll also learn some other principles of achieving a more blurred background:
One Thing to Note
My answers here are biased towards lenses that give a type of composition which isolates the subject and makes them stand out. For instance, let’s compare two shots:

I took this shot using the 85mm f1.8 lens. You can see that the subject is well isolated thanks to the higher focal length and the wider aperture.
Here’s another shot from the same shoot where I used the 35mm f1.8 lens:

Here you can see that the wider focal length shows more of the background and the shot doesn’t isolate the subject well.
But that’s what I prefer when I shoot portraits. There can easily be another person who likes the second type of shot more. So just wanted to clarify that I give more preference to the subject being isolated since I personally feel those type of portraits look cleaner and more focused on what matters.
But at least now you know that you shouldn’t straight away go for the 50mm f1.8 lens, which is usually the most recommended lens to beginners. You’ll be able to now understand that it’s basically a lens which is stuck in between. Neither does it give a wider look nor does it compress the background enough. That’s why I almost never use it.
By the way, the two shots above are from my Off-Camera Flash Photography course, which is very helpful for portrait photographers. I actually show you this whole shoot in that course.
Best Focal Length for Full Body Portraits
This is a tricky affair because shooting full body portraits which have a nice blurred background is not easy.
The reason for that is that you have to be away from the subject to get their full body in the frame. Since you have to move away it reduces the depth of field because apart from a lot of other factors, how shallow or deep the depth of field also depends on the distance between the subject and the photographer. I highly recommend that you read my detailed article on this subject.
Therefore you need to compensate that by using a lens which will allow you to use a higher focal length as we all as a wider aperture, like the 70-200 f2.8 or the 85mm f1.4 or the 135mm f2.
Even though 85mm F1.8 is also not bad for full body portraits, the 85mm f1.4 is better since f1.4 is wider than f1.8 and therefore blurs the background more.
Conclusion
So there you have it.
I hope this article helped you answer the question – “What is the best focal length for portraits?” but that you also understood that the answer might differ for different people.
If you liked this article, then do check out my Portrait Photography Course, which has 24 videos and 4 hours of content. It is available via Udemy.com. Check out the promo video below:


Very nice knowledge,sir,Now I complete understand your answer.
That’s great Mukesh!