
How to Blur the Background in DSLR Photography – Technique and Lens
Do you want to learn how to get blurry background photos? Learning how to blur background can take your photography to the next level as it really makes the subject in your shots stand out.
Blurring the background in a shot is one of those essential things that immediately gives a portrait (or any other shot) a professional and artistic look.
However, there are a couple of steps involved in this process which make sure that you can blur the background in any given situation and irrespective of what your subject is.
Before I get started, I do want to point out that I have a very detailed course on portrait photography called Portrait Photography for Beginners. It has 24 videos and 4 hours of content, where we take a level based approach and you go all the way from shooting a basic portrait at Level 1 to getting some amazing looking portraits at the higher levels because at each level we add something that the previous level did not have.
Now let’s look at four important steps which will make sure you can effectively blur the background:
1. Using a small f-stop number to blur the background
One of the most important things when it comes to blurring the background is the usage of a wide aperture or a small f-stop number. This means that one of the most important things in blurring the background is the lens you use. Prime lenses (like the 85mm f1.8) or premium zoom lens (like the 70-200mm f2.8) help you to shoot at very small f-stop numbers are the go-to lenses when it comes to achieving a great looking bokeh. Using a larger f-stop number will increase depth of field and keep everything sharp. Let’s look at the image below to understand this:
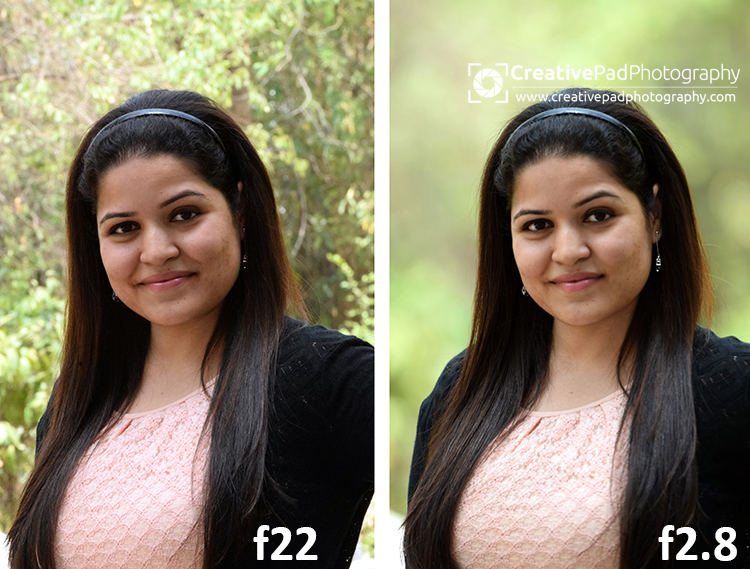
Here in the image on the left, using a large f-stop number like f22 has resulted in a deeper depth of field, thereby making the background sharper. In the image on the right, I have used f2.8, which has resulted in a shallow depth of field, thereby blurring the background.
Using a kit lens restricts your f-stop number to between f3.5-5.6, which reduces the blur. But as we’ll see in the next few steps, you can even use a kit lens to blur the background by following some additional steps.
2. Making sure the background is away from the subject to increase the blur in the background
When you take a shot, the area near the focus point (your subject) is the sharpest and as things move away from the subject, they start to lose sharpness and become blur. This area of focus (depth of field) can be reduced by reducing the f-stop number as seen in the last step. But another thing that can help you is to move the background away from the subject. The farther away the background is, the more blurred it will be. To understand this , let’s look at two different images:
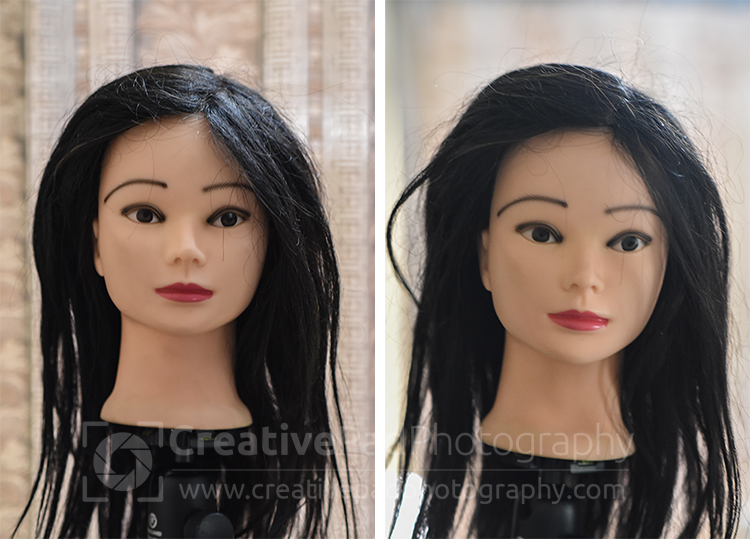
Here, in both the images I have used f2.8. But because in the image on the left, the mannequin was just half a foot away from the background, it has resulted in a sharper background and hence you can see the texture in the curtain clearly. In the image on the right, I moved the mannequin around 7 feet away from the curtain and that has resulted in giving the curtain a strong blur.
So whenever you really want to blur the background, always make sure that you move your subject well away from any background. This results in a better blur and gives more isolation to your subject. This is even more important when you are using a kit lens because you’re already dealing with the problem of a higher minimum f-stop number.
3. Making sure you get close to the subject as it helps in making the background more blurry
In the last point we learned that it is important to move the subject away from the background. But what about the distance between the subject and the photographer? This time you have to do the opposite. The closer you get to the subject, the more blurred the background becomes. This is just how optics work. Let’s see the images below to understand this difference:

In this image, I have used f1.8 and focused on the paper cup. I’ve been able to blur the background because I’m following the first two steps that we saw above – using a small f-stop number and keeping the background away. But I can blur the background even more if I move closer to the cup, like shown in the image below:

You can actually see this phenomenon with your own eye. Extend your arm and raise your index finger. Focus on the finger and gradually keep moving your finger closer to your eye. You’ll notice that as you keep bringing the finger closer, the background seems to keep getting more blurred.
Let’s look at how people get this concept wrong when shooting portraits and how you can correct it. Let’s look at the image below:

Here you can see that there is a lot of space around the subject. This means that the photographer hasn’t gone close to the subject. That is why even though the f-stop number used for this shot is f2.8, the background does not seem that blurred.
Now let’s look at another image where the photographer has moved in closer to the subject. This time you can see that the background looks much more blurred even though the f-stop did not change.

But at this point you can ask a very valid question – What if I want to capture half of the body like in the first shot?
In that case also, you will have to follow the principle of going as close as possible. To understand this, let’s see the first image again:

You can see that there is a lot of space around the subject so that means the photographer can go closer. But if you start to go closer, the subject may go out of the frame from the top and bottom parts. So the first thing would be to shoot in portrait format and not landscape format. This would immediately give you more room to move in closer as people are longer rather than wider. Doing this allows you to go close, like shown in the image below:

Clicked with 85mm f1.8 lens
Now, you can see that the background blur has increased even though we still got the same composition as far as the subject is concerned. You can see that the photographer has been able to move closer to the subject because there is very less space around the subject. This principle is referred to as filling the frame with the subject. Shots that fill the frame with the subject will have a shallower depth of field because it means that the photographer was able to go closer to the subject.
This the reason why it’s not very easy to blur the background when you take full body shots with a kit lens, like the image below:

Here the background doesn’t seem too blurred because taking a full body shot with a kit lens means that you cannot get too close to the subject even if you are shooting in portrait style. This aspect itself reduces the background blur. On top of that a kit lens doesn’t allow for a very small f-stop number so that too decreases the background blur. That’s why it’s always recommended that for full body shots, you use a lens that allows you to shoot at small f-stop numbers like f1.4/f1.8/f2.8. Let’s look at the same shot taken at f1.8:

You can see that this has resulted in a shot with a much stronger background blur.
We can still improve this shot further. For that, we’ll have to incorporate the next step, which is….
4. Using a higher focal length to compress and blur the background
When you use a higher focal length, it compresses the background due to the higher magnification, thereby magnifying the blur in the background. To understand this, let’s look at the shots below:

You can notice that as the focal length increases, you see a lot less of the background as it keeps getting compressed or magnified. This gives the effect that the background is more blurred.
This is the reason why it’s always advisable to go away from the subject and zoom in to take a shot rather than going close and shooting at a wider focal length. This results in a more isolated subject as the background seems to have more blur and lesser distractions.
So in the example in the last point where we took a full body portrait, let’s increase the focal length and take the shot again. The last shot was shot at 85 mm. Let’s shoot this new shot at 200 mm at f2.8 using the popular 70-200mm f2.8 lens. Here’s the result:

You can see that this shot has resulted in a really nice looking full body portrait with not only a good amount of background blur, but also a reduced amount of background due to the magnification. This has really cut out distractions and our subject is looking more prominent in the frame.
This is the principle by which you can improve shots from kit lens too. Of course you won’t get the benefit of a wide aperture like f2.8 or f1.8 but you can still produce the isolation by making sure you shoot by going away and zooming in. That’s another reason why you should at least have a zoom kit lens (like the 55-200 mm for Nikon or the 55-250 mm for Canon) with you if you intend to click portraits with a kit lens.
So now that you know the different aspects involved in blurring the background effectively, you’ll realize that getting a good isolated portrait isn’t always a matter of using an expensive lens, but also using the correct shooting principles which were discussed above.


Super explanation as always 🙂
Thank you 🙂
Helpful, as always. Thanks Kush! 🙂
Thank you my Anonymous friend 🙂
Thanks…
I have read this article and understand. But is there any other internal settings that my help to get a blurry images? My camera is Nikon D3100
Blurring of the background will not depend on the camera. It will depend on the lens. The wider the aperture it can go to, the more blurring you will get.
I will help me.. very helpful content.. thanks Sharma ji..
Thanks Kunal! 🙂
Brilliantly explained Kush
Thanks Elizabeth 🙂
Good explanation in a very easy and simple way.
Just a query – in the last photograph, using 200 mm focal lens, isn’t it little overexposed (when compared to the previous photos – using kit lens)?
Thanks Sudeep. You’re right. I may have slightly overexposed that last shot. My focus was more on the principles being taught in the article but I’ll probably edit the shot and replace it. Thanks for pointing it out.