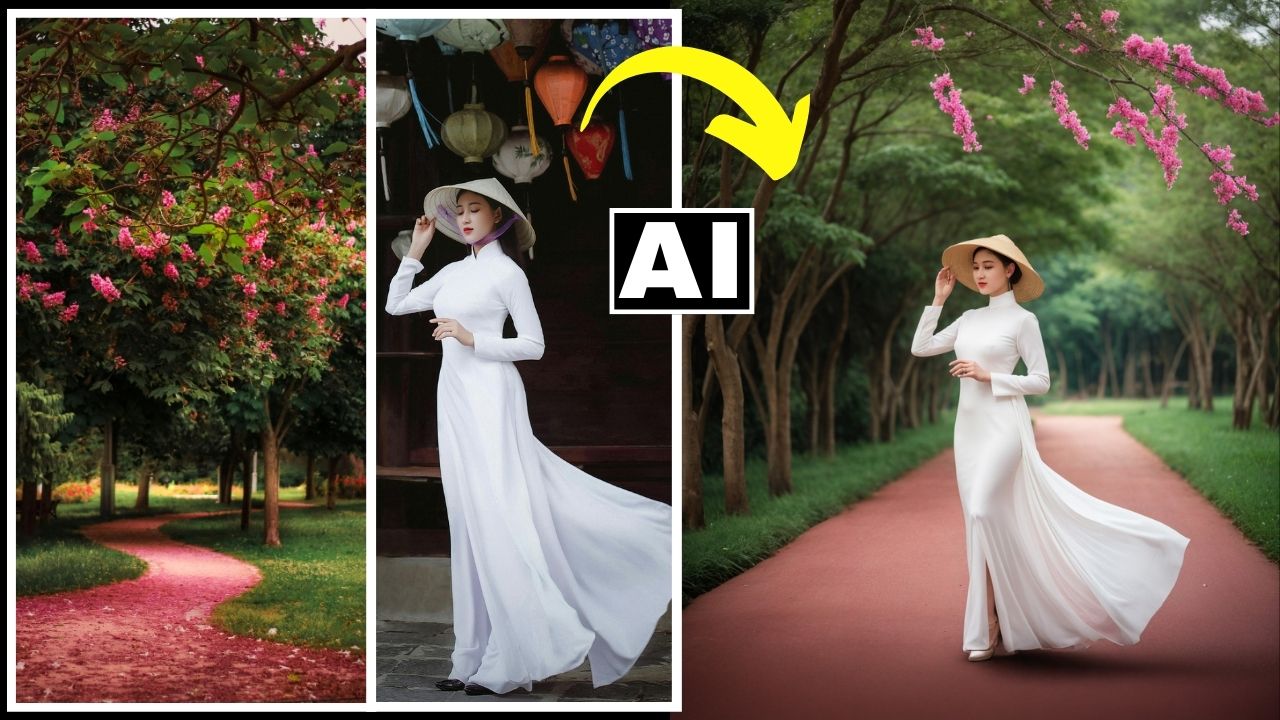
Blend Two Images To Create a Composite in Fooocus AI and Stable Diffusion
In this video we will be seeing how to use the Image Prompt and PyraCanny feature in Fooocus AI to blend two images and create a composite that follows the same pose in the original portrait image. We will also be using a couple of other AI tools and Photoshop to achieve the final outcome. We’ll also be seeing how to use Google Colab to run Fooocus AI in case you don’t have the set up already. Here’s the video:
Video Summary
This video demonstrates how to use Fooocus AI, a free and open-source tool, to create a composite by blending two different images together using Stable Diffusion.
Key Steps in the Process:
- Setup via Google Colab: [00:43] Instead of running Stable Diffusion locally, the tutorial uses Google Colab to borrow processing power from Google. You simply connect your Google account, hit the play button, and wait about 5 minutes for a public URL to be generated.
- Preparing Images: [02:15] The project uses two images: a portrait and a background. To blend them effectively, the background is removed from the subject portrait using Pixelcut AI [02:44].
- Detailed Prompting with ChatGPT: [03:44] For high-quality results, the creator uses ChatGPT to analyze both images and generate a highly detailed composite prompt that describes both the subject and the new background.
- Using Fooocus AI Settings:
- Aspect Ratio: [05:44] The aspect ratio is adjusted (specifically to 14×17) to match the vertical orientation of the original shots.
- Image Weight Sliders: [06:18] These sliders determine how much priority the AI gives to each input image. It’s a “balancing act” [11:20] where you adjust the weights (e.g., 0.8 and 0.7) to get the best blend.
- PyraCanny for Pose Control: [08:41] To force the AI to maintain the exact pose of the original subject, the “PyraCanny” setting is used. This helps the AI recognize and stick to the edges of the original person.
- Enhancing Realism with Pencil AI: [13:29] After generating the initial composite, the image is run through Pencil AI’s “AI Detailer” to add texture and make it look more like a real photograph. The “Resemblance” slider is set to 2 and “Creativity” to 0.3 or 0.4.
- Final Touches: [15:27] The final steps include using Remaker AI for a face swap to ensure the subject’s face remains identical to the original, and using Photoshop’s Remove Tool [16:04] to clean up minor AI artifacts or background distractions.
By combining these free tools, you can create professional-looking composite images without needing a powerful computer.
Important Links
Link to Fooocus AI GitHub page:
Link to download the images shown in the video: