Turn Boring Landscape Shots Into Breathtaking Ones Using Fooocus AI
In this video we will be seeing how to replace the background in a boring landscape shot and turn it into something amazing and breathtaking. For this we will be using Stable Diffusion AI Generator and Fooocus AI, along with Google Colab. We will be using the Inpainting feature in Fooocus, along with the Advanced Masking feature. We will be creating the mask in Photoshop. After we’ve got our result, we will also be making it more photo-realistic in Pincel AI app. Here’s the video:
Video Summary
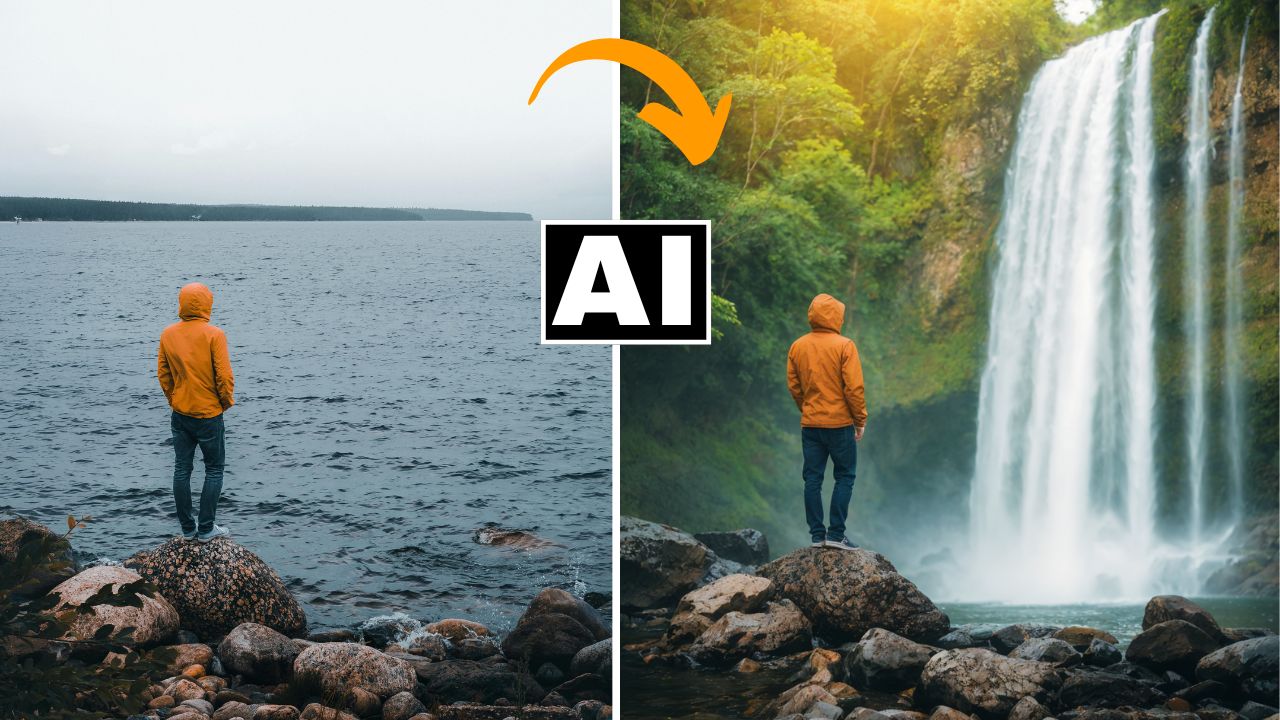
This video is a tutorial on how to use Fooocus AI, a free, open-source AI image generator based on Stable Diffusion, to transform ordinary landscape photos into breathtaking scenes.
Here is a helpful summary of the process demonstrated in the video:
Comparing Free vs. Paid AI Tools The creator begins by showing how a paid tool like Adobe Photoshop’s generative fill (using Firefly) struggles with complex edits. When trying to replace a background with a “hyper-realistic waterfall in a tropical jungle,” Photoshop produces unrealistic, comic-book-style results and alters the subject [01:29]. To solve this, the creator recommends using Fooocus AI via Google Colab, which is free and yields much better results.
Setting up Fooocus AI
- Google Colab Setup: Access the provided Google Colab link, hit “Connect,” and then click “Play” to run the code. After about 5 minutes, click the “public URL” link to open the Fooocus AI interface [02:44].
Creating a Mask
- Instead of manually brushing the areas to be replaced within Fooocus AI, it is much more effective to upload a pre-made black-and-white mask [04:00].
- In Photoshop (or Photopea): Select the subject and foreground using selection tools (like Select Subject or Object Selection). Create a layer mask, invert it so the background is white (the area to be changed) and the foreground is black (the area to keep), and export the mask as an image [05:09]. A free cloud-based alternative, Photopea, can also be used following the same steps, albeit with manual selection tools [08:24].
Generating the New Background
- Uploading to Fooocus AI: Check “Enable Advanced Masking Features” and upload the black-and-white mask. Also, ensure “Inpaint or Outpaint” is selected [09:26].
- Prompt and Generation: Type the prompt (“hyper realistic waterfall in a tropical jungle”). To improve quality and generate multiple options to choose from, go to the “Advanced” settings, prioritize “Quality,” and increase the image number (e.g., to 3) [09:56].
- The video reviews several generations, noting how stable diffusion provides far superior and more realistic results compared to the Photoshop attempt [10:39].
Enhancing Realism with Pencil AI
- Once a winning image is selected and downloaded, the creator uses another free tool, Pencil AI (using the AI Detailer feature), to increase photo-realism [13:33].
- By adjusting settings like Resemblance (set to 2 to avoid shape changes) and Creativity (set to a conservative 0.3 or 0.4), Pencil AI sharpens details, adds realistic textures to clothing and foliage, and makes the final image look much more like a genuine photograph [14:04].
Important Links
Link to Fooocus AI GitHub page:
https://github.com/lllyasviel/Fooocus
Link to download the images shown in the video:
Link to Photopea (Free replica of Photoshop):
Link to Pincel AI – Pincel AI